


Back to Contents Page
Processor Thermal-Cooling Assembly
Dell™ Vostro™ 1200 Service Manual
Removing the Processor Thermal-Cooling Assembly
Replacing the Processor Thermal-Cooling Assembly
Removing the Processor Thermal-Cooling Assembly
1.
Follow the instructions in
Before You Begin
.
2.
Remove the battery (see
Removing the Battery
).
3.
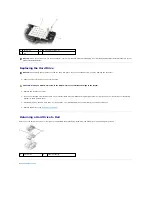
On the bottom of the computer, remove the one M2.5x5-mm screw and nine M2.5x8-mm screws.
4.
Insert a plastic scribe into the notch on the component cover, and lift to remove the cover.
5.
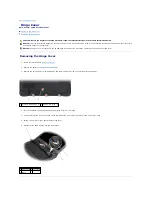
Loosen (in consecutive order) the four spring-loaded screws, labeled "1" through "4," that secure the processor thermal-cooling assembly to the system
board.
6.
Lift the processor thermal-cooling assembly and remove it from the system board.
CAUTION:
Before you begin the following procedure, follow the safety instructions in the
Product Information Guide
.
NOTICE:
To avoid electrostatic discharge, ground yourself by using a wrist grounding strap or by periodically touching an unpainted metal surface (such
as the back panel) on the computer.
1 M2.5x8-mm component cover screws (9)
2 M2.5x5-mm screw
3 component cover
1
plastic scribe
2
component cover
NOTICE:
To ensure maximum cooling for the processor, do not touch the heat transfer areas on the processor thermal-cooling assembly. The oils in
your skin reduce the heat transfer capability of the thermal pads.
Содержание Vostro 1200
Страница 24: ...Back to Contents Page ...
Страница 35: ...Back to Contents Page ...