background image

22

Setting Up and Using Your Computer

w

w

w

.d

e

ll

.co

m

 |

 s

u

p

p

o

rt

.d

e

ll.c

o

m

B

A T T ER Y

 B

AY

When a battery is installed, you can use the computer without 

connecting the computer to an electrical outlet. For more information, see the 

Tell 

Me How

 help file. To access the help file, see page 17.

M

O DU LE

 B

AY

  —

Holds optical devices such as a DVD drive or a DVD/CD-RW 

drive.

S

C RO LL

 P

A D

Four-directional button that allows you to scroll through 

documents.

T

OU C H

 P

AD

Use the touch pad as you would use a mouse.

P

OW E R

 B

U T T ON

Press the power button to turn on the computer.

E

A S Y

-L

AU NC H

 K

E YS

Launch frequently used programs.

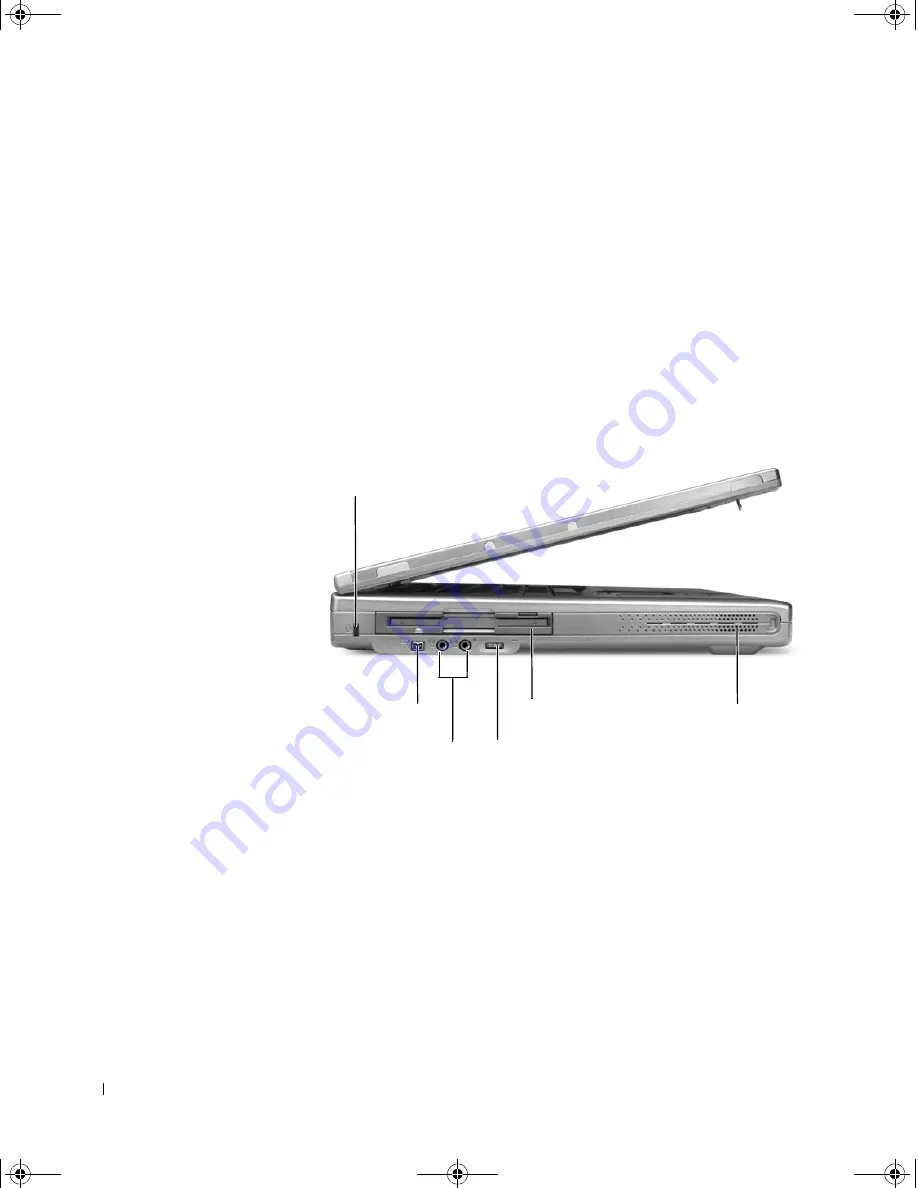
Left View

S

E CU RI T Y

 C

AB LE

 S

LO T

Lets you attach a commercially available antitheft 

device to the computer. For more information, see the instructions included with 

the device.

IEEE 1394 P

OR T

Connects to an IEEE 1394-compatible device, such as a 

digital camcorder.

A

U D IO

 C

ON N ECT O RS

You can attach audio devices, such as speakers, 

headphones, or a microphone.

V

OL UM E

 W

H EE L

Adjusts the volume level.

F

L OP P Y

 D

R IV E

Accepts a 3.5-inch floppy disk for data storage.

security cable slot

speaker

audio connectors

IEEE 1394 port

volume wheel

floppy drive

7T097bk1.book  Page 22  Thursday, September 26, 2002  6:47 AM

Содержание SmartPC 200N

Страница 1: ...w w w d e l l c o m s u p p o r t d e l l c o m Dell SmartPC 200N and 250N Owner s Manual 7T097bk1 book Page 1 Thursday September 26 2002 6 47 AM ...

Страница 2: ...rporation All rights reserved Reproduction in any manner whatsoever without the written permission of Dell Computer Corporation is strictly forbidden Trademarks used in this text Dell the DELL logo Inspiron Dell Precision Dimension OptiPlex Latitude DellNet TrueMobile and SmartStep are trademarks of Dell Computer Corporation Intel Celeron and Pentium are registered trademarks of Intel Corporation ...

Страница 3: ...puter 12 Protecting Against Electrostatic Discharge 13 Battery Disposal 13 1 Information Resources Finding Information and Assistance 16 2 Setting Up and Using Your Computer A Tour of Your Computer 20 Front View 20 Left View 22 Right View 23 Back View 24 Bottom View 25 Setting Up a Printer 26 Printer Cable 26 Connecting a Parallel Printer 26 7T097bk1 book Page 3 Thursday September 26 2002 6 47 AM ...

Страница 4: ...eator Basic 33 Using Blank CD R Discs or Blank CD RW Discs 33 Helpful Tips 33 How to Copy a CD 34 3 How Do I Turning On Your Computer 38 Turning Off Your Computer 38 Power Problems 38 Installing and Removing a Battery 39 Installing a Battery 39 Removing a Battery 40 Storing a Battery 40 Swapping Modules in the Module Bay 40 Playing a CD or Movie 40 Connecting a Television to the Computer 41 S Vide...

Страница 5: ...tore 52 Drivers 53 What Is a Driver 53 Identifying Drivers 53 Reinstalling Drivers 54 Manually Reinstalling Drivers for Windows XP 55 Resolving Software and Hardware Incompatibilities 56 Reinstalling Microsoft Windows XP 57 Before You Reinstall 57 Reinstalling Windows XP 57 Reinstalling Drivers and Software 60 5 Adding and Replacing Parts Adding Memory 62 Replacing the Hard Drive 66 Returning a Ha...

Страница 6: ...rranty Repair or Credit 78 Before You Call 79 Contacting Dell 79 Regulatory Notices 96 Limited Warranties and Return Policy 97 Limited Warranty Terms for Canada 97 Total Satisfaction Return Policy 101 Dell Software and Peripherals 102 Intel Warranty Statement for Pentium and Celeron Processors Only U S and Canada Only 103 7T097bk1 book Page 6 Thursday September 26 2002 6 47 AM ...

Страница 7: ... underneath your computer do not place your computer in a closed in wall unit or on a bed sofa or rug Place the AC adapter in a ventilated area such as a desk top or on the floor when you use it to run the computer or to charge the battery Do not cover the AC adapter with papers or other items that will reduce cooling also do not use the AC adapter inside a carrying case The AC adapter may become ...

Страница 8: ...e computer from the electrical outlet Clean your computer with a soft cloth dampened with water Do not use liquid or aerosol cleaners which may contain flammable substances Power Use only the Dell provided AC adapter approved for use with this computer Use of another AC adapter may cause a fire or explosion Before you connect the computer to an electrical outlet check the AC adapter voltage rating...

Страница 9: ... and may result in damage to the battery pack or cause fire or burns The battery poses a burn hazard if you handle it improperly Do not disassemble it Handle a damaged or leaking battery pack with extreme care If the battery is damaged electrolyte may leak from the cells and may cause personal injury Keep the battery away from children Do not store or leave your computer or battery pack near a hea...

Страница 10: ...ED such as a portable computer may be prohibited in aircraft during certain critical phases of flight for example takeoff and landing Some airlines may further define the critical flight phase as any time the aircraft is below 3050 m 10 000 ft Please follow the airline s specific instructions as to when the use of a PED is allowed EMC Instructions Use shielded signal cables to ensure that you main...

Страница 11: ...s such as dirt dust food liquids temperature extremes and overexposure to sunlight When you move your computer between environments with very different temperature and or humidity ranges condensation may form on or within the computer To avoid damaging the computer allow sufficient time for the moisture to evaporate before using the computer NOTICE When taking the computer from low temperature con...

Страница 12: ...e Tell Me How help file when setting up and using your computer To access the help file see page 17 This portable computer is not designed for continuous operation as office equipment For extended use in an office Dell recommends that you connect an external monitor and an external keyboard When Working Inside Your Computer Before removing or installing memory modules Mini PCI cards or modems perf...

Страница 13: ... not remove the component from the antistatic packing material until you are ready to install the component Just before unwrapping the antistatic packaging be sure to discharge static electricity from your body When transporting a sensitive component first place it in an antistatic container or packaging Handle all sensitive components in a static safe area If possible use antistatic floor pads an...

Страница 14: ...14 When Using Your Computer w w w d e l l c o m s u p p o r t d e l l c o m 7T097bk1 book Page 14 Thursday September 26 2002 6 47 AM ...

Страница 15: ...SE CT ION 1 Information Resources Finding Information and Assistance 7T097bk1 book Page 15 Thursday September 26 2002 6 47 AM ...

Страница 16: ...CD to run diagnostic tools if you are unable to run the diagnostics located on your hard drive Service and Registration Labels Express Service Code and Service Tag Sequence Product Key also called the Product ID or Certificate of Authenticity COA The Express Service Code and Service Tag Sequence are unique identifiers for your Dell computer You will need the Product Key or Product ID number to com...

Страница 17: ...d Dell technical professionals Dell Talk Explore a list of online links to Dell s primary vendors GO TO THE DELL SUPPORT WEBSITE Go to support dell com for help with general usage installation and troubleshooting questions See Returning Items for Warranty Repair or Credit on page 78 for a description of the hardware and software support provided by Dell E MAIL DELL Go to support dell com and then ...

Страница 18: ...18 Information Resources w w w d e l l c o m s u p p o r t d e l l c o m 7T097bk1 book Page 18 Thursday September 26 2002 6 47 AM ...

Страница 19: ...Computer Setting Up a Printer Printer Problems Transferring Information to a New Computer With Microsoft Windows XP Setting Up a Home and Office Network With Windows XP Connecting to the Internet Copying CDs 7T097bk1 book Page 19 Thursday September 26 2002 6 47 AM ...

Страница 20: ...LAY LATCH Keeps the display closed STATUS LIGHTS LEDs that show the status of the computer and its functions and components module bay keyboard power button touch pad battery bay display latch status lights easy launch keys four directional scroll pad touch pad buttons 7T097bk1 book Page 20 Thursday September 26 2002 6 47 AM ...

Страница 21: ...e Turns on when you turn on the computer Turns on when the computer enters standby mode Flashes when the computer reads or writes data NOTICE To avoid loss of data never shut down the computer when the light is flashing Turns on when the battery is being charged Turns on when the uppercase letter function is enabled Turns on when the numeric keypad is enabled power standby media activity battery c...

Страница 22: ...se POWER BUTTON Press the power button to turn on the computer EASY LAUNCH KEYS Launch frequently used programs Left View SECURITY CABLE SLOT Lets you attach a commercially available antitheft device to the computer For more information see the instructions included with the device IEEE 1394 PORT Connects to an IEEE 1394 compatible device such as a digital camcorder AUDIO CONNECTORS You can attach...

Страница 23: ... How help file To access the help file see page 17 PC CARD SLOT Accepts one Type III or two Type II I PC Card s AIR VENTS The computer uses an internal fan to create airflow through the vents which prevents the computer from overheating HINT The computer turns on the fans when the computer gets hot The fans may make noise which is normal and does not indicate a problem with the fans or the compute...

Страница 24: ...or Do not plug a telephone line into the network connector NETWORK CONNECTOR Connect the computer to a network PS 2 CONNECTOR Connect a PS 2 compatible device such as a PS 2 keyboard USB CONNECTOR Connect USB devices such as a USB digital camera S VIDEO TV OUT CONNECTOR Connect a display device with S video input such as a TV PARALLEL CONNECTOR Connect a parallel device such as a parallel printer ...

Страница 25: ...ee the Tell Me How help file To access the help file see page 17 MODEM COVER Protects the modem BATTER Y LOCK Locks the battery in the battery bay MODULE BAY Holds optical devices such as a DVD drive or a DVD CD RW drive BATTER Y BAY When a battery is installed and charged you can use the computer without connecting it to an electrical outlet memory module cover battery latch releases module bay b...

Страница 26: ... cable or a parallel cable Your printer may not come with a printer cable so if you purchase a cable separately ensure that it is compatible with your printer If you purchased a printer cable at the same time you purchased your computer the cable may arrive in the computer box Connecting a Parallel Printer 1 Complete the operating system setup if you have not already done so 2 Turn off the compute...

Страница 27: ...t USB devices while the computer is turned on 1 Complete the operating system setup if you have not already done so 2 Install the printer driver if necessary See the documentation that came with your printer 3 Attach the USB printer cable to the USB connector on the computer and the printer The USB connectors fit only one way parallel printer cable parallel connector on computer connector on print...

Страница 28: ...e printer is ready to use If you need to install a printer driver insert the installation CD Then follow the prompts on the screen using the instructions that came with the printer If your printer installation CD does not automatically run click the Start button click Run and then type x setup exe where x is the letter of your DVD drive usually drive D Click OK and follow the prompts on your scree...

Страница 29: ...n the computer that is running Windows XP You can CHECK THE PRINTER CABLE CONNECTIONS Ensure that the printer cable is properly connected to the computer TEST THE ELECTRICAL OUTLET Ensure that the electrical outlet is working by testing it with another device such as a lamp ENSURE THAT THE PRINTER IS TURNED ON See the documentation supplied with the printer VERIFY THAT WINDOWS RECOGNIZES THE PRINT...

Страница 30: ...computers in a home or small office 1 Click the Start button point to All Programs Accessories Communications and then click Network Setup Wizard 2 On the welcome screen click Next 3 Click checklist for creating a network HINT Selecting the This computer connects directly to the Internet connection method enables the integrated firewall provided with Windows XP 4 Complete the checklist and require...

Страница 31: ...xplorer or AOL icon on the Windows desktop 3 Follow the instructions on the screen to complete the setup If you do not have an MSN Explorer or AOL icon on your desktop or if you want to set up an Internet connection with a different ISP 1 Save and close any open files and exit any open programs 2 Click the Start button and click Control Panel 3 Click Network and Internet Connections 4 Click Set up...

Страница 32: ... CD Creator Basic documentation that came with your computer See the following section Using Easy CD Creator Basic for instructions on how to locate that documentation HINT The information in this section also applies to using Easy CD Creator Basic with a DVD RW or a DVD R drive To burn CDs you need to use CD burner software Roxio Easy CD Creator Basic is your computer s CD burner software The sof...

Страница 33: ...oft Windows XP Help and Support Center The documentation is also provided on the Roxio reinstallation CD which is included with your computer Each Easy CD Creator Basic project program also has thorough online help files Using Blank CD R Discs or Blank CD RW Discs Your CD RW drive writes to two different types of recording media CD R and CD RW discs Use blank CD R CD Recordable disks to record mus...

Страница 34: ... CD recording techniques If you make a mistake you can erase the CD RW disc and try again You can also use blank CD RW discs to test music file projects before you record the project permanently to a blank CD R disc See the Roxio support website at support roxio com for additional helpful tips How to Copy a CD HINT If you have a DVD CD RW combo drive and experience recording problems check the Rox...

Страница 35: ... may take a few minutes 5 After the source CD is copied remove the source CD from the CD RW drive tray The CD RW drive tray opens automatically after the source CD is copied HINT You must use CD R discs to burn music CDs that you want to play in regular stereos CD RW discs do not play in most home or car stereos 6 Insert a blank CD into the CD RW drive and close the tray The recording starts autom...

Страница 36: ...36 Setting Up and Using Your Computer w w w d e l l c o m s u p p o r t d e l l c o m 7T097bk1 book Page 36 Thursday September 26 2002 6 47 AM ...

Страница 37: ...Turning Off Your Computer Power Problems Installing and Removing a Battery Swapping Modules in the Module Bay Playing a CD or Movie Connecting a Television to the Computer Using the Keyboard 7T097bk1 book Page 37 Thursday September 26 2002 6 47 AM ...

Страница 38: ...ell Me How CHECK THE POWER LIGHT When the power light is lit or blinking the computer has power If the power light is blinking the computer is in standby mode press the power button to exit standby mode If the light is off press the power button to turn on the computer CHARGE THE BATTER Y The battery charge may be depleted 1 Reinstall the battery 2 Use the AC adapter to connect the computer to an ...

Страница 39: ...advice on disposing of a lithium ion battery CAUTION Misuse of the battery may increase the risk of fire or chemical burn Do not puncture incinerate disassemble or expose the battery to temperatures above 65 C 149 F Keep the battery away from children Handle damaged or leaking batteries with extreme care Damaged batteries may leak and cause personal injury or equipment damage Installing a Battery ...

Страница 40: ... How help file click the Start button click Help and Support click User s Guides and then click Tell Me How Swapping Modules in the Module Bay You can install optical devices such as a DVD ROM or a DVD CD RW in the module bay NOTICE Before swapping modules in the module bay ensure that the computer is turned off NOTICE To prevent damage to module bay devices place them in a safe dry place when the...

Страница 41: ... then click Tell Me How Connecting a Television to the Computer HINT Video and audio cables for connecting your computer to a television are not included with your computer Cables may be purchased at most consumer electronics stores Your computer has an S video TV out connector that enables you to connect the computer to a television using a commercially available S video cable The audio connector...

Страница 42: ...n ensure that you have the following cables 1 Turn off the computer and the television and or audio device you want to connect 2 Plug one end of the S video cable into the S video connector on the computer 1 S video cable 2 audio cable 1 2 7T097bk1 book Page 42 Thursday September 26 2002 6 47 AM ...

Страница 43: ... on the other end of the audio cable into the audio input connectors on your television or other audio device 6 Turn on the television turn on any audio device you connected and then turn on the computer 7 See Enabling the Display Settings for a Television on page 44 to ensure that the computer recognizes and works properly with the television 7T097bk1 book Page 43 Thursday September 26 2002 6 47 ...

Страница 44: ...Click the Start button click Settings and then click the Control Panel icon 2 Click Appearance and Themes click the Display icon click the Settings tab and then click Advanced 3 Click the Displays tab 4 Click the upper left corner of the TV button to enable the television 5 To play a DVD on the television click the small primary button resembles a bull s eye at bottom left under the TV picture 7T0...

Страница 45: ... is blank or if the DVD player window is set to full screen mode the entire computer display screen is blank Using the Keyboard Numeric Keypad HINT When you connect an external keyboard or keypad to the computer the keypad is disabled The keypad numbers and symbols are outlined in squares on the right of the keypad keys To enable the keypad press Fn NumLk Below the display the green light above th...

Страница 46: ...nctions You can set them to launch frequently used programs To configure the easy launch keys click the Start button All Programs Launch Manager and then click Launch Manager Click Add to assign a program to a launch key click Delete to clear a launch key assignment Easy Launch Keys 1 By default is used to launch the e mail program lights up when incoming e mail is received 2 By default is used to...

Страница 47: ...d disables the numeric keypad Fn Scr Lk Enables and disables scroll lock Fn F3 Switches the video image to the next display in the following sequence the integrated display an external monitor and both displays simultaneously Fn Right Arrow Increases brightness on the integrated display only not on an external monitor Fn Left Arrow Decreases brightness on the integrated display only not on an exte...

Страница 48: ...48 How Do I w w w d e l l c o m s u p p o r t d e l l c o m 7T097bk1 book Page 48 Thursday September 26 2002 6 47 AM ...

Страница 49: ...Maintaining Your Computer Using Microsoft Windows System Restore Drivers Resolving Software and Hardware Incompatibilities Reinstalling Microsoft Windows XP 7T097bk1 book Page 49 Thursday September 26 2002 6 47 AM ...

Страница 50: ...lder data files or e mail messages after restoring the computer to an earlier state If you restore the computer to an operating state that existed before you installed a program the program s data files are not lost but you must reinstall the actual program again NOTICE It is important to make regular backups of your data files System Restore does not monitor changes to or recover your data files ...

Страница 51: ...he new restore point in the Restore point description field The present date and time are automatically added to the description of the new restore point 5 Click Create 6 Click OK Restoring the Computer to an Earlier Operating State If problems occur after installing a device driver first try using Device Driver Rollback see page 54 If Device Driver Rollback does not resolve the problem then use S...

Страница 52: ...pears after System Restore finishes collecting data and then the computer automatically restarts 6 After the computer restarts click OK To change the restore point you can either repeat the steps using a different restore point or you can undo the restoration Undoing the Last System Restore NOTICE Save and close all open files and exit all open programs Do not alter open or delete any files or pro...

Страница 53: ...u experience a problem with any device perform the steps in the following sections to identify whether the driver is the source of your problem and to update the driver if necessary Identifying Drivers 1 Click the Start button and click Control Panel 2 In the Control Panel window under Pick a Category click Performance and Maintenance 3 In the Performance and Maintenance window click System 4 In t...

Страница 54: ... screen click the Hardware tab 5 Click Device Manager 6 In the Device Manager window right click the device for which the new driver was installed and then click Properties 7 Click the Drivers tab 8 Click Roll Back Driver If Device Driver Rollback does not resolve the problem then use System Restore see page 50 to return your operating system to the operating state it was in before you installed t...

Страница 55: ...llow the screen prompts to complete the installation If no Install button is present automatic installation is not an option For installation instructions either see the appropriate instructions in the following subsections or click Extract follow the extracting instructions and read the readme file If instructed to navigate to the driver files click the CD directory on the driver information wind...

Страница 56: ... See the following procedure to check for IRQ conflicts on your computer 1 Click the Start button and click Control Panel 2 Click Performance and Maintenance and click System 3 Click the Hardware tab and click Device Manager 4 In the Device Manager list check for conflicts with the other devices Conflicts are indicated by a yellow exclamation point beside the conflicting device or a red X if the d...

Страница 57: ... installed the new device driver Reinstalling Windows XP To reinstall Windows XP perform the steps in the following sections in the order in which they are listed The reinstallation process can take 1 to 2 hours to complete After the reinstallation is complete you will need to reinstall the device drivers virus protection program and other software NOTICE The Operating System CD provides options f...

Страница 58: ...ption and then remove the CD from the drive 4 If you want to install a new copy of Windows XP press Esc to select the fresh copy option 5 Press Enter to select the highlighted partition recommended and then follow the instructions on the screen HINT The time required to complete the setup depends on the size of the hard drive and the speed of your computer You can step away from the computer at th...

Страница 59: ...you do not see this option 7 If you are reinstalling Windows XP Professional you may be prompted to provide further network information regarding your network configuration such as the domain name or workgroup name If you are unsure of your settings accept the default selections Windows XP installs the operating system components and configures the computer The computer automatically restarts Comp...

Страница 60: ...ve Reinstalling Drivers and Software 1 Reinstall the appropriate drivers see page 54 2 Reinstall your virus protection software See the documentation that came with the software for instructions 3 Reinstall your other software programs See the documentation that came with the software for instructions 7T097bk1 book Page 60 Thursday September 26 2002 6 47 AM ...

Страница 61: ...SE CT ION 5 Adding and Replacing Parts Adding Memory Replacing the Hard Drive 7T097bk1 book Page 61 Thursday September 26 2002 6 47 AM ...

Страница 62: ...his document 1 Save and close any open files exit any open programs and shut down the computer 2 Remove any installed PC Cards 3 Remove all installed batteries and disconnect the AC adapter cable and any external devices from the computer Wait 5 seconds before proceeding 4 Ground yourself by touching a metal connector on the back of the computer and continue to do so periodically during this proce...

Страница 63: ... a memory module remove the existing module NOTICE Handle memory modules by their edges and do not touch the components on a module a Use your fingertips to carefully spread apart the securing clips on each end of the memory module connector The module should pop up b Remove the module from the connector memory module cover screw 7T097bk1 book Page 63 Thursday September 26 2002 6 47 AM ...

Страница 64: ...uter does not boot No error message indicates this failure a Align the notch in the module with the slot in the center of the connector b Slide the edge of the module firmly into the connector and rotate the module down until you feel a click If you do not feel the click remove the module and reinstall it memory module securing clip 7T097bk1 book Page 64 Thursday September 26 2002 6 47 AM ...

Страница 65: ...d tighten the captive screw NOTICE If the memory module cover is difficult to close remove the module and reinstall it Forcing the cover to close may damage your computer memory module cover screw 7T097bk1 book Page 65 Thursday September 26 2002 6 47 AM ...

Страница 66: ...before removing the hard drive Do not remove the hard drive while the computer is on in standby mode or in hibernate mode NOTICE Hard drives are extremely fragile even a slight bump can damage the drive HINT Dell does not guarantee compatibility or provide support for hard drives from sources other than Dell To replace the hard drive 1 Ensure that the work surface is flat and clean to prevent scra...

Страница 67: ...out on the pull tab located at the front of the hard drive pull the hard drive out of its connector and lift the hard drive out of its bay 10 Remove the new drive from its packaging Save the original packaging for storing or shipping the hard drive 11 Line up the connectors on one end of the new drive with the connectors at the rear of the hard drive bay At an angle of approximately 30 degrees gen...

Страница 68: ...g System CD to install the operating system for your computer 14 Use the Drivers and Utilities CD to install the drivers and utilities for your computer Returning a Hard Drive to Dell Return your old hard drive to Dell in its original or comparable foam packaging Otherwise the hard drive may be damaged in transit hard drive foam packaging 7T097bk1 book Page 68 Thursday September 26 2002 6 47 AM ...

Страница 69: ...fications BIOS and Standard Settings Returning Items for Warranty Repair or Credit Before You Call Contacting Dell Regulatory Notices Limited Warranties and Return Policy 7T097bk1 book Page 69 Thursday September 26 2002 6 47 AM ...

Страница 70: ... address bus width 32 bits PC Card PCMCIA controller TI PCI 1520 PC Card connector two supports two Type I or Type II cards or one Type III card Cards supported 3 3 V and 5 V PC Card connector size 68 pins Data width maximum PCMCIA 16 bits CardBus 32 bits Memory Memory module connector two user accessible SODIMM sockets Memory module capacities 128 256 and 512 MB Memory type 3 3 V SODIMM DDR Stand...

Страница 71: ...B compliant connector S video TV out 7 pin mini DIN connector optional S video to composite video adapter cable Modem RJ 11 port Network adapter RJ 45 port IEEE 1394 4 pin serial connector Communications Modem Type v 92 56K MDC Controller softmodem Interface internal AC 97 bus Network adapter 10 100 Ethernet LAN on system board Video Video type 128 bit hardware accelerated Data bus 4X AGP Video co...

Страница 72: ...ones speakers connector Speaker two 4 ohm speakers Internal speaker amplifier 1 0 W channel into 4 ohms Volume controls volume thumb wheel Display Type active matrix TFT XGA SXGA Dimensions Height 228 1 mm 8 98 inches Width 304 1 mm 11 97 inches Diagonal 381 mm 15 inches Maximum resolutions 1024 x 768 at 16 8 million colors XGA 1400 x 1050 at 16 8 million colors SXGA Response time typical 37 ms ri...

Страница 73: ...Keyboard Number of keys 84 U S and Canada 85 U K France Germany 84 China Key travel 2 7 mm 0 3 0 11 inch 0 016 inch Key spacing 19 05 mm 0 3 mm 0 75 inch 0 012 inch Layout QWERTY AZERTY Touch Pad X Y position resolution graphics table mode 240 cpi Size Width 64 88 mm 2 55 inch sensor active area Height 48 88 mm 1 92 inch rectangle Scroll Pad Orientation four directional Display continued 7T097bk1 ...

Страница 74: ... hours Computer off 2 to 3 hour Operating life approximately 2 to 3 hours with 12 cell battery depending on usage Life span approximate 500 discharge charge cycles Temperature range Operating 0 to 35 C 32 to 95 F Storage 40 to 65 C 40 to 149 F AC Adapter Input voltage 100 240 VAC Input current maximum 1 5 A Input frequency 50 60 Hz 90 W Output current 4 5 A 90 W Output power 90 W Rated output volt...

Страница 75: ...cal Height 46 1 mm 1 8 inches Width 326 mm 12 8 inches Depth 275 mm 10 8 inches Weight With XGA display 3 56 Kg 7 84 lb With SXGA display 3 62 KG 7 97 lb Environmental Temperature range Operating 5 to 35 C 41 to 95 F Storage 10 to 60 C 24 to 140 F Relative humidity maximum Operating 20 to 80 noncondensing Storage 20 to 80 noncondensing AC Adapter continued 7T097bk1 book Page 75 Thursday September ...

Страница 76: ... to the Help area on the screen The system setup screens display the current setup information and settings for your computer Each screen is laid out with the system setup options listed at the left To the right of each option is a field that displays the setting or value for that option You can change some of the settings that appear as white type on the screen Options or values that you cannot c...

Страница 77: ...r page of the system setup program The boot order page displays a general list of the bootable devices that may be installed in your computer including but not limited to the following Floppy Disk Internal HDD CD DVD CD RW drive During the boot routine the computer starts at the top of the list and scans each enabled device for the operating system start up files When the computer finds the files ...

Страница 78: ...redit as follows 1 Call Dell to obtain a Return Material Authorization Number and write it clearly and prominently on the outside of the box For the telephone number to call see the contact numbers for your region 2 Include a copy of the invoice and a letter describing the reason for the return 3 Include any accessories that belong with the item s being returned power cables software floppy disks ...

Страница 79: ...ructions at the beginning of this document Contacting Dell To contact Dell electronically you can access the following websites www dell com support dell com technical support premiersupport dell com technical support for educational government healthcare and medium large business customers including Premier Platinum and Gold customers For specific web addresses for your country find the appropria...

Страница 80: ...mail New Zealand nz_tech_support dell com Home and Small Business 1 300 65 55 33 Government and Business toll free 1 800 633 559 Preferred Accounts Division PAD toll free 1 800 060 889 Customer Care toll free 1 800 819 339 Corporate Sales toll free 1 800 808 385 Transaction Sales toll free 1 800 808 312 Fax toll free 1 800 818 341 Austria Vienna International Access Code 900 Country Code 43 City C...

Страница 81: ... Brazil International Access Code 00 Country Code 55 City Code 51 Website www dell com br Customer Support Technical Support 0800 90 3355 Tech Support Fax 51 481 5470 Customer Care Fax 51 481 5480 Sales 0800 90 3390 British Virgin Islands General Support toll free 1 866 278 6820 Brunei Country Code 673 Customer Technical Support Penang Malaysia 604 633 4966 Customer Service Penang Malaysia 604 633...

Страница 82: ...ide Toronto toll free 1 800 387 5752 Sales direct sales from within Toronto 416 758 2200 Sales federal government education and medical toll free 1 800 567 7542 Sales major accounts toll free 1 800 387 5755 TechFax toll free 1 800 950 1329 Cayman Islands General Support 1 800 805 7541 Chile Santiago Country Code 56 City Code 2 Sales Customer Support and Technical Support toll free 1230 020 4823 Co...

Страница 83: ... East toll free 800 858 2020 Large Corporate Accounts East Government and Education toll free 800 858 2669 Large Corporate Accounts Queue Team toll free 800 858 2572 Large Corporate Accounts South toll free 800 858 2355 Large Corporate Accounts West toll free 800 858 2811 Large Corporate Accounts Spare Parts toll free 800 858 2621 Colombia General Support 980 9 15 3978 Costa Rica General Support 0...

Страница 84: ...ominica General Support toll free 1 866 278 6821 Dominican Republic General Support 1 800 148 0530 Ecuador General Support toll free 999 119 El Salvador General Support 01 899 753 0777 Finland Helsinki International Access Code 990 Country Code 358 City Code 9 Website support euro dell com E mail fin_support dell com E mail Support servers Nordic_support dell com Technical Support 09 253 313 60 Te...

Страница 85: ...tional Access Code 00 Country Code 49 City Code 6103 Website support euro dell com E mail tech_support_central_europe dell com Technical Support 06103 766 7200 Home Small Business Customer Care 0180 5 224400 Global Segment Customer Care 06103 766 9570 Preferred Accounts Customer Care 06103 766 9420 Large Accounts Customer Care 06103 766 9560 Public Accounts Customer Care 06103 766 9555 Switchboard...

Страница 86: ...Access Code 16 Country Code 353 City Code 1 Website support euro dell com E mail dell_direct_support dell com Ireland Technical Support 1850 543 543 U K Technical Support dial within U K only 0870 908 0800 Home User Customer Care 01 204 4095 Small Business Customer Care 01 204 4444 U K Customer Care dial within U K only 0870 906 0010 Corporate Customer Care 01 204 4003 Ireland Sales 01 204 4444 U ...

Страница 87: ... 02 696 821 13 Switchboard 02 696 821 12 Corporate Technical Support 02 577 826 90 Customer Care 02 577 825 55 Fax 02 575 035 30 Switchboard 02 577 821 Jamaica General Support dial from within Jamaica only 1 800 682 3639 Country City International Access Code Country Code City Code Department Name or Service Area Website and E Mail Address Area Codes Local Numbers and Toll Free Numbers 7T097bk1 bo...

Страница 88: ... to 400 employees 044 556 1465 Preferred Accounts Division Sales over 400 employees 044 556 3433 Large Corporate Accounts Sales over 3500 employees 044 556 3430 Public Sales government agencies educational institutions and medical institutions 044 556 1469 Global Segment Japan 044 556 3469 Individual User 044 556 1760 Faxbox Service 044 556 3490 Switchboard 044 556 4300 Korea Seoul International A...

Страница 89: ...Brussels Belgium 02 481 91 00 Customer Care Brussels Belgium 02 481 91 19 Fax Brussels Belgium 02 481 92 99 Switchboard Brussels Belgium 02 481 91 00 Macao Country Code 853 Technical Support toll free 0800 582 Customer Service Penang Malaysia 604 633 4949 Transaction Sales toll free 0800 581 Malaysia Penang International Access Code 00 Country Code 60 City Code 4 Technical Support toll free 1 800 ...

Страница 90: ...t 020 674 45 00 Home Small and Medium Business 020 674 55 00 Home Small and Medium Business Fax 020 674 47 75 Home Small and Medium Business Customer Care 020 674 42 00 Corporate 020 674 50 00 Corporate Fax 020 674 47 79 Corporate Customer Care 020 674 43 25 New Zealand International Access Code 00 Country Code 64 E mail New Zealand nz_tech_support dell com E mail Australia au_tech_support dell co...

Страница 91: ...ss Code 011 Country Code 48 City Code 22 Website support euro dell com E mail pl_support dell com Customer Service Phone 57 95 700 Customer Care 57 95 999 Sales 57 95 999 Customer Service Fax 57 95 806 Reception Desk Fax 57 95 998 Switchboard 57 95 999 Portugal International Access Code 00 Country Code 35 E mail support euro dell com es es emaildell Technical Support 800 834 077 Customer Care 800 ...

Страница 92: ... Technical Support 011 709 7710 Customer Care 011 709 7707 Sales 011 709 7700 Fax 011 706 0495 Switchboard 011 709 7700 Southeast Asian and Pacific Countries Customer Technical Support Customer Service and Sales Penang Malaysia 604 633 4810 Spain Madrid International Access Code 00 Country Code 34 City Code 91 Website support euro dell com E mail support euro dell com es es emaildell Home and Smal...

Страница 93: ...ail swisstech dell com E mail for French speaking HSB and Corporate Customers support euro dell com ch fr emaildell Technical Support Home and Small Business 0844 811 411 Technical Support Corporate 0844 822 844 Customer Care Home and Small Business 0848 802 202 Customer Care Corporate 0848 821 721 Fax 022 799 01 90 Switchboard 022 799 01 01 Taiwan International Access Code 002 Country Code 886 Te...

Страница 94: ...mployees 0870 908 0500 Technical Support direct PAD and general 0870 908 0800 Global Accounts Customer Care 01344 373 185 or 01344 373 186 Home and Small Business Customer Care 0870 906 0010 Corporate Customer Care 0870 908 0500 Preferred Accounts 500 5000 employees Customer Care 01344 373 196 Central Government Customer Care 01344 373 193 Local Government Education Customer Care 01344 373 199 Hea...

Страница 95: ...omers toll free 1 800 695 8133 Projectors Technical Support toll free 1 877 459 7298 Public government education and healthcare Service and Technical Support toll free 1 800 456 3355 Employee Purchase Program EPP Customers toll free 1 800 234 1490 Dell Sales toll free 1 800 289 3355 or toll free 1 800 879 3355 Dell Outlet Store Dell refurbished computers toll free 1 888 798 7561 Software and Perip...

Страница 96: ...gether in the electronic environment While this computer has been designed and determined to be compliant with regulatory agency limits for EMI there is no guarantee that interference will not occur in a particular installation If this equipment does cause interference with radio communications services which can be determined by turning the equipment off and on you are encouraged to try to correc...

Страница 97: ... products including Dell branded monitors keyboards and pointing devices mice What is not covered by this limited warranty This limited warranty does not cover Software including the operating system and software added to the Dell branded hardware products through our factory integration system or the reloading of the software Non Dell branded products and accessories Problems that result from Ext...

Страница 98: ...AMAGES FOR PRODUCTS NOT BEING AVAILABLE FOR USE OR FOR LOST DATA OR LOST SOFTWARE OUR LIABILITY WILL BE NO MORE THAN THE AMOUNT YOU PAID FOR THE PRODUCT THAT IS THE SUBJECT OF A CLAIM THIS IS THE MAXIMUM AMOUNT FOR WHICH WE ARE RESPONSIBLE SOME PROVINCES DO NOT ALLOW THE EXCLUSION OR LIMITATION OF SPECIAL INDIRECT INCIDENTAL OR CONSEQUENTIAL DAMAGES SO THE ABOVE LIMITATION OR EXCLUSION MAY NOT APP...

Страница 99: ...al information removable media such as floppy disks CDs or PC Cards We are not responsible for any of your confidential proprietary or personal information lost or corrupted data or damaged or lost removable media During the remaining years following the first year of all limited warranties We will replace any defective part with new or refurbished parts if we agree that it needs to be replaced Wh...

Страница 100: ... for the product you bought Dell owns all parts removed from repaired products What do I do if I am not satisfied We pride ourselves on our great customer service If you are not satisfied with the service you receive under this limited warranty please let us know We have found that the best way to resolve issues regarding our limited warranty is to work together If after those discussions you are ...

Страница 101: ...fee unless otherwise prohibited by law If you are an organization that bought the products under a written agreement with Dell the agreement may contain different terms for the return of products than specified by this policy To return products you must call Dell Customer Service at 1 800 387 5759 to receive a Credit Return Authorization Number To expedite the process of your refund or credit Dell...

Страница 102: ... as the manufacturer such as monitors batteries memory docking stations and projectors To determine which limited warranty applies to the product you purchased see the Dell invoice and or the product documentation that accompanied your product Descriptions of Dell s limited warranties are described in preceding sections Return Policy If you are an end user customer who bought Dell Software and Per...

Страница 103: ...Appendix 103 Intel Warranty Statement for Pentium and Celeron Processors Only U S and Canada Only 7T097bk1 book Page 103 Thursday September 26 2002 6 47 AM ...

Страница 104: ...104 Appendix w w w d e l l c o m s u p p o r t d e l l c o m 7T097bk1 book Page 104 Thursday September 26 2002 6 47 AM ...

Страница 105: ...drives See hard drive 66 F finding information 16 H hard drive replacing 66 returning to Dell 68 I information transferring to new computer 29 Internet connection about 30 options 30 setting up 31 IRQ conflicts 56 M memory adding 62 removing 63 module bay swapping modules 40 movie playing 40 N network setting up home and office 30 P power fixing problems 38 shutdown 38 turning off computer 38 turn...

Страница 106: ...ety instructions 7 software reinstalling software 54 57 specifications 70 System Restore 50 system setup program commonly used options 77 options 77 screens 76 viewing 76 T television connecting to computer 41 enabling display settings 44 troubleshooting power problems 38 W warranty 97 Windows XP device driver rollback 54 reinstalling 57 7T097bk1 book Page 106 Thursday September 26 2002 6 47 AM ...

Страница 107: ..._ Frame ___ Word ___ Quark Other___________________ FILE TYPE _X_Postscript Other_________________ ___Postscript Other_________________ PS DRIVER USED _X_Scitex Dolev400 PSM L2 ___Scitex Dolev400 PSM L2 COLORS SEPARATIONS Book COVER _X_CMYK ___Gray Scale Book INTERIOR Print all as Gray Scale Graphics Included OTHER ___CMYK ___Gray Scale Pantone s_________________________________ Book COVER ___CMYK...

Страница 108: ...UNT 108 SPECIAL INSTRUCTIONS Add blank pages needed to complete signatures Any document 3 pages or more please add blank pages at the end of book to equal mul tiples of 4 8 16 or 32 Each new language begins on an odd numbered page and ends on an even numbered page If this document contains Hebrew add blank pages at the end of the Hebrew document This would resemble the beginning of the document se...

Отзывы: