background image

Bezel

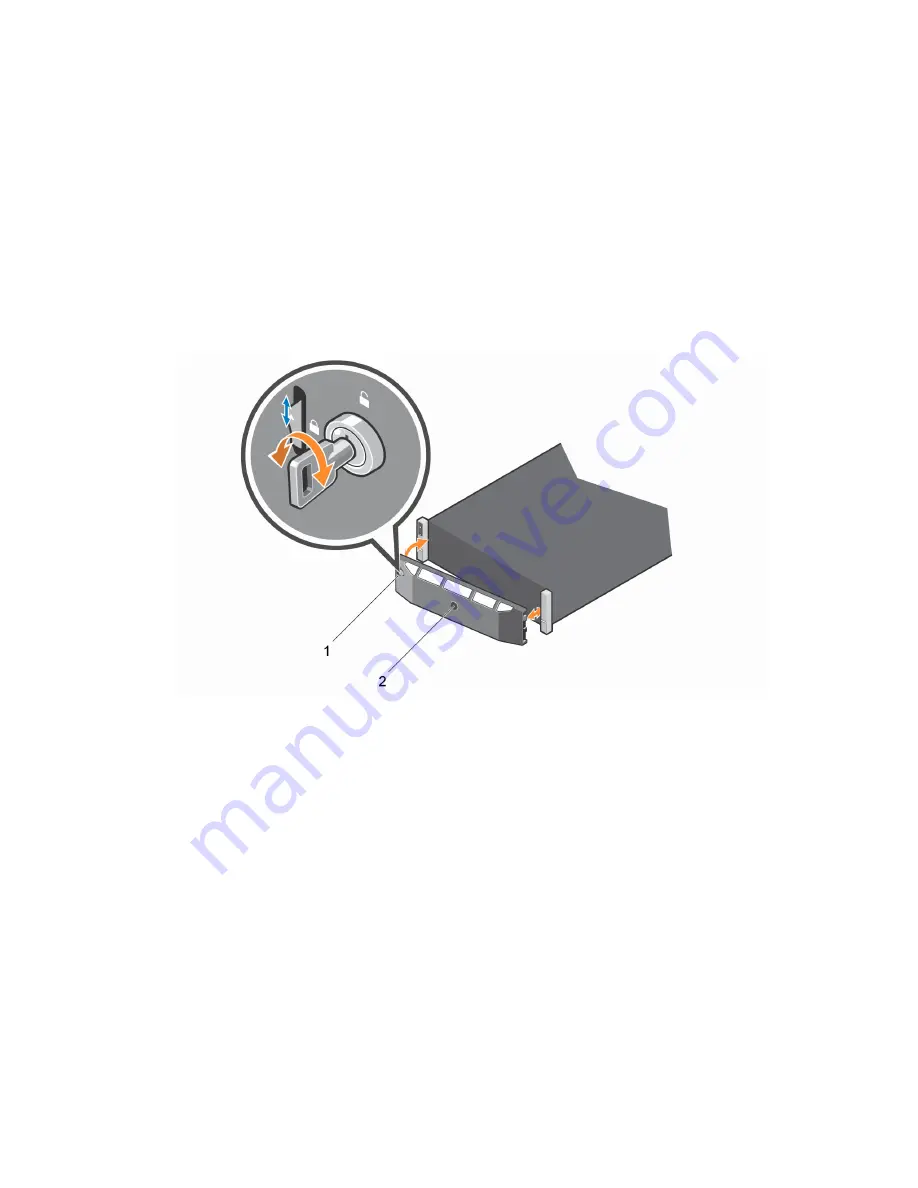
The front bezel is a cover for the front panel of the SC7020 storage system.

Remove the Front Bezel

Before you remove or install hard drives in the storage system, remove the front bezel.

1.

Use the system key to unlock the keylock at the left end of the bezel.

2.

Lift the release latch next to the keylock.

3.

Rotate the left end of the bezel away from the front panel.

4.

Unhook the right end of the bezel and pull the bezel away from the storage system.

Figure 6. Installing and Removing the Bezel

1.

Keylock

2. Front bezel

Install the Front Bezel

To secure the storage system, install the front bezel.

1.

Hook the right end of the replacement bezel onto the front panel of the storage system.

2.

Insert the left end of the bezel into the securing slot until the release latch locks into place.

3.

Secure the bezel with the keylock.

Hard Drives 

The SC7020 storage system supports hot-swappable hard drives.
The SC7020 storage system supports a minimum of 7 internal 2.5-inch drives up to a maximum of 30 
drives. The drives are installed from left to right, and then top to bottom. The first row of drives are 

Replacing SC7020 Storage System Components

13

Содержание SC7020

Страница 1: ...Dell Storage Center SC7020 Storage System Owner s Manual ...

Страница 2: ...d the problem WARNING A WARNING indicates a potential for property damage personal injury or death 2016 Dell Inc All rights reserved This product is protected by U S and international copyright and intellectual property laws Dell and the Dell logo are trademarks of Dell Inc in the United States and or other jurisdictions All other marks and names mentioned herein may be trademarks of their respect...

Страница 3: ... 11 Safety Precautions 11 Installation Safety Precautions 11 Electrical Safety Precautions 11 Electrostatic Discharge Precautions 12 General Safety Precautions 12 Bezel 13 Remove the Front Bezel 13 Install the Front Bezel 13 Hard Drives 13 Identify the Failed Drive 14 Remove the Failed Drive 14 Install the Replacement Drive 14 Rack Rails 15 Remove the Rack Rails 15 Install the Rack Rails 16 Power ...

Страница 4: ...se by Dell end users Contacting Dell Dell provides several online and telephone based support and service options Availability varies by country and product and some services might not be available in your area To contact Dell for sales technical support or customer service issues go to www dell com support For customized support type your system service tag on the support page and click Submit Fo...

Страница 5: ... indicators and a system identification button In addition the hard drives are installed and removed through the front of the storage system chassis Figure 1 SC7020 Storage System Front Panel View Item Name Icon Description 1 Power indicator Lights when the storage system power is on Off No power On steady green At least one power supply is providing power to the storage system 2 Status indicator ...

Страница 6: ...l of the SC7020 contains the storage controller indicators and power supply indicators Figure 2 SC7020 Storage System Back Panel View Item Name Icon Description 1 Power supply cooling fan module PSU 2 Contains a 1485 W power supply and fans that provide cooling for the storage system with AC input to the power supply of 200 240 V An LED between the top of the handle and the bottom of the handle in...

Страница 7: ...dated Blinking green then off Power supply mismatch 5 Power socket 2 Accepts the following standard computer power cords IEC320 C13 for deployments worldwide IEC60320 C19 for deployments in Japan SC7020 Storage System Drives The SC7020 storage system supports Dell Enterprise hard disk drives HDDs and Dell Enterprise solid state drives eSSDs only The drives in the SC7020 storage system are installe...

Страница 8: ...ge system Figure 4 SC7020 Drive Numbering SC7020 Storage Controller Features and Indicators The SC7020 storage system includes two storage controllers in two interface slots SC7020 Storage Controller The following figure shows the features and indicators on an SC7020 storage controller Figure 5 SC7020 Storage Controller Item Control Feature Icon Description 1 Identification LED Blinking blue conti...

Страница 9: ...1 are numbered 1 to 4 from left to right Ports for I O cards installed in riser 2 are numbered 1 to 4 from right to left 5 Serial port micro USB Used to initially configure a storage controller It is also used under the supervision of Dell Technical Support to troubleshoot and support systems 6 MGMT port Ethernet port used for storage system management and access to Dell Storage Manager Two LEDs w...

Страница 10: ...nine card Two LEDs beneath each port provide connectivity information Off No connectivity Steady green left LED Link full speed 10GBASE T Steady amber left LED Link degraded speed Blinking green right LED Activity 10 SC7020 Storage System Hardware ...

Страница 11: ...tic discharge When handling the storage system hardware use an electrostatic wrist guard not included or a similar form of protection The chassis must be mounted in a rack The following safety requirements must be considered when the chassis is being mounted The rack construction must be capable of supporting the total weight of the installed chassis The design should incorporate stabilizing featu...

Страница 12: ...rve all conventional ESD precautions when handling plug in modules and components Use a suitable ESD wrist or ankle strap Avoid contact with backplane components and module connectors Keep all components and printed circuit boards PCBs in their antistatic bags until ready for use General Safety Precautions Always follow general safety precautions to avoid injury and damage to Storage Center equipm...

Страница 13: ...ling and Removing the Bezel 1 Keylock 2 Front bezel Install the Front Bezel To secure the storage system install the front bezel 1 Hook the right end of the replacement bezel onto the front panel of the storage system 2 Insert the left end of the bezel into the securing slot until the release latch locks into place 3 Secure the bezel with the keylock Hard Drives The SC7020 storage system supports ...

Страница 14: ...ve Use this procedure to remove a drive from the SC7020 storage system 1 Remove the front bezel from the storage system 2 Locate the failed hard drive in the storage system 3 Press the release button to open the hard drive carrier release handle 4 Slide the hard drive carrier out of the hard drive slot Install the Replacement Drive Use this procedure to install a drive in the SC7020 storage system...

Страница 15: ...torage Manager Client About this task NOTE Replacing rack rails must be performed during a scheduled maintenance window when the Storage Center system is unavailable to the network Steps 1 Make sure all the cables are labeled 2 Disconnect all of the cables from the storage system 3 Loosen the screws in the chassis ears that secure the chassis to the rack Figure 8 Loosen the Screws 4 Remove the sto...

Страница 16: ...y Cooling Fan Modules The SC7020 storage system supports two hot swappable power supply cooling fan modules The cooling fans that cool the storage system and the power supplies are integrated into the power supply cooling fan module and cannot be replaced separately If one power supply cooling fan module fails the second module continues to provide power to the storage system NOTE When a power sup...

Страница 17: ...nager Client 1 Click the Hardware tab 2 In the Hardware tab navigation pane select the Controllers node 3 Click the Fans tab 4 Find the fan with a status of Down 5 Record the location of the failed fan Replace a Power Supply Cooling Fan Module Use this procedure to replace failed power supply cooling fan modules About this task You can replace power supply cooling fan modules one at a time without...

Страница 18: ...is CAUTION The power supply cooling fan modules are heavy To avoid injury use both hands while removing the module Figure 11 Removing a Power Supply Cooling Fan Module 1 Release tab 2 Power supply cooling fan module 3 Power supply cage 5 Slide the replacement power supply cooling fan module into the chassis until it is fully seated and the release tab clicks into place 18 Replacing SC7020 Storage ...

Страница 19: ...e the power supply cooling fan module and determine its status When the power supply cooling fan module is functioning properly the AC power status indicator turns green and the power supply cooling fan status indicator is off 9 In the Dell Storage Manager Client make sure that the replacement power supply is recognized and shows as up and running 10 After replacing a power supply cooling fan modu...

Страница 20: ...saved to an SSD within the storage controller Storage Connectivity Configurations Storage Center supports up to 168 drives in one redundant path SAS chain An SC7020 supports up to 12 SC400 expansion enclosures or 6 SC420 expansion enclosures Redundant Array of Independent Disks RAID Controller Two hot swappable storage controllers Management RAID management using the Dell Storage Manager Client Ba...

Страница 21: ...indicating fault One single color LED for identification Power supply cooling fan Two LED status indicators for power supply status AC fail status DC fail status and fan fail status Power Supply Units PSU AC power supply per power supply PSU Type 1 PSU Type 2 Japan Only Maximum output power 1485 watts 1485 watts Maximum input power 1688 watts 1707 watts Maximum input current 8 8 amps 17 5 amps Max...

Страница 22: ...lative humidity Operating 10 to 80 noncondensing with 29 C 84 2 F maximum dew point Storage 5 to 95 noncondensing with 33 C 91 F maximum dew point Maximum vibration Operating 0 21 G at 5 500 Hz for 15 min Storage 1 04 G at 2 200 Hz for 15 min Maximum shock Operating 31 G 5 with pulse duration of 2 6 msec 10 equivalent to 20 in sec 51 cm sec Storage 71 G 5 with pulse duration of 2 msec 10 equivalen...

Отзывы: