Quick Reference Guide
33
Using Microsoft
®
Windows
®
XP System Restore
The Microsoft Windows XP operating system provides System Restore to allow you to return your
computer to an earlier operating state (without affecting data files) if changes to the hardware, software,
or other system settings have left the computer in an undesirable operating state. See the Windows Help
and Support Center for information about using System Restore (see "Finding Information" on page 5
for information about accessing the Windows Help and Support Center).
NOTICE:
Make regular backups of your data files. System Restore does not monitor your data files or recover them.
Creating a Restore Point
1
Click the
Start
button and click
Help and Support
.
2
Click
System Restore
.
3
Follow the instructions on the screen.
Restoring the Computer to an Earlier Operating State
NOTICE:
Before you restore the computer to an earlier operating state, save and close any open files and exit any
open programs. Do not alter, open, or delete any files or programs until the system restoration is complete.
1
Click the
Start
button, point to
All Programs
→
Accessories
→
System Tools
, and then click
System Restore
.
2
Ensure that
Restore my computer to an earlier time
is selected and click
Next
.
3
Click a calendar date to which you want to restore your computer.
The
Select a Restore Point
screen provides a calendar that allows you to see and select restore points.
All calendar dates with available restore points appear in boldface type.
4
Select a restore point and click
Next
.
If a calendar date has only one restore point, then that restore point is automatically selected.
If two or more restore points are available, click the restore point that you prefer.
5
Click
Next
.
The
Restoration Complete
screen appears after System Restore finishes collecting data
and then the computer restarts.
6
After the computer restarts, click
OK
.
To change the restore point, you can either repeat the steps using a different restore point, or you can
undo the restoration.
Содержание Precision PD055
Страница 4: ...4 Contents ...
Страница 47: ...w w w d e l l c o m s u p p o r t d e l l c o m Dell Precision Workstation 490 快速参考指南 型号 DCTA ...
Страница 50: ...50 目录 ...
Страница 56: ...56 快速参考指南 3 您可以采用不同方式连接显 示器 视您的图形卡而定 注 您可能需要使用附带 的适配器或电缆 才能将 显示器连接至计算机 连接显示器 ...
Страница 59: ...快速参考指南 59 4 注 如果您的计算机 已安装声卡 请将扬 声器连接至此卡 连接扬声器 5 连接电源电缆并打开 计算机和显示器 ...
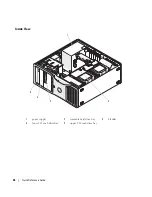
Страница 72: ...72 快速参考指南 内部视图 1 电源设备 2 可旋转的硬盘驱动器托架 3 灵活托架 4 下部 5 25 英寸驱动器托架 5 上部 5 25 英寸驱动器托架 1 2 3 4 5 ...
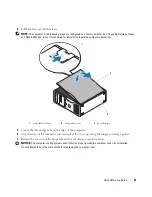
Страница 73: ...快速参考指南 73 内部视图 已旋出硬盘驱动器托架 1 电源设备 2 系统板 3 内存风扇 4 前面风扇 5 卡风扇 1 2 3 4 5 ...
Страница 74: ...74 快速参考指南 系统板组件 3 4 5 6 7 12 22 23 24 25 26 2 27 10 13 14 15 16 17 19 20 11 9 21 18 1 8 ...
Страница 90: ...90 快速参考指南 ...
Страница 93: ...w w w d e l l c o m s u p p o r t d e l l c o m Dell Precision Workstation 490 クイックリファレンスガイド モデル DCTA ...
Страница 96: ...96 目次 ...
Страница 119: ...クイックリファレンスガイド 119 内部 1 電源装置 2 回転式ハードドライブベイ 3 FlexBay 4 5 25 インチドライブベイ 下 5 5 25 インチドライブベイ 上 1 2 3 4 5 ...
Страница 120: ...120 クイックリファレンスガイド コンピュータの内部 ハードドライブベイを外側に回転させた状態 1 電源装置 2 システム基板 3 メモリファン 4 前面ファン 5 カードファン 1 2 3 4 5 ...
Страница 121: ...クイックリファレンスガイド 121 システム基板のコンポーネント 3 4 5 6 7 12 22 23 24 25 26 2 27 10 13 14 15 16 17 19 20 11 9 21 18 1 8 ...
Страница 138: ...138 クイックリファレンスガイド ...
Страница 142: ...42 索引 142 索引 ...

