background image

Installing the Keyboard

1.

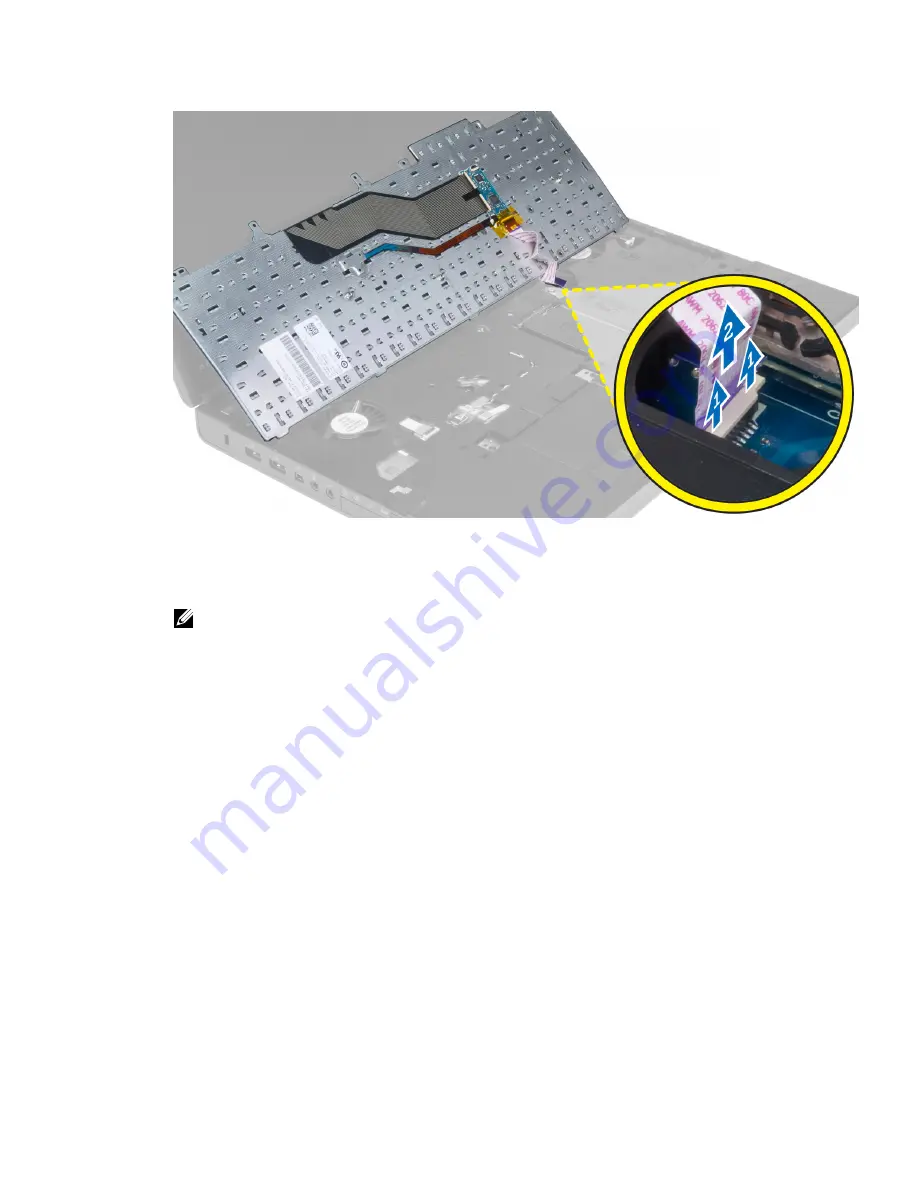
Connect the keyboard-data cable to the system board.

NOTE: Ensure that you fold the keyboard-data cable in perfect alignment.

2.

Press the keyboard in its compartment.

3.

Tighten the screws to secure the keyboard to the computer.

4.

Press over the cross section of the following keys to secure the keyboard to the computer:
a) <R> , <T> , <F> and <G> keys
b) over the <9> key
c) NUMLOCK <9> key

19

Содержание Precision Mobile Workstation M4700

Страница 1: ...Dell Precision Mobile Workstation M4700 Owner s Manual Regulatory Model P21F Regulatory Type P21F001 ...

Страница 2: ...registered trademarks or trademarks of Intel Corporation in the U S and other countries AMD is a registered trademark and AMD Opteron AMD Phenom AMD Sempron AMD Athlon ATI Radeon and ATI FirePro are trademarks of Advanced Micro Devices Inc Microsoft Windows MS DOS Windows Vista the Windows Vista start button and Office Outlook are either trademarks or registered trademarks of Microsoft Corporation...

Страница 3: ...the Keyboard Trim 15 Installing the Keyboard Trim 16 Removing the Keyboard 17 Installing the Keyboard 19 Removing the Primary Memory 20 Installing the Primary Memory 20 Removing the Secondary Memory 21 Installing the Secondary Memory 21 Removing the Optical Drive 21 Installing the Optical Drive 23 Removing the Hard Drive 23 Installing the Hard Drive 24 Removing the Wireless Local Area Network WLAN...

Страница 4: ...ng the I O Board 41 Removing the Switch Board 41 Installing the Switch Board 42 Removing the Unified Security Hub USH Board 42 Installing the USH Board 43 Removing the Display Assembly 43 Installing the Display Assembly 46 Removing the Hinge Cover 46 Installing the Hinge Cover 47 Removing the System Board 47 Installing the System Board 50 Removing the Power Connector Port 51 Installing the Power C...

Страница 5: ...d or Setup Password 68 4 Diagnostics 71 Enhanced Pre Boot System Assessment ePSA Diagnostics 71 5 Troubleshooting Your Computer 73 Device Status Lights 73 Battery Status Lights 74 Technical Specification 74 6 Specifications 81 Technical Specification 81 7 Contacting Dell 89 Contacting Dell 89 ...

Страница 6: ...6 ...

Страница 7: ... the computer CAUTION Handle components and cards with care Do not touch the components or contacts on a card Hold a card by its edges or by its metal mounting bracket Hold a component such as a processor by its edges not by its pins CAUTION When you disconnect a cable pull on its connector or on its pull tab not on the cable itself Some cables have connectors with locking tabs if you are disconne...

Страница 8: ...h could harm internal components 11 Remove any installed ExpressCards or Smart Cards from the appropriate slots Recommended Tools The procedures in this document may require the following tools Small flat blade screwdriver 0 Phillips screwdriver 1 Phillips screwdriver Small plastic scribe Turning Off Your Computer CAUTION To avoid losing data save and close all open files and exit all open program...

Страница 9: ...external devices cards and cables before turning on your computer CAUTION To avoid damage to the computer use only the battery designed for this particular Dell computer Do not use batteries designed for other Dell computers 1 Connect any external devices such as a port replicator battery slice or media base and replace any cards such as an ExpressCard 2 Connect any telephone or network cables to ...

Страница 10: ...10 ...

Страница 11: ...into its slot until it clicks into place 2 Follow the procedures in After Working Inside Your Computer Removing the ExpressCard 1 Follow the procedures in Before Working Inside Your Computer 2 Press in on the ExpressCard to release it from the computer Slide the ExpressCard out of the computer Installing the ExpressCard 1 Slide the ExpressCard into its slot until it clicks into place 2 Follow the ...

Страница 12: ...attery 1 Slide the battery into its slot until it clicks into place 2 Follow the procedures in After Working Inside Your Computer Removing the Subscriber Identity Module SIM Card 1 Follow the procedures in Before Working Inside Your Computer 2 Remove the battery 12 ...

Страница 13: ...all the battery 3 Follow the procedures in After Working Inside Your Computer Removing the Base Cover 1 Follow the procedures in Before Working Inside Your Computer 2 Remove the battery 3 Remove the screws that secure the base cover to the computer Press the rubber tabs towards the rear of the computer to disengage the base cover 13 ...

Страница 14: ...4 Flip and remove the base cover from the computer 14 ...

Страница 15: ...base cover to the computer 3 Install the battery 4 Follow the procedures in After Working Inside Your Computer Removing the Keyboard Trim 1 Follow the procedures in Before Working Inside Your Computer 2 Remove the battery 3 Pry up the keyboard trim starting from the top inner edge 4 Pry up the bottom edge of the keyboard trim from the top inner edge 15 ...

Страница 16: ...Installing the Keyboard Trim 1 Toe in the keyboard trim from the front and align it to its original position on the computer Ensure that the hard tab on the left corner snaps into place 16 ...

Страница 17: ...3 Install the battery 4 Follow the procedures in After Working Inside Your Computer Removing the Keyboard 1 Follow the procedures in Before Working Inside Your Computer 2 Remove the a battery b keyboard trim 3 Remove the screws that secure the keyboard to the computer 17 ...

Страница 18: ...4 Starting from the bottom of the keyboard separate the keyboard from the computer and flip the keyboard over 5 Disconnect the keyboard data cable from the system board and remove the keyboard 18 ...

Страница 19: ...u fold the keyboard data cable in perfect alignment 2 Press the keyboard in its compartment 3 Tighten the screws to secure the keyboard to the computer 4 Press over the cross section of the following keys to secure the keyboard to the computer a R T F and G keys b over the 9 key c NUMLOCK 9 key 19 ...

Страница 20: ...ore Working Inside Your Computer 2 Remove the a battery b base cover 3 Pry the retention clips away from the primary memory until it pops up Lift the primary memory and remove it from the computer Installing the Primary Memory 1 Insert the primary memory into the memory socket 2 Press the clips to secure the primary memory to the system board 3 Install the 20 ...

Страница 21: ...le until it pops up Lift up the memory module and remove it from the computer Installing the Secondary Memory 1 Insert the secondary memory into the memory socket 2 Press the clips to secure the memory module to the system board 3 Install the a keyboard b keyboard trim c battery 4 Follow the procedures in After Working Inside Your Computer Removing the Optical Drive 1 Follow the procedures in Befo...

Страница 22: ...4 Pry and slide out the optical drive to remove it from the computer 5 Remove the screws that secure the drive latch bracket to the optical drive and remove the bracket 22 ...

Страница 23: ...o the computer 3 Install the a battery b base cover 4 Follow the procedures in After Working Inside Your Computer Removing the Hard Drive 1 Follow the procedures in Before Working Inside Your Computer 2 Remove the a battery b base cover 3 Remove the screws that secure the hard drive to the computer Slide the hard drive latch to the unlock position and pull out the hard drive from the computer 23 ...

Страница 24: ...e bracket to the hard drive 2 Insert the hard drive into its slot in the computer till it clicks in place 3 Tighten the screws to secure the hard drive to the computer 4 Install the a base cover b battery 5 Follow the procedures in After Working Inside Your Computer Removing the Wireless Local Area Network WLAN Card 1 Follow the procedures in Before Working Inside Your Computer 2 Remove the a batt...

Страница 25: ... remove the antenna cables connected to the WWAN card Remove the screw that secures the WWAN card to the computer Remove the WWAN card from the computer NOTE The location of the WWAN card may vary from what is displayed in the illustrations Installing the Wireless Wide Area Network WWAN Card Optional 1 Slide the WWAN card in the WWAN card slot 2 Tighten the screw to secure the WWAN card to the com...

Страница 26: ...place 5 Remove the bluetooth module Disconnect and remove the bluetooth cable from the module Installing the Bluetooth Module 1 Connect the bluetooth cable to the bluetooth module 2 Tighten the screw to secure the bluetooth module in place 3 Insert the bluetooth module in its slot and press down the bluetooth door 4 Route and connect the bluetooth cable 5 Install the a base cover b battery 26 ...

Страница 27: ...at secure the processor fan to the computer Remove the processor fan from the computer 4 Disconnect the processor fan cable Installing the Processor Fan 1 Connect the processor fan cable 2 Insert the processor fan into its slot in the computer 3 Tighten the screws that secure the processor fan to the computer 4 Install the a base cover b battery 5 Follow the procedures in After Working Inside Your...

Страница 28: ... the Video Card Fan 1 Connect the video card fan cable 2 Insert the video card fan into its slot and tighten the screws to secure it to the computer 3 Install the a base cover b battery 4 Follow the procedures in After Working Inside Your Computer Removing the Coin Cell Battery 1 Follow the procedures in Before Working Inside Your Computer 2 Remove the a battery b base cover 3 Disconnect the coin ...

Страница 29: ...Install the a base cover b battery 4 Follow the procedures in After Working Inside Your Computer Removing the Palmrest 1 Follow the procedures in Before Working Inside Your Computer 2 Remove the a battery b base cover c keyboard trim d keyboard e optical drive f hard drive drive 3 Disconnect the RFID and fingerprint reader cables 29 ...

Страница 30: ...4 Remove the screws that secure the palmrest to the base of the computer 5 Flip the computer and disconnect the following cables from the system board a media board b speaker 30 ...

Страница 31: ...c touchpad d power button 6 Remove the screws that secure the palmrest to the computer and flip it over from the edge 7 Flip and remove the palmrest from the computer 31 ...

Страница 32: ...Installing the Palmrest 1 Toe in the palmrest from the front and align it to its original position on the computer 32 ...

Страница 33: ...cure the palmrest to the front of the computer 5 Tighten the screws to secure the palmrest to the base of the computer 6 Install the a hard drive b optical drive c keyboard d keyboard trim e base cover f battery 7 Follow the procedures in After Working Inside Your Computer Removing the ExpressCard Module 1 Follow the procedures in Before Working Inside Your Computer 2 Remove the a ExpressCard b ba...

Страница 34: ...nly 4 Remove the screws that secure the ExpressCard module to the computer and remove the ExpressCard module Installing the ExpressCard Module 1 Insert the ExpressCard module into its compartment 2 Tighten the screws to secure the ExpressCard module to the computer 3 Connect the a ExpressCard cable to the system board b the USH board cable to the USH board for M4700 only 4 Install the 34 ...

Страница 35: ...e the a battery b base cover c keyboard trim d keyboard e optical drive f hard drive g palm rest h processor fan 3 Loosen the captive screws that secure the heat sink to the computer Lift up and remove the heat sink from the computer Installing the Heat Sink 1 Replace the heat sink in its slot Tighten the captive screws to secure the heat sink to the computer 2 Install the a processor fan b palm r...

Страница 36: ...e direction Remove the processor from the computer Installing the Processor 1 Align the notches on the processor and the socket and insert the processor into the socket 2 Rotate the processor cam lock in a clockwise direction 3 Install the a heat sink b processor fan c palm rest d hard drive e optical drive f keyboard g keyboard trim h base cover i battery 4 Follow the procedures in After Working ...

Страница 37: ...tical drive f hard drive g palm rest h video fan 3 Disconnect and un route any antenna cables connected to installed wireless cards 4 Remove the antenna cables from the routing channels 5 Loosen the captive screws on the heat sink 37 ...

Страница 38: ...k 1 Slide the heat sink into its original position in the computer 2 Tighten the captive screws to secure the heat sink 3 Route and connect the antenna cables to the installed wireless cards 4 Install the a video fan b palm rest c hard drive d optical drive e keyboard f keyboard trim 38 ...

Страница 39: ...fan i video card heat sink j heatsink 3 Remove the screws that secure the video card to the computer Remove the video card from the computer Installing the Video Card 1 Insert the video card into its slot in the computer 2 Tighten the screws to secure it to the computer 3 Install the a heatsink b video card heat sink c video card fan d palm rest e hard drive f optical drive g keyboard h keyboard t...

Страница 40: ...d b battery c base cover d keyboard trim e keyboard f optical drive g hard drive h palmrest 3 Disconnect the ExpressCard module connector from the I O board 4 Remove the screw that secures the I O board to the computer Lift the right edge of the I O board upwards to disengage the connector and remove it from computer 40 ...

Страница 41: ...ard module connector to the I O board 4 Install the a palmrest b hard drive c optical drive d keyboard e keyboard trim f base cover g battery h SD card 5 Follow the procedures in After Working Inside Your Computer Removing the Switch Board 1 Follow the procedures in Before Working Inside Your Computer 2 Remove the a battery b base cover c keyboard trim d keyboard e optical drive f hard drive 41 ...

Страница 42: ... system board and secure it through the routing channel 4 Install the a palmrest b hard drive c optical drive d keyboard e keyboard trim f base cover g battery 5 Follow the procedures in After Working Inside Your Computer Removing the Unified Security Hub USH Board 1 Follow the procedures in Before Working Inside Your Computer 2 Remove the a battery b base cover c keyboard trim d keyboard e optica...

Страница 43: ...lmrest b hard drive c optical drive d keyboard e keyboard trim f base cover g battery 5 Follow the procedures in After Working Inside Your Computer Removing the Display Assembly 1 Follow the procedures in Before Working Inside Your Computer 2 Remove the a battery b base cover c keyboard trim d keyboard e optical drive f hard drive g palmrest 3 Disconnect the antenna cables from the wireless cards ...

Страница 44: ...4 Flip the computer and pull up the antenna cables through the routing hole 5 Flip the computer and remove the screws from the bottom and back of the computer 44 ...

Страница 45: ...S cable bracket and disconnect the LVDS cable and camera cable from the system board NOTE LVDS cable is available in M4700 without the bracket LVDS cable bracket is available only in M6700 7 Remove the screws that secure the display assembly to the computer Remove the display assembly from the computer 45 ...

Страница 46: ...racket is available only in M6700 4 Route the cables through the routing channels 5 Insert the wireless antenna cables through the routing hole on the chassis 6 Tighten the screws at the bottom and back of the computer 7 Route and connect the antenna cables to their connectors 8 Install the a palmrest b hard drive c optical drive d keyboard e keyboard trim f base cover g battery 9 Follow the proce...

Страница 47: ...nge cover in its position on the computer 2 Tighten the screws to secure the hinge cover to the computer 3 Install the a display assembly b palmrest c hard drive d optical drive e keyboard f keyboard trim g base cover h battery 4 Follow the procedures in After Working Inside Your Computer Removing the System Board 1 Follow the procedures in Before Working Inside Your Computer 2 Remove the a SD car...

Страница 48: ...condary memory k processor fan l video card fan m palmrest n heat sink o processor p video card heat sink q video card r I O board s display assembly 3 Disconnect the coin cell battery cable 4 Disconnect the bluetooth cable 5 Disconnect the USH connector cable 48 ...

Страница 49: ...connect the USH cable 7 Disconnect the wireless cable 8 Remove all mini cards if available 9 Remove the screws that secure the system board in place and lift the top edge of the system board to a 20 angle 49 ...

Страница 50: ...e the system board to the computer 4 Connect the following cables a USH connector b bluetooth c wireless board connectors d coin cell battery 5 Install the wireless cards if available 6 Install the a display assembly b I O board c video card d video card heat sink e processor f heat sink g palmrest h video card fan i processor fan j secondary memory k primary memory l hard drive m optical drive n ...

Страница 51: ... keyboard g optical drive h hard drive i primary memory j secondary memory k processor fan l video card fan m palm rest n processor heatsink o processor p video card heatsink q video card r I O board s display assembly t system board 3 Un route and lift up the power connector cable from the chassis to remove the power connector port Installing the Power Connector Port 1 Insert the power connector ...

Страница 52: ... k secondary memory l primary memory m hard drive n optical drive o keyboard p keyboard trim q base cover r battery s ExpressCard t SD card 3 Follow the procedures in After Working Inside Your Computer Removing the Display Bezel 1 Follow the procedures in After Working Inside Your Computer 2 Remove the battery 3 Pry up the bottom edge of the display bezel 52 ...

Страница 53: ...r way around the sides and top edge of the display bezel and remove the display bezel from the computer Installing the Display Bezel 1 Slide in the display bezel from the bottom and press on the display bezel 53 ...

Страница 54: ...4 Follow the procedures in After Working Inside Your Computer Removing the Display Panel 1 Follow the procedures in Before Working Inside Your Computer 2 Remove the a battery b display bezel 3 Remove the screw that secures the display panel to the display assembly Flip the display panel over 54 ...

Страница 55: ...4 Peel back the adhesive tape that secures the LVDS cable to the display panel 5 Disconnect the LVDS cable 55 ...

Страница 56: ...6 Remove the screws that secure the display brackets to the display panel Remove the display brackets 7 56 ...

Страница 57: ...ollow the procedures in After Working Inside Your Computer Removing the Camera 1 Follow the procedures in Before Working Inside Your Computer 2 Remove the a battery b display bezel 3 Disconnect the camera cable Remove the screw that secures the camera module to the computer Remove the camera module from the computer Installing the Camera 1 Place the camera module in its slot on the computer 2 Tigh...

Страница 58: ...58 ...

Страница 59: ...ess System Setup by pressing F2 key Bring up the one time boot menu by pressing F12 key The one time boot menu displays the devices that you can boot from including the diagnostic option The boot menu options are Removable Drive if available STXXXX Drive NOTE XXX denotes the SATA drive number Optical Drive Diagnostics NOTE Choosing Diagnostics will display the ePSA diagnostics screen The boot sequ...

Страница 60: ...s section may or may not appear Table 2 General Option Description System Information This section lists the primary hardware features of your computer System Information Memory Information Processor Information Device Information Battery Information Displays the charge status of the battery Boot Sequence Allows you to change the order in which the computer attempts to find an operating system All...

Страница 61: ...esources even if the setting is disabled SATA Operation Allows you to configure the internal SATA hard drive controller The options are Disabled ATA AHCI RAID On Default Setting NOTE SATA is configured to support RAID mode Drives Allows you to configure the SATA drives on board The options are SATA 0 SATA 1 SATA 3 SATA 4 SATA 5 Default Setting All drives are enabled SMART Reporting This field cont...

Страница 62: ...able Camera Enable Hard Drive Free Fall Protection Enable Media Card and 1394 Enable Media Card Only Disable MC 1394 Default Setting The highlighted devices are enabled Table 4 Video Option Description LCD Brightness Allows you to set the panel brightness when the ambient sensor is Off Optimus Allows you to enable or disable the NVIDIA Optimus technology Enable Optimus Default Setting Table 5 Secu...

Страница 63: ...t a System password and a Hard Drive password when the admin password is set Default Setting Allow Non Admin Password Changes is not selected Non Admin Setup Changes Allows you to determine whether changes to setup option are permitted when an administrator password is set The option is disabled Allows Wireless Switch Changes Computrace Allows you to activate or disable the optional Computrace sof...

Страница 64: ... TurboBoost Allows you to enable or disable the Intel TurboBoost mode of the processor Default Setting Enable Intel TurboBoost Hyper Thread Control Allows you to enable or disable the HyperThreading in the processor Default Setting Enabled Rapid Start Technology Allows you to set the Rapid Start Technology feature This feature is enabled by default You can define the Rapid Start timer value Table ...

Страница 65: ...eep Allows you to block the computer from entering into the sleep state Option is disabled by default Block Sleep S3 Primary Battery Configuration Allows you to define how to use the battery charge when AC is plugged in The options are Standard Charge Express Charge Predominantly AC use Auto Charge Default Setting Custom Charge you can set the percentage to which the battery must charge NOTE All c...

Страница 66: ... Option menu This option is enabled by default Table 9 Virtualization Support Option Description Virtualization This option specifies whether a Virtual Machine Monitor VMM can utilize the additional hardware capabilities provided by Intel Virtualization technology Enable Intel Virtualization Technology Default Setting VT for Direct I O Enables or disables the Virtual Machine Monitor VMM from utili...

Страница 67: ...nter the Service Tag or Express Service Code and click Submit NOTE To locate the Service Tag click Where is my Service Tag NOTE If you cannot find your Service Tag click Detect Service Tag Proceed with the instructions on screen 4 If you are unable to locate or find the Service Tag click the Product Category of your computer 5 Choose the Product Type from the list 6 Select your computer model and ...

Страница 68: ...ystem Setup screen select System Security and press Enter The System Security screen appears 2 In the System Security screen verify that Password Status is Unlocked 3 Select System Password enter your system password and press Enter or Tab Use the following guidelines to assign the system password A password can have up to 32 characters The password can contain the numbers 0 through 9 Only lower c...

Страница 69: ... Password alter or delete the existing system password and press Enter or Tab 4 Select Setup Password alter or delete the existing setup password and press Enter or Tab NOTE If you change the System and or Setup password re enter the new password when promoted If you delete the System and or Setup password confirm the deletion when promoted 5 Press Esc and a message prompts you to save the changes...

Страница 70: ...70 ...

Страница 71: ... provide extra information about the failed device s View status messages that inform you if tests are completed successfully View error messages that inform you of problems encountered during testing CAUTION Use the system diagnostics to test only your computer Using this program with other computers may cause invalid results or error messages NOTE Some tests for specific devices require user int...

Страница 72: ...72 ...

Страница 73: ...ure to the system The following table lists how to read the LED codes when possible errors occur Table 14 LED Lights Storage LED Power LED Wireless LED Fault Description Blinking Solid Solid A possible processor failure has occurred Solid Blinking Solid The memory modules are detected but has encountered an error Blinking Blinking Blinking A system board failure has occurred Blinking Blinking Soli...

Страница 74: ...ferings may vary by region For more information regarding the configuration of your computer click Start Start icon Help and Support and then select the option to view information about your computer Table 15 System Information Feature Specification System Chipset Mobile Intel QM77 Express Chipset DMA Channels two 82C37 DMA controllers with seven independently programmable channels Interrupt Level...

Страница 75: ...e Data bus PCIe X16 Video controller and memory M4700 AMD FirePro M4000 with 1 GB GDDR5 NVIDIA Quadro K1000M with 2 GB GDDR3 NVIDIA Quadro K2000M with 2 GB GDDR3 M6700 AMD FirePro M6000 with 2 GB GDDR5 NVIDIA Quadro K3000M with 2 GB GDDR5 NVIDIA Quadro K4000M with 4 GB GDDR5 NVIDIA Quadro K5000M with 4 GB GDDR5 Table 19 Audio Feature Specification Integrated dual channel High Definition audio Tabl...

Страница 76: ...e 6 pin IEEE 1394 connector Video 15 pin VGA connector 19 pin HDMI connector 20 pin DisplayPort connector Memory card reader one 8 in 1 memory card reader Docking port one Subscriber Identity Module SIM port one ExpressCard one Smart card optional one Table 23 Display Feature M4700 M6700 Type HD 1366 X 768 FHD 1920 X 1080 HD 1600 X 900 FHD 1920 X 1080 Size 15 6 inches 17 3 inches Dimensions Height...

Страница 77: ...l 10 30 50 FHD Table 24 Keyboard Feature Specification Number of keys United States 86 keys United Kingdom 87 keys Brazil 87 keys Japan 90 keys Layout QWERTY AZERTY Kanji Table 25 Touchpad Feature Specification Active Area X axis 80 00 mm Y axis 40 50 mm Table 26 Camera Feature Specification Type HD 720P with dual mic Resolution HD 1280 X 720 pixels 30 frames per second FPS Table 27 Storage Featur...

Страница 78: ...Configuration support ODD modules and Air Bay with SATA HDD option Table 28 Battery Feature Specification Type lithium ion Dimensions 6 cell 9 cell 9 cell long cycle life LCL Depth 82 60 mm 3 25 inches Height 190 65 mm 7 50 inches Width 20 mm 0 78 inches Weight 6 cell 345 g 0 76 lb 9 cell 9 cell LCL 535 g 1 18 lb Voltage 11 10 V Temperature range Operating 0 C to 35 C 32 F to 95 F Non operating 40...

Страница 79: ...Cards and Technologies ISO14443A 160 kbps 212 kbps 424 kbps and 848 kbps ISO14443B 160 kbps 212 kbps 424 kbps and 848 kbps ISO15693 HID iClass FIPS201 NXP Desfire Table 31 Physical Dimension Physical M4700 M6700 Height 32 70 mm 1 28 inches 33 10 mm 1 30 inches Width 376 mm 14 80 inches 416 70 mm 16 40 inches Depth 256 mm 10 07 inches 270 60 mm 10 65 inches Weight Minimum 2 79 kg 6 15 lb 3 52 kg 7 ...

Страница 80: ...rating 0 66 GRMS 2 Hz 600 Hz Storage 1 3 GRMS 2 Hz 600 Hz Maximum shock Operating 140 G 2 ms Non operating 163 G 2 ms Altitude Storage 0 m to 10668 m 0 ft to 35 000 ft Airborne contaminant level G1 or lower as defined by ANSI ISA S71 04 1985 80 ...

Страница 81: ...Integrated I O APIC capability with 24 interrupts BIOS Chip NVRAM 96 Mb 12 MB Table 34 Processor Feature Specification Processor type Intel Core i5 and i7 Dual Core Intel Core i7 Quad Extreme Intel Core i7 Quad Core L1 cache Up to 32 KB cache depending on processor type L2 cache Up to 256 KB cache depending on processor type L3 cache Up to 8 MB cache depending on processor type Table 35 Memory Fea...

Страница 82: ...Quadro K3000M with 2 GB GDDR5 NVIDIA Quadro K4000M with 4 GB GDDR5 NVIDIA Quadro K5000M with 4 GB GDDR5 Table 37 Audio Feature Specification Integrated dual channel High Definition audio Table 38 Communication Feature Specification Network adapter network interface card capable of 10 100 1000 Mb s communication Wireless internal wireless local area network WLAN internal wireless wide area network ...

Страница 83: ...iber Identity Module SIM port one ExpressCard one Smart card optional one Table 41 Display Feature M4700 M6700 Type HD 1366 X 768 FHD 1920 X 1080 HD 1600 X 900 FHD 1920 X 1080 Size 15 6 inches 17 3 inches Dimensions Height 256 mm 10 07 inches 270 60 mm 10 65 inches Width 376 mm 14 80 inches 416 70 mm 16 40 inches Diagonal 396 24 mm 15 60 inches 439 42 mm 17 3 inches Active area X Y 344 23 mm X 193...

Страница 84: ...00 mm Y axis 40 50 mm Table 44 Camera Feature Specification Type HD 720P with dual mic Resolution HD 1280 X 720 pixels 30 frames per second FPS Table 45 Storage Feature Specification Storage Storage Interface SATA 1 1 5 Gb s SATA 2 3 0 Gb s SATA 3 6 Gb s Drives configurations M4700 one internal 2 5 inch SATA HDD SSD SATA3 one mSATA SSD SATA2 M6700 two internal 2 5 inch SATA HDD SSD SATA3 one mSATA...

Страница 85: ... 0 78 inches Weight 6 cell 345 g 0 76 lb 9 cell 9 cell LCL 535 g 1 18 lb Voltage 11 10 V Temperature range Operating 0 C to 35 C 32 F to 95 F Non operating 40 C to 65 C 40 F to 149 F Coin cell battery 3 V CR2032 lithium ion cell Table 47 AC Adapter Feature M4700 M6700 Input voltage 90 VAC to 264 VAC 90 VAC to 264 VAC Input current maximum 2 50 A 3 50 A Input frequency 50 Hz to 60 Hz 50 Hz to 60 Hz...

Страница 86: ... Physical Dimension Physical M4700 M6700 Height 32 70 mm 1 28 inches 33 10 mm 1 30 inches Width 376 mm 14 80 inches 416 70 mm 16 40 inches Depth 256 mm 10 07 inches 270 60 mm 10 65 inches Weight Minimum 2 79 kg 6 15 lb 3 52 kg 7 77 lb Table 50 Environmental Feature Specification Temperature range Operating 0 C to 40 C 32 F to 104 F Storage 40 C to 65 C 40 F to 149 F Relative humidity maximum Opera...

Страница 87: ...Feature Specification Altitude Storage 0 m to 10668 m 0 ft to 35 000 ft Airborne contaminant level G1 or lower as defined by ANSI ISA S71 04 1985 87 ...

Страница 88: ...88 ...

Страница 89: ...hone based support and service options Availability varies by country and product and some services may not be available in your area To contact Dell for sales technical support or customer service issues 1 Visit dell com support 2 Select your support category 3 Verify your country or region in the Choose a Country Region drop down menu at the top of page 4 Select the appropriate service or suppor...

Отзывы: