22
Rack Installation Guide
3
Before attaching the cables to their respective connectors, see
the instructions in "Connecting and Bundling the Cables" on page 22
and refer to Figure 1-9.
Connecting and Bundling the Cables
NOTICE:
Ensure that each bundle of cables that you are connecting cascades over
the strain-relief bar, allowing maximum airflow and serviceability for your system.
1
Create separate bundles of cables for each logical grouping of a maximum
of eight I/O cables or power cables (see Figure 1-9).
2
Connect the topmost I/O cables, arranging them as they cascade over
the strain-relief bar in an ordered row beginning with the top connector
in the group (see Figure 1-9).
3
You can manage and organize your cables following the steps described in
"Using the I/O Cable Enumerators" on page 22 before you use the Velcro
tie wraps to secure each cable bundle to the strain-relief bar.
NOTE:
Figure 1-9 illustrates a fully loaded system configuration. If you are
managing large numbers of cables, consider first identifying each cable
group, attaching the enumerators, and then bundling each cable group
with the Velcro tie wraps.
Using the I/O Cable Enumerators
1
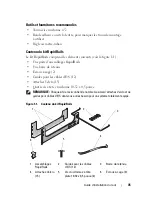
Locate the I/O cable enumerators that are included with your system
(see Figure 1-1 and Figure 1-2). The purpose of the enumerator is to keep
the sequence of cable connectors and their respective cables ordered and
intact to facilitate easy removal and replacement of system modules.
2
For each group of eight cables, select the side numbered one and eight.
For a group of 16 cables, you will need two enumerators numbered 1 and 8
and numbered 9 and 16 (see Figure 1-9).
NOTE:
Each enumerator is numbered 1 and 8 on one side and 9 and 16
on the opposite side. You will need one enumerator for a set of eight cables
and two enumerators for a set of 16 cables.
3
Orient the enumerator horizontally to attach each of the cascading
cables directly above the point of contact with the strain-relief bar
(see Figure 1-9).
Содержание PowerEdge M1000e
Страница 2: ......
Страница 3: ...Rack Installation Guide ...
Страница 6: ...4 Contents ...
Страница 15: ...Rack Installation Guide 13 Figure 1 4 Marking the Vertical Rails 1 tape on vertical rails 1 ...
Страница 29: ...Guide d installation du rack ...
Страница 32: ...30 Sommaire ...
Страница 54: ...52 Guide d installation du rack ...
Страница 57: ...Rack Installations anleitung ...
Страница 60: ...58 Inhalt ...
Страница 84: ...82 Rack Installationsanleitung ...
Страница 87: ...ラック取り付けガイド ...
Страница 90: ...88 目次 ...
Страница 105: ...ラック取り付けガイド 103 図 1 7 ラックへのシステムの取り付け 1 蝶ネジ 4 2 LCD モジュール 3 レールアセンブリ 2 3 2 1 ...
Страница 111: ...ラック取り付けガイド 109 ラック扉の取り付け ラックキャビネットに付属のマニュアルに記載されている扉の取り付け手 順を参照してください これでラックへのシステムの取り付けは完了です ...
Страница 112: ...110 ラック取り付けガイド ...
Страница 115: ...Guía de instalación del rack ...
Страница 118: ...116 Contenido ...
Страница 127: ...Guía de instalación del rack 125 Figura 1 4 Marcado de los rieles verticales 1 Cinta en los rieles verticales 1 ...
Страница 142: ...140 Guía de instalación del rack ...


