


Rack Installation Guide
13
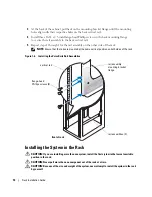
CAUTION:
It is recommended that more than one person assist in lifting the system.
NOTICE:
It is recommended that you use a lift table to aid in installing the system in the rack, particularly
if the rail assemblies are more than waist-high.
1
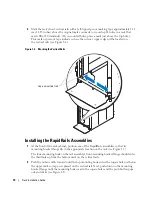
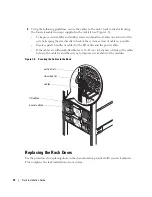
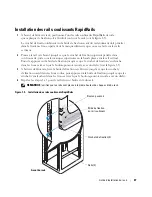
Lift the system into position to install it in the rack.
It is recommended that more than one person assist in lifting the system.
2
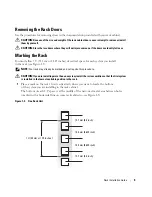
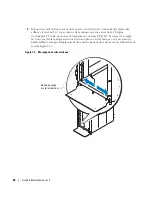
Guide the system into the rack and lower the system onto the rail assemblies (see Figure 1-7).
3
Tighten the thumbscrews on the rack front panel.
Figure 1-7.
Installing the System in the Rack
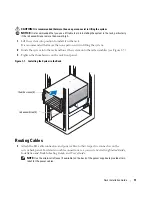
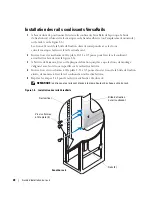
Routing Cables
1
Attach the I/O cable connectors and power cables to their respective connectors on the
system back panel. For details on cable connections, see your system’s
Getting Started Guide
,
Installation and Troubleshooting Guide
, and
User’s Guide
.
NOTE:
Use the strain-relief loops (if available) on the back of the power supplies to provide strain
relief for the power cables.
rail assemblies (2)
thumbscrews (4)
Содержание PowerEdge 1955
Страница 2: ......
Страница 3: ...Rack Installation Guide ...
Страница 6: ...4 Contents ...
Страница 18: ...16 Index 16 Index ...
Страница 19: ...Guide d installation du rack ...
Страница 22: ...20 Sommaire ...
Страница 34: ...32 Guide d installation du rack ...
Страница 36: ...34 Index 34 Index ...
Страница 37: ...Rack Installationsanleitung ...
Страница 40: ...38 Inhalt ...
Страница 52: ...50 Rack Installationsanleitung ...
Страница 54: ...52 Index 52 Index ...
Страница 55: ...ラック取り付けガイド ...
Страница 58: ...56 目次 ...
Страница 70: ...68 索引 68 索引 ...
Страница 71: ...Guía de instalación del rack ...
Страница 74: ...72 Contenido ...
Страница 86: ...84 Guía de instalación del rack ...
Страница 88: ...86 Índice 86 Índice ...


