background image

Starting and Configuring the Device

15

When the power is turned on with the local terminal already connected, the device goes through Power 

On Self Test (POST). POST runs every time the device is initialized and checks hardware components 

to determine if the device is fully operational before completely booting. If a critical problem is 

detected, the program flow stops. If POST passes successfully, a valid executable image is loaded into 

RAM. POST messages are displayed on the terminal and indicate test success or failure.
The boot process runs less than 45 seconds when in unmanaged mode, and about 90 seconds when in 

other modes.

Booting the Device - Managed Mode

The procedure described in this section refers to the device when set to Managed mode. See Figure 4-2 

for a description of how to enter the Managed mode
In managed mode, the boot procedure can be monitored on the connected terminal as follows:

1

Ensure that the device console port is connected to a VT100 terminal device or VT100 terminal 

emulator via the RS-232 crossover cable.

2

Locate an AC power receptacle.

3

Deactivate the AC power receptacle.

4

Connect the device


to the AC receptacle.

5

Activate the AC power receptacle.
When the power is turned on with the local terminal already connected, the device goes through 

Power On Self Test (POST). POST runs every time the device is initialized and checks hardware 

components to determine if the device is fully operational before completely booting. If a critical 

problem is detected, the program flow stops. If POST passes successfully, a valid executable image is 

loaded into RAM. POST messages are displayed on the terminal and indicate test success or failure.

6

The boot process begins running in less than 45 seconds when in Unmanaged mode (and 

approximately 90 seconds when in other modes).

Initial Configuration Through the Set-up Wizard

To configure the device, it must be in Management mode. 


NOTE: 

The switch is factory-set in Unmanaged Mode. To set the switch to Managed mode, press the Mode button 

for up to 7 seconds.

In Management mode, you can configure the device in the following ways:

• Through the web management application (described in "Initial Configuration Through the Web" 

on page 19).

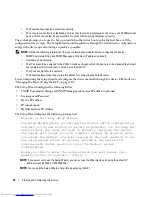
• Through the Set-up wizard, as described below.


NOTE: 

The initial simple configuration uses the following assumptions:

The PowerConnect device was never configured before, and is in the same state as when you received it.

Содержание PowerConnect 28 SERIES

Страница 1: ...Dell PowerConnect 28xx Systems Getting Started Guide ...

Страница 2: ...c All rights reserved Reproduction in any manner whatsoever without the written permission of Dell Inc is strictly forbidden Trademarks used in this text Dell Dell OpenManage the DELL logo Inspiron Dell Precision Dimension OptiPlex PowerConnect PowerApp PowerVault Axim DellNet and Latitude are trademarks of Dell Inc Microsoft and Windows are registered trademarks of Microsoft Corporation Other tra...

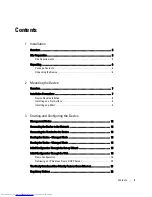
Страница 3: ...ng on a Wall 9 3 Starting and Configuring the Device Management Modes 12 Connecting the Device to the Network 12 Connecting the Terminal to the Device 13 Booting the Device Managed Mode 13 Booting the Device Managed Mode 15 Initial Configuration Through the Set up Wizard 15 Initial Configuration Through the Web 19 Basic Configuration 19 Retrieving an IP Address From a DHCP Server 20 The Newly Intr...

Страница 4: ...4 Contents DELL CONFIDENTIAL PRELIMINARY 1 10 12 FOR PROOF ONLY información NOM únicamente para México 22 Informação sobre Órgão Regulador 22 ...

Страница 5: ...gement features The PowerConnect management features are designed to minimize administrative management effort while enhancing and improving network traffic control The switch is delivered from the factory in Unmanaged Mode If users wish to use the switch as an unmanaged switch they can simply plug the switch in and start using it No configuration is necessary If the same user wishes to use the sw...

Страница 6: ...operating temperature range is 0 to 45 C 32 to 113 F at a relative humidity of up to 95 non condensing Verify that water or moisture cannot enter the device case Unpacking Package Contents While unpacking the device ensure that the following items are included The device AC power cable Self adhesive rubber pads for on shelf installation Rack mount kit for installation Documentation CD Product Info...

Страница 7: ...d or falling over Ensure that the power source circuits are properly grounded Observe and follow the service markings Do not service any device except as explained in the system documentation Opening or removing covers marked with a triangular symbol with a lighting bolt may cause electrical shock These components are to be serviced by trained service technicians only Ensure that the power cable e...

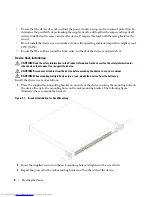
Страница 8: ...e Product Information Guide as well as the safety information for other devices that connect to or support the device CAUTION Disconnect all cables from the device before mounting the device in a rack or cabinet CAUTION When mounting multiple devices into a rack mount the devices from the bottom up Install the device in a rack as follows 1 Place the supplied rack mounting bracket on one side of th...

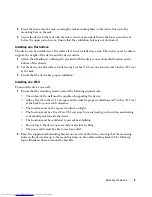
Страница 9: ...k 3 Ensure that the device has proper ventilation Installing on a Wall To mount the device on a wall 1 Ensure that the mounting location meets the following requirements The surface of the wall must be capable of supporting the device Allow at least 2 inches 5 1 cm space on the sides for proper ventilation and 5 inches 12 7 cm at the back for power cable clearance The location must not be exposed ...

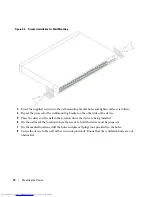
Страница 10: ...ing bracket on the other side of the device 5 Place the device on the wall in the location where the device is being installed 6 On the wall mark the locations where the screws to hold the device must be prepared 7 On the marked locations drill the holes and place all plugs not provided in the holes 8 Secure the device to the wall with screws not provided Ensure that the ventilation holes are not ...

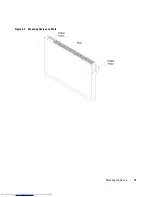
Страница 11: ...Mounting the Device 11 Figure 2 3 Mounting Device on a Wall ...

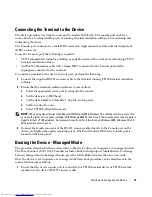
Страница 12: ...he Device to the Network To connect to an uplink port use Category 6 Shielded Twisted Pair STP cables with RJ 45 connectors at both ends The RJ 45 ports on the Ethernet device support automatic Media Dependent Interface Media Dependent Interface with internal crossover wiring MDI MDIX Standard straight through twisted pair cables can be used to connect to any other Ethernet network systems servers...

Страница 13: ...rmat to 8 data bits 1 stop bit and no parity d Set flow control to none e Select VT100 for Emulation mode NOTE When using HyperTerminal with Microsoft Windows 2000 Windows XP or Windows Vista ensure that you have the latest service packs installed With Windows 2000 Service Pack 2 the arrow keys function properly in HyperTerminal s VT100 emulation Go to www microsoft com for information on Windows ...

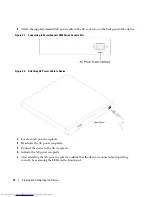
Страница 14: ...Connect 2800 Series Console Port Figure 3 2 Attaching AC Power Cable to Device 3 Locate an AC power receptacle 4 Deactivate the AC power receptacle 5 Connect the device to the AC receptacle 6 Activate the AC power receptacle 7 After activating the AC power receptacle confirm that the device is connected and operating correctly by examining the LEDs on the front panel ...

Страница 15: ...le 4 Connect the device to the AC receptacle 5 Activate the AC power receptacle When the power is turned on with the local terminal already connected the device goes through Power On Self Test POST POST runs every time the device is initialized and checks hardware components to determine if the device is fully operational before completely booting If a critical problem is detected the program flow...

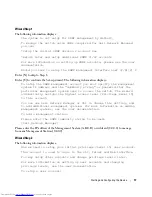
Страница 16: ...ute You can skip using the setup wizard and configure the device manually through the device CLI mode see Managing the Device Using the CLI on page 154 The Setup Wizard configures the following fields SNMP Community String and SNMP Management System IP address optional Username and Password Device IP address IP subnet mask Default Gateway IP address The Setup Wizard displays the following informat...

Страница 17: ...gement system uses to access the switch The wizard automatically assigns the highest access level Privilege Level 15 to this account You can use Dell Network Manager or CLI to change this setting and to add additional management systems For more information on adding management systems see the user documentation To add a management station Please enter the SNMP community string to be used Dell_Net...

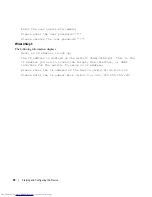
Страница 18: ...llowing information displays Next an IP address is set up The IP address is defined on the default VLAN VLAN 2 This is the IP address you use to access the Telnet Web interface or SNMP interface for the switch To setup an IP address Please enter the IP address of the device A B C D 10 6 22 100 Please enter the IP subnet mask A B C D or nn 255 255 255 224 ...

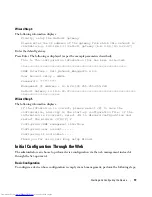
Страница 19: ...6 22 100 255 255 255 224 Default Gateway is 10 6 22 97 Wizard Step 5 The following information displays If the information is correct please select Y to save the configuration and copy to the start up configuration file If the information is incorrect select N to discard configuration and restart the wizard Y N Y Y Configuring SNMP management interface Configuring user account Configuring IP and s...

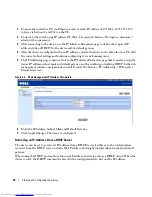
Страница 20: ...ins a link to the IP Interface Parameters page that is used to assign the device IP address subnet mask and default gateway and for enabling or disabling DHCP In the web management interface navigation menu at left select the System IP Addressing IP Interface Parameters screen Figure 3 3 Web management IP Interface Parameters 6 Enter the IP Address Subnet Mask and Default Gateway 7 Click Apply Cha...

Страница 21: ... network energy consumption using power saving technology that automatically reduces power consumption upon detection of a Link Down and or a Short Reach This ensures that networks use less power per port and are more eco friendly without giving up network integrity The Energy Detection and Short Reach modes are enabled by default ...

Страница 22: ...mação sobre Órgão Regulador A marca de certificação se aplica a este Equipamento de Rede de Dados Para maiores consultas sobre ANATEL visite o site www anatel gov br Exportador Dell Inc One Dell Way Round Rock TX 78682 Importador Dell México S A de C V Paseo de la Reforma 2620 11 Piso Col Lomas Altas 11950 México D F Enviar a Dell México S A de C V al Cuidado de Kuehne Nagel de México S de R L Ave...

Отзывы: