4-4-3
Math-coprocessor test failure
4-4-4
Cache test failure
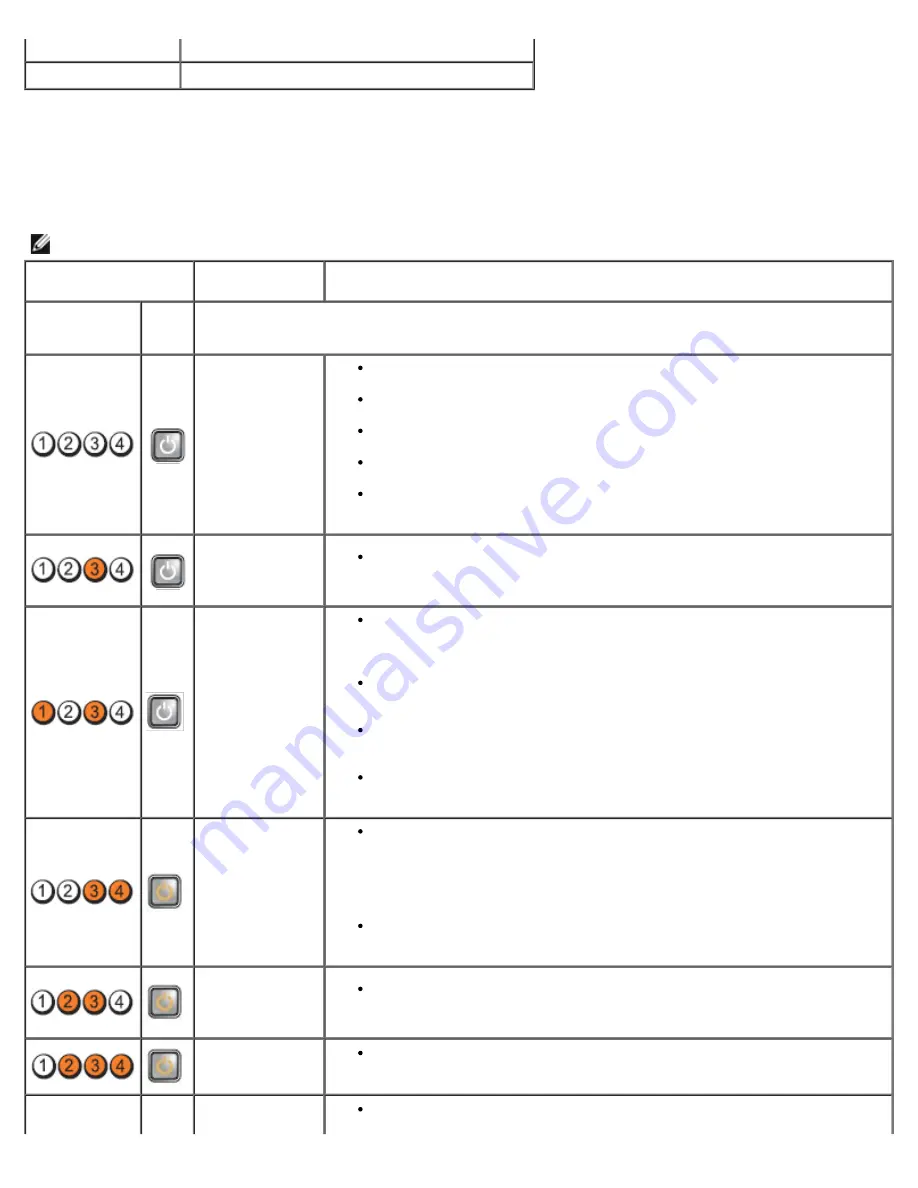
Diagnostic Lights
To help troubleshoot a problem, your computer has four lights labeled 1, 2, 3, and 4 on the bank panel. When the computer
starts normally, the lights flash before turning off. If the computer malfunctions, the sequence of the lights help to identify
the problem.
NOTE:
After the computer completes POST, all four lights turn off before booting to the operating system.
Light Pattern
Problem
Description
Suggested Resolution
Diagnostic LEDs
Power
Button
LED
The computer is
either turned off
or not receiving
power.
Reseat the power cable in the power connector on the back of the
computer and the electrical outlet.
Bypass power strips, power extension cables, and other power protection
devices to verify that the computer turns on properly.
Ensure that any power strips being used are plugged into an electrical
outlet and are turned on.
Ensure that the electrical outlet is working by testing it with another
device, such as a lamp.
Ensure that the main power cable and front panel cable are securely
connected to the system board.
A possible
system board
failure has
occurred.
Unplug the computer. Allow one minute for the power to drain. Plug the
computer into a working electrical outlet and press the power button.
A possible
system board,
power supply, or
peripheral failure
has occurred.
Power off computer, leaving the computer plugged in. Press and hold the
power supply test button on the rear of the power supply unit. If the LED
next to the switch illuminates, the problem may be with your system
board.
If the LED next to the switch does not illuminate, disconnect all internal
and external peripherals, and press and hold the power supply test
button. If it illuminates, there could be a problem with a peripheral.
If the LED still does not illuminate, remove the PSU connections from the
system board, then press and hold the power supply button. If it
illuminates, there could be a problem with the system board.
If the LED still does not illuminate, the problem is probably with the power
supply.
Memory modules
are detected, but
a memory power
failure has
occurred.
If two or more memory modules are installed, remove the modules, then
reinstall one module and restart the computer. If the computer starts
normally, continue to install additional memory modules (one at a time)
until you have identified a faulty module or reinstalled all modules without
error. If only one memory module is installed, try moving it to a different
DIMM connector and restart the computer.
If available, install verified working memory of the same type into your
computer.
A possible CPU or
system board
failure has
occurred.
Replace the CPU with a known good CPU. If the computer still fails to
boot, inspect the CPU socket for damage.
BIOS may be
corrupt or
missing.
The computer hardware is operating normally but the BIOS may be
corrupt or missing.
A possible
system board
Remove all peripheral cards from the PCI and PCI-E slots and restart the
computer. If the computer boots, add the peripheral cards back one by
Содержание OptiPlex 980 - Desktop
Страница 10: ...ft Airborne contaminant level G2 or lower as defined by ISA S71 04 1985 Back to Contents Page ...
Страница 13: ......
Страница 39: ...6 To remove the upper front panel release the tabs 7 Pull out and remove the front panel ...
Страница 45: ...5 Remove the metal cover from the wireless card assembly 6 Disconnect the antennae ...
Страница 47: ...9 Release and remove the antennae 10 Remove the WLAN board from the bracket ...
Страница 50: ...3 Disconnect the fan connector from the system board 4 Remove the screws from the processor fan shroud ...
Страница 55: ...7 Lift the processor cover 8 Remove the processor from the computer ...
Страница 63: ...3 Release the front thermal sensor cable 4 Release the hook to remove the front thermal Sensor ...
Страница 70: ...5 Release the control panel cable 6 Release the hooks and remove the control panel cover ...
Страница 71: ...7 Remove the screws 8 Remove the control panel ...
Страница 81: ...7 Remove the screws from the system board 8 Slide and remove the system board ...


