


Removing the system board
WARNING:
Before working inside your computer, read the safety information
that shipped with your computer and follow the steps in
Before working inside your computer
. After working inside your computer,
follow the instructions in
After working inside your computer
. For more safety
best practices, see the Regulatory Compliance home page at
www.dell.com/regulatory_compliance
.
NOTE:
Your computer’s Service Tag is stored in the system board. You must
enter the Service Tag in the BIOS setup program after you replace the system
board.
NOTE:
Replacing the system board removes any changes you have made to the
BIOS using the BIOS setup program. You must make the appropriate changes
again after you replace the system board.
NOTE:
Before disconnecting the cables from the system board, note the
location of the connectors so that you can reconnect the cables correctly after
you replace the system board.
Topics:
•
Prerequisites
•
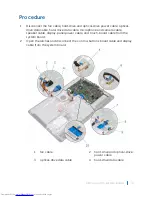
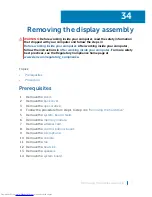
Procedure
Prerequisites
1
Remove the
stand
.
2 Remove the
back cover
.
3 Remove the
system-board shield
.
4 Remove the
heat sink
.
5 Remove the
memory module
.
6 Remove the
wireless card
.
32
Removing the system board
72
Содержание Inspiron 22 3000 SERIES
Страница 1: ...Inspiron 22 3000 Series Service Manual Regulatory Model W17B Regulatory Type W17B001 ...
Страница 25: ...1 stand riser 2 stand base Removing the stand assembly 25 ...
Страница 28: ...1 back cover Removing the back cover 28 ...
Страница 32: ...1 optical drive bezel 2 optical drive 3 optical drive bracket 4 screws 2 Removing the optical drive 32 ...
Страница 36: ...1 screws 3 2 hard drive bracket 3 hard drive Removing the hard drive 36 ...
Страница 39: ...1 system board shield 2 screws 4 3 display assembly base Removing the system board shield 39 ...
Страница 42: ...1 memory module 2 securing clips 2 3 memory module slot Removing the memory module 42 ...
Страница 49: ...3 Replace the stand Replacing the wireless card 49 ...
Страница 54: ...1 microphone cable 2 display assembly base 3 microphone module Removing the microphone 54 ...
Страница 58: ...1 tab 2 camera cable 3 camera frame Removing the camera 58 ...
Страница 61: ...1 coin cell battery 2 battery socket 3 plastic scribe Removing the coin cell battery 61 ...
Страница 64: ...1 fan 2 screws 2 3 display assembly base 4 fan cable 5 system board Removing the fan 64 ...
Страница 67: ...1 screw 2 heat sink 3 captive screws 5 Removing the heat sink 67 ...
Страница 70: ...1 speaker cable 2 routing guides 3 speakers 2 4 screw 5 tape 6 rubber grommets 4 Removing the speakers 70 ...
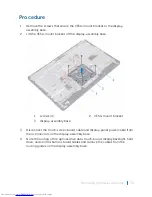
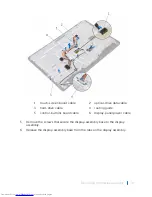
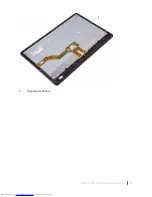
Страница 81: ...1 display assembly Removing the display assembly 81 ...
Страница 87: ...12 Replace the optical drive 13 Replace the back cover 14 Replace the stand Replacing the display cable 87 ...
Страница 91: ...12 Replace the back cover 13 Replace the stand Replacing the rubber feet 91 ...
Страница 104: ...2 Click or tap Display 3 Change the display settings as required Technology and components 104 ...


