background image

Steps

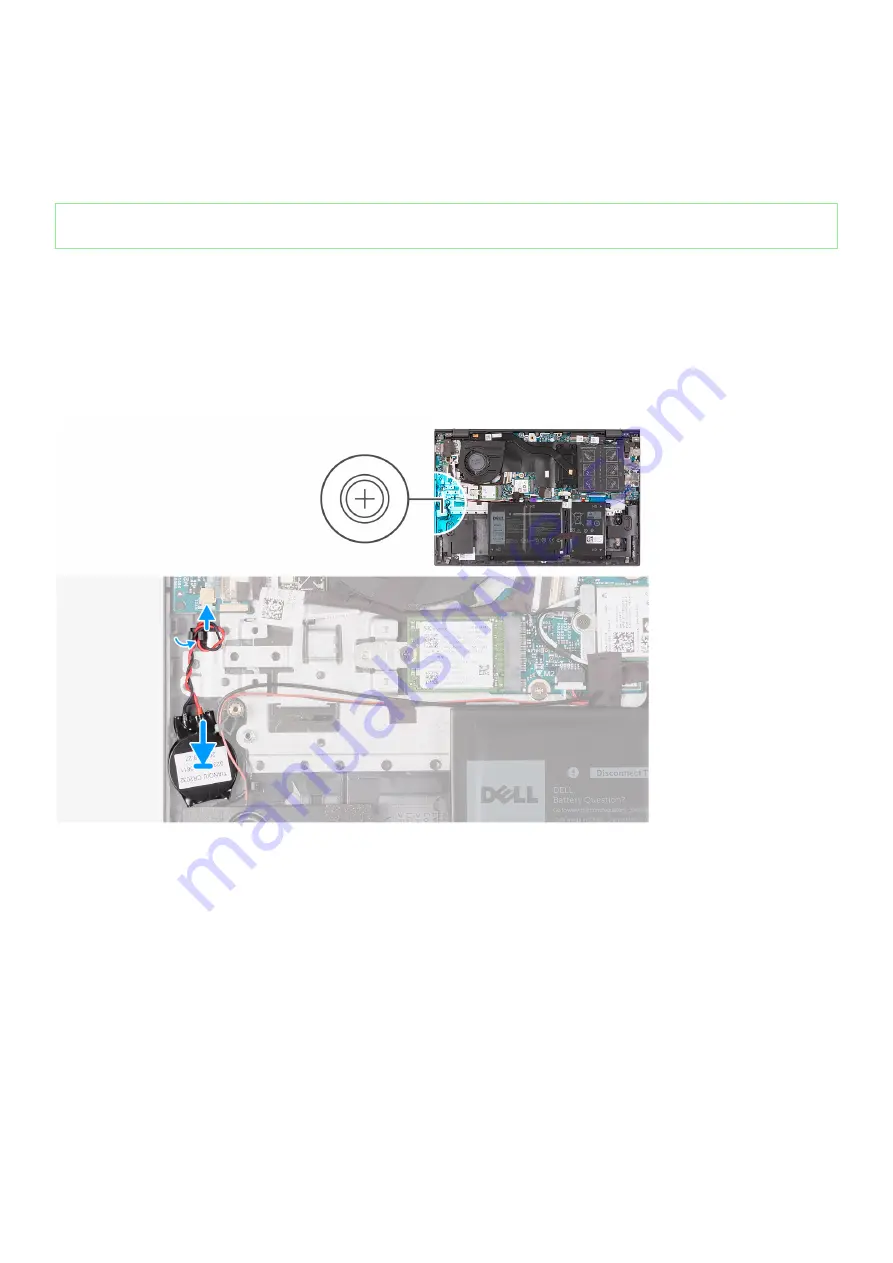
1. Disconnect the coin-cell battery cable from the I/O board.
2. Remove the coin-cell battery cable from the routing guides on the palm-rest and keyboard assembly.
3. Peel the coin-cell battery from the palm-rest and keyboard assembly.

Identifier

GUID-32BC69F1-A5F4-48F1-B6CB-6357A9281725

Version

1

Status

Released

Installing the coin-cell battery

Prerequisites

If you are replacing a component, remove the existing component before performing the installation procedure.

About this task

The following image indicates the location of the coin-cell battery and provides a visual representation of the installation procedure.

Steps

1. Adhere the coin-cell battery in the coin-cell battery slot on the palm-rest and keyboard assembly.
2. Route the coin-cell battery cable through the routing guides on the palm-rest and keyboard assembly.
3. Connect the coin-cell battery cable to the I/O board.

Next steps

1. Install the 

base cover

.

2. Follow the procedure in 

after working inside your computer

.

40

Removing and installing components

Содержание Inspiron 14 5408

Страница 1: ...Inspiron 14 5408 Service Manual Regulatory Model P130G Regulatory Type P130G001 ...

Страница 2: ...N A CAUTION indicates either potential damage to hardware or loss of data and tells you how to avoid the problem WARNING A WARNING indicates a potential for property damage personal injury or death 2020 Dell Inc or its subsidiaries All rights reserved Dell EMC and other trademarks are trademarks of Dell Inc or its subsidiaries Other trademarks may be trademarks of their respective owners May 2020 ...

Страница 3: ... 22 Solid state drive M 2 slot one 24 Removing the 2230 solid state drive in M 2 slot one 24 Installing the 2230 solid state drive in M 2 slot one 25 Removing the 2280 solid state drive in M 2 slot one 26 Installing the 2280 solid state drive in M 2 slot one 26 Replacing the SSD 1 support bracket 27 Solid state drive M 2 slot two 28 Removing the 2230 solid state drive in M 2 slot two 28 Installing...

Страница 4: ...ingerprint reader 58 Installing the power button with optional fingerprint reader 59 System board 60 Removing the system board 60 Installing the system board 62 Palm rest and keyboard assembly 65 Removing the palm rest and keyboard assembly 65 Installing the palm rest and keyboard assembly 66 3 Drivers and downloads 68 4 System setup 69 Entering BIOS setup program 69 Navigation keys 69 One time bo...

Страница 5: ...power rail built in self test L BIST 86 Display panel built in self test LCD BIST 87 Outcome 87 Recovering the operating system 88 System diagnostic lights 88 Enabling Intel Optane memory 89 Disabling Intel Optane memory 89 Flea power release 90 WiFi power cycle 90 6 Getting help and contacting Dell 91 Contents 5 ...

Страница 6: ...structions Use the following safety guidelines to protect your computer from potential damage and to ensure your personal safety Unless otherwise noted each procedure included in this document assumes that you have read the safety information that shipped with your computer NOTE Before working inside your computer read the safety information that is shipped with your computer For more safety best ...

Страница 7: ...POST No Video symptom with a beep code emitted for missing or nonfunctional memory Intermittent Intermittent failures represent approximately 80 percent of ESD related failures The high rate of intermittent failures means that most of the time when damage occurs it is not immediately recognizable The DIMM receives a static shock but the tracing is merely weakened and does not immediately produce o...

Страница 8: ...t can cause an ESD event On the work area insulators such as Styrofoam and other plastics should always be moved at least 12 inches or 30 centimeters away from sensitive parts before physically handling any hardware components ESD Packaging All ESD sensitive devices must be shipped and received in static safe packaging Metal static shielded bags are preferred However you should always return the d...

Страница 9: ...uter Steps 1 Replace all screws and ensure that no stray screws remain inside your computer 2 Connect any external devices peripherals or cables you removed before working on your computer 3 Replace any media cards discs or any other parts that you removed before working on your computer 4 Connect your computer and all attached devices to their electrical outlets 5 Turn on your computer Working in...

Страница 10: ...x This is to ensure that the correct number of screws and correct screw type is restored when the component is replaced NOTE Some computers have magnetic surfaces Ensure that the screws are not left attached to such surface when replacing a component NOTE Screw color may vary with the configuration ordered Table 1 Screw list Component Secured to Screw type Quantity Screw image Base cover Palm rest...

Страница 11: ...optional Palm rest and keyboard assembly M2 x 2 5 2 Power adapter port bracket Palm rest and keyboard assembly M2 x 3 1 USB 3 1 Type C port bracket System board M2 x 3 2 Hinge brackets Palm rest and keyboard assembly M2 5 x 5 4 I O board Palm rest and keyboard assembly M2 x 3 1 System board Palm rest and keyboard assembly M2 x 3 2 Identifier GUID 886E3D83 8D4A 45AB A75F D73DE55519DC Version 1 Stat...

Страница 12: ... 6 Speakers 7 System board 8 Touchpad 9 Display assembly 10 Palm rest and keyboard assembly 11 Power button with fingerprint reader 12 Coin cell battery 13 I O board 14 Fan 15 Wireless card 16 M 2 2280 solid state drive in M 2 slot one 12 Removing and installing components ...

Страница 13: ...8CC B870 B418CCD207D8 Version 1 Status Released Removing the base cover Prerequisites 1 Follow the procedure in before working inside your computer About this task The following images indicate the location of the base cover and provide a visual representation of the removal procedure Removing and installing components 13 ...

Страница 14: ... two captive screws that secure the base cover to the palm rest and keyboard assembly 2 Remove the five screws M2x4 that secure the base cover to the palm rest and keyboard assembly 14 Removing and installing components ...

Страница 15: ...ess and hold the power button for five seconds to ground the computer and drain the flea power Identifier GUID 406E7EAA DACC 4D13 A19E F2CDD2F5046D Version 1 Status Released Installing the base cover Prerequisites If you are replacing a component remove the existing component before performing the installation procedure About this task The following image indicates the location of the battery and ...

Страница 16: ...16 Removing and installing components ...

Страница 17: ...ws that secure the base cover to the palm rest and keyboard assembly Next steps 1 Follow the procedure in after working inside your computer Identifier GUID F65273B2 AF5E 4C69 B895 7CEF2148F79D Version 1 Status Released Battery Identifier GUID CB85D1BB 5792 47FE 9D62 86FAD680EB40 Version 1 Status Released Removing the 4 cell battery Prerequisites 1 Follow the procedure in before working inside you...

Страница 18: ...eyboard assembly Identifier GUID 1626F6EE 2D7F 4080 8B1B FBD1BC417208 Version 1 Status Released Installing the 4 cell battery Prerequisites If you are replacing a component remove the existing component before performing the installation procedure About this task The following image indicates the location of the battery and provides a visual representation of the installation procedure 18 Removing...

Страница 19: ...that secures the battery cable to the system board Next steps 1 Install the base cover 2 Follow the procedure in after working inside your computer Identifier GUID 686C64ED EC70 4722 8E70 0AA862E845ED Version 1 Status Released Removing the 3 cell battery Prerequisites 1 Follow the procedure in before working inside your computer 2 Remove the base cover About this task The following images indicate...

Страница 20: ...eyboard assembly Identifier GUID 765E753F ABE9 4401 9649 73ADC5E8FBF1 Version 1 Status Released Installing the 3 cell battery Prerequisites If you are replacing a component remove the existing component before performing the installation procedure About this task The following image indicates the location of the battery and provides a visual representation of the installation procedure 20 Removing...

Страница 21: ...d and adhere the tape that secures the battery cable to the system board Next steps 1 Install the base cover 2 Follow the procedure in after working inside your computer Identifier GUID 5E57D4F0 475A 4136 85C3 F4509661C1B0 Version 1 Status Released Memory module Identifier GUID E3ECA168 1D53 4D2C A9E3 3F81F1146E90 Version 1 Status Released Removing the memory module Prerequisites 1 Follow the proc...

Страница 22: ...ly spread apart the securing clips on each end of the memory module slot until the memory module pops up 3 Remove the memory module from the memory module slot Identifier GUID C401602C 7C19 4364 B8C3 C56687BB5764 Version 1 Status Released Installing the memory module Prerequisites If you are replacing a component remove the existing component before performing the installation procedure 22 Removin...

Страница 23: ... Align the notch on the memory module with the tab on the memory module slot 3 Slide the memory module firmly into the slot at an angle 4 Press the memory module down until it clicks into place NOTE If you do not hear the click remove the memory module and reinstall it Next steps 1 Install the base cover 2 Follow the procedure in after working inside your computer Removing and installing component...

Страница 24: ...puters shipped with a 2230 solid state drive installed in M 2 slot one NOTE Depending on the configuration ordered your computer may support a 2230 solid state drive or a 2280 solid state drive in M 2 slot one The following image indicates the location of the 2230 solid state drive that is installed in M 2 slot one and provides a visual representation of the removal procedure Steps 1 Remove the sc...

Страница 25: ... 2280 solid state drive in M 2 slot one NOTE Install the solid state drive mounting bracket if it is not installed The following image indicates the location of the 2230 solid state drive that is installed in M 2 slot one and provides a visual representation of the installation procedure Steps 1 Align the notches on the solid state drive with the SSD1 slot on the system board 2 Slide the solid sta...

Страница 26: ...following image indicates the location of the 2280 solid state drive Intel Optane storage that is installed in M 2 slot one and provides a visual representation of the removal procedure Steps 1 Remove the screw M2x3 that secures the solid state drive Intel Optane storage to the palm rest and keyboard assembly 2 Slide and lift the solid state drive Intel Optane storage off the SSD1 slot on the syst...

Страница 27: ...solid state drive Intel Optane storage with the SSD1 slot on the system board 2 Slide the solid state drive Intel Optane storage into the SSD1 slot on the system board 3 Replace the screw M2x3 that secures the solid state drive Intel Optane storage to the palm rest and keyboard assembly Next steps 1 Install the base cover 2 Follow the procedure in after working inside your computer Identifier GUID...

Страница 28: ...eased Removing the 2230 solid state drive in M 2 slot two Prerequisites NOTE This procedure applies only to computers shipped with a 2230 solid state drive installed in M 2 slot two NOTE Depending on the configuration ordered your computer may support a 2230 solid state drive or a 2280 solid state drive in M 2 slot two 1 Follow the procedure in before working inside your computer 2 Remove the base...

Страница 29: ...de and lift the solid state drive off the SSD2 slot on the system board Identifier GUID 536EECFB 0533 4CDF BDE0 884E5F50BBC0 Version 1 Status Released Installing the 2230 solid state drive in M 2 slot two Prerequisites If you are replacing a component remove the existing component before performing the installation procedure About this task NOTE This procedure applies only to computers shipped wit...

Страница 30: ... the SSD2 slot on the system board 2 Slide the solid state drive into the SSD2 slot on the system board 3 Replace the screw M2x3 that secures the solid state drive to the palm rest and keyboard assembly 4 Place the solid state drive bracket on the solid state drive 5 Align the screw holes on the solid state drive bracket with the screw holes on the system board and the palm rest and keyboard assem...

Страница 31: ...d state drive installed in M 2 slot two NOTE Depending on the configuration ordered your computer may support a 2230 solid state drive or a 2280 solid state drive in M 2 slot two The following image indicates the location of the 2280 solid state drive Intel Optane storage that is installed in M 2 slot two and provides a visual representation of the removal procedure Steps 1 Remove the screw M2x3 t...

Страница 32: ... replacing a component remove the existing component before performing the installation procedure About this task NOTE This procedure applies only to computers shipped with a 2280 solid state drive installed in M 2 slot two NOTE Depending on the configuration ordered your computer may support a 2230 solid state drive or a 2280 solid state drive in M 2 slot two NOTE Install the solid state drive mo...

Страница 33: ... to the palm rest and keyboard assembly 4 Place the solid state drive bracket on the solid state drive 5 Align the screw holes on the solid state drive bracket with the screw holes on the system board and the palm rest and keyboard assembly 6 Replace the screw M2x3 that secures the solid state drive bracket to the palm rest and keyboard assembly Next steps 1 Install the base cover 2 Follow the pro...

Страница 34: ...Remove the SSD support bracket from the support bracket slot 3 Depending on the type of solid state drive M 2 2230 M 2 2280 align and insert the SSD support bracket into the support bracket slot 4 Replace the screw M1 6x2 5 that secures the SSD support bracket to the palm rest and keyboard assembly 5 Install the solid state drive Identifier GUID C60E500D 4773 4C02 91AA B98AB0DC46C6 Version 1 Statu...

Страница 35: ...e antenna cables from the WLAN card 4 Slide and remove the WLAN card from the WLAN card slot Identifier GUID C78396BF A6EC 4395 912E D70CD2230D43 Version 1 Status Released Installing the WLAN card Prerequisites If you are replacing a component remove the existing component before performing the installation procedure About this task The following image indicates the location of the WLAN card and p...

Страница 36: ... black triangle Black 2 Align the notch on the WLAN card with the tab on the WLAN card slot and insert the WLAN card at an angle into the WLAN card slot 3 Place the WLAN card bracket on the WLAN card 4 Align the screw hole on the WLAN card bracket and the screw hole on the system board 5 Replace the screw M2x3 that secures the WLAN card to the system board Next steps 1 Install the base cover 2 Fol...

Страница 37: ...2F9EDDBD8 Version 1 Status Released Removing the fan Prerequisites 1 Follow the procedure in before working inside your computer 2 Remove the base cover About this task The following images indicate the location of the system fan and provide a visual representation of the removal procedure Removing and installing components 37 ...

Страница 38: ...y 5 Lift the fan off the palm rest and keyboard assembly Identifier GUID EEC61757 B015 4C2D B91F F47C90BBF6D8 Version 1 Status Released Installing the system fan Prerequisites If you are replacing a component remove the existing component before performing the installation procedure About this task The following image indicates the location of the system fan and provides a visual representation of...

Страница 39: ... the mylar that covers the fan cable Next steps 1 Install the base cover 2 Follow the procedure in after working inside your computer Identifier GUID D99D5F9B 0FF3 406B A51F FFA061BB89EA Version 1 Status Released Coin cell battery Identifier GUID F950F53C BF01 4A38 AE01 5DCE5BED09F2 Version 1 Status Released Removing the coin cell battery Prerequisites 1 Follow the procedure in before working insi...

Страница 40: ...isting component before performing the installation procedure About this task The following image indicates the location of the coin cell battery and provides a visual representation of the installation procedure Steps 1 Adhere the coin cell battery in the coin cell battery slot on the palm rest and keyboard assembly 2 Route the coin cell battery cable through the routing guides on the palm rest a...

Страница 41: ...ion of the removal procedure Steps 1 Remove the two M2 5x5 screws that secure the right display hinge to the system board 2 Disconnect the power adapter port cable from the system board 3 Remove the M2x3 screw that secures the power adapter port to the palm rest and keyboard assembly 4 Lift the power adapter port off the palm rest and keyboard assembly Identifier GUID 9D390BB3 0754 4E82 8E35 8C2DC...

Страница 42: ... the screw holes on the display hinges with the screw holes on the system board 6 Replace the two M2 5x5 screws that secure the right display hinge to the system board Next steps 1 Install the base cover 2 Follow the procedure in after working inside your computer Identifier GUID E641BD48 9062 46FE 8F5A 723887A0921D Version 2 Status Released Display assembly Identifier GUID E8A2E7C5 D091 4256 BAE6...

Страница 43: ...Removing and installing components 43 ...

Страница 44: ...lay hinges 6 Slide the palm rest and keyboard assembly off the display assembly 7 After performing the above steps you are left with the display assembly Identifier GUID 2D05C0E7 0818 4F10 A9B4 6CA8CE1F5827 Version 1 Status Released Installing the display assembly Prerequisites If you are replacing a component remove the existing component before performing the installation procedure About this ta...

Страница 45: ...Removing and installing components 45 ...

Страница 46: ...r on the system board then firmly press into position Next steps 1 Install the base cover 2 Follow the procedure in after working inside your computer Identifier GUID A4EB1B18 E790 4DC7 A6B0 85015144D8CE Version 2 Status Released I O board Identifier GUID 7184C87F 3DE9 445E A815 5EF73EC30518 Version 1 Status Released Removing the I O board Prerequisites 1 Follow the procedure in before working ins...

Страница 47: ... a component remove the existing component before performing the installation procedure About this task The following image indicates the location of the I O board and provides a visual representation of the installation procedure Steps 1 Place the I O board on the palm rest and keyboard assembly 2 Replace the M2x3 screw that secures the I O board to the palm rest and keyboard assembly 3 Connect t...

Страница 48: ...BE 7EE6 4064 8432 F193016319C9 Version 1 Status Released Removing the touchpad Prerequisites 1 Follow the procedure in before working inside your computer 2 Remove the base cover 3 Remove the battery About this task The following images indicate the location of the touchpad and provide a visual representation of the removal procedure 48 Removing and installing components ...

Страница 49: ...est and keyboard assembly 5 Lift the touchpad off the palm rest and keyboard assembly Identifier GUID F8D51BD1 7E77 4C02 A267 D7080F967E63 Version 1 Status Released Installing the touchpad Prerequisites If you are replacing a component remove the existing component before performing the installation procedure About this task The following image indicates the location of the touchpad and provides a...

Страница 50: ...palm rest and keyboard assembly 4 Align and place the touchpad bracket into the slot on the palm rest and keyboard assembly 5 Replace the three M1 6x2 screws that secure the touchpad bracket to the palm rest and keyboard assembly 6 Connect the touchpad cable to the system board and close the latch Next steps 1 Install the battery 2 Install the base cover 3 Follow the procedure in after working ins...

Страница 51: ...s Released Removing the speakers in 4 cell battery configuration Prerequisites 1 Follow the procedure in before working inside your computer 2 Remove the base cover 3 Remove the battery About this task The following images indicate the location of the speaker and provide a visual representation of the removal procedure Removing and installing components 51 ...

Страница 52: ...fting the speakers 4 Lift the speakers along with the cable off the palm rest and keyboard assembly Identifier GUID FEBF1B88 E7AD 49A9 9100 02B08F97C798 Version 1 Status Released Installing the speakers in 4 cell battery configuration Prerequisites If you are replacing a component remove the existing component before performing the installation procedure About this task The following image indicat...

Страница 53: ...the keyboard backlight cable and the keyboard cable to the system board Next steps 1 Install the battery 2 Install the base cover 3 Follow the procedure in after working inside your computer Identifier GUID 4763D26B 7C39 4B91 8B4D F3949F445181 Version 1 Status Released Removing the speakers in 3 cell battery configuration Prerequisites 1 Follow the procedure in before working inside your computer ...

Страница 54: ...fting the speakers 4 Lift the speakers along with the cable off the palm rest and keyboard assembly Identifier GUID D3BE3FB5 C2BF 4B96 9BCB 4A433DF4F572 Version 1 Status Released Installing the speakers in 3 cell battery configuration Prerequisites If you are replacing a component remove the existing component before performing the installation procedure About this task The following image indicat...

Страница 55: ...back in place before replacing the speakers 2 Route the speaker cable through the routing guides on the palm rest and keyboard assembly 3 Connect the speaker cable to the system board 4 Connect the keyboard backlight cable and the keyboard cable to the system board Next steps 1 Install the battery 2 Install the base cover 3 Follow the procedure in after working inside your computer Removing and in...

Страница 56: ...k The oils in your skin can reduce the heat transfer capability of the thermal grease NOTE The heat sink may become hot during normal operation Allow sufficient time for the heat sink to cool before you touch it The following images indicate the location of the heat sink and provide a visual representation of the removal procedure Steps 1 In the reverse order 7 6 5 4 3 2 1 loosen the seven captive...

Страница 57: ...e following image indicates the location of the heat sink and provides a visual representation of the installation procedure Steps 1 Place the heat sink on the system board and align the screw holes on the heat sink with the screw holes on the system board 2 In sequential order 1 2 3 4 5 6 7 tighten the seven captive screws that secure the heat sink to the system board NOTE The number of screws va...

Страница 58: ...tion of the removal procedure Steps 1 Remove the screw M2x2 that secures the power button bracket to the palm rest and keyboard assembly 2 Lift the power button bracket off the palm rest and keyboard assembly 3 Remove the two screws M2x2 5 that secure the power button to the palm rest and keyboard assembly 4 Peel off the fingerprint reader board optional and the power button cable from the palm re...

Страница 59: ...lace the power button on the palm rest and keyboard assembly 2 Adhere the fingerprint reader board optional and the power button cable on the palm rest and keyboard assembly 3 Replace the two screws M2x2 5 that secure the power button with fingerprint reader to the palm rest and keyboard assembly 4 Align and place the power button bracket on the power button 5 Replace the screw M2x2 that secures t...

Страница 60: ...ure in before working inside your computer 2 Remove the base cover 3 Remove the memory module 4 Remove the WLAN card 5 Remove the solid state drive in M 2 slot one 6 Remove the solid state drive in M 2 slot two 7 Remove the battery 8 Remove the heat sink About this task The following images indicate the location of the system board and provide a visual representation of the removal procedure 60 Re...

Страница 61: ...Removing and installing components 61 ...

Страница 62: ...the system board 10 Disconnect the speaker cable from the system board 11 Disconnect the touchpad cable from the system board 12 Disconnect the keyboard backlight cable from the system board 13 Disconnect the keyboard cable from the system board 14 Remove the two M2x3 screws that secure the system board to the palm rest and keyboard assembly Identifier GUID 2CA11EDA 3534 4207 BBBC 9DCF125BBE3F Ver...

Страница 63: ...Removing and installing components 63 ...

Страница 64: ...he system board 9 Adhere the tape that covers the USB Type C port bracket 10 Connect the I O board cable to the system board and close the latch 11 Connect the fan cable to the system board 12 Adhere the mylar that covers the I O board cable 13 Connect the power adapter port cable to the system board 14 Connect the display cable to the system board and close the latch 15 Adhere the transparent tap...

Страница 65: ...es 1 Follow the procedure in before working inside your computer 2 Remove the base cover 3 Remove the memory module 4 Remove the WLAN card 5 Remove the solid state drive in M 2 slot one 6 Remove the solid state drive in M 2 slot two 7 Remove the fan 8 Remove the battery 9 Remove the power adapter port 10 Remove the display assembly 11 Remove the I O board 12 Remove the touchpad 13 Remove the coin ...

Страница 66: ...nstalling the palm rest and keyboard assembly Prerequisites If you are replacing a component remove the existing component before performing the installation procedure About this task Place the palm rest and keyboard assembly on a flat surface 66 Removing and installing components ...

Страница 67: ...7 Install the I O board 8 Install the display assembly 9 Install the power adapter port 10 Install the battery 11 Install the fan 12 Install the solid state drive in M 2 slot two 13 Install the solid state drive in M 2 slot one 14 Install the WLAN card 15 Install the memory module 16 Install the base cover 17 Follow the procedure in after working inside your computer Removing and installing compon...

Страница 68: ...1B8A47E387E Version 1 Status Released Drivers and downloads When troubleshooting downloading or installing drivers it is recommended that you read the Dell Knowledge Based article Drivers and Downloads FAQ SLN128938 3 68 Drivers and downloads ...

Страница 69: ... type of hard drive installed and enabling or disabling base devices Identifier GUID DACDEF92 BD0F 40C4 B280 5E81EB67A4C5 Version 1 Status Released Entering BIOS setup program Steps 1 Turn on your computer 2 Press F2 immediately to enter the BIOS setup program NOTE If you wait too long and the operating system logo appears continue to wait until you see the desktop Then turn off your computer and ...

Страница 70: ... GUID BFFA76A3 0626 42E1 9867 8EBFC7BDA0DD Version 2 Status Released System setup options NOTE Depending on this computer and its installed devices the items that are listed in this section may or may not be displayed Table 4 System setup options System information menu Overview BIOS Version Displays the BIOS version number Service Tag Displays the Service Tag of the computer Asset Tag Displays th...

Страница 71: ...nology Displays the technology that is used for the memory Device Information Video Controller Displays the integrate graphics information of the computer dGPU Video Controller Displays the discrete graphics information of the computer Video BIOS Version Displays the video BIOS version of the computer Video Memory Displays the video memory information of the computer Panel Type Displays the Panel ...

Страница 72: ... drive optical drive and USB drive Enable External USB Ports Enables or disables USB ports to be functional in an operating system environment SATA Operation Configures operating mode of the integrated SATA hard drive controller Default RAID SATA is configured to support RAID Intel Rapid Restore Technology Drives Enables or disables various onboard drives M 2 PCIe SSD 0 SATA 2 Default ON SATA 0 De...

Страница 73: ...em and hard drive password without the need for admin password Default ON Non Admin Setup Changes Allow Wireless Switch Changes Enables or disables changes to the setup option when an Administrator password is set Default OFF Enable UEFI Capsule Firmware Updates Enables or disables BIOS updates through UEFI capsule update packages Computrace Enable or disable the BIOS module interface of the optio...

Страница 74: ...ion needs to be turned off Secure Boot Mode Selects the Secure Boot operation mode Default Deployed Mode NOTE Deployed Mode should be selected for normal operation of Secure Boot Table 10 System setup options Expert Key Management menu Expert Key Management Enable Custom Mode Enables or disables the keys in the PK KEK db and dbx security key databases to be modified Default OFF Custom Mode Key Man...

Страница 75: ...dvanced Battery Charged maximizes battery health while still supporting heavy use during the work day Default OFF Block Sleep Blocks the computer from entering Sleep S3 mode in the operating system Default OFF NOTE If enabled the computer will not go to sleep Intel Rapid Start will be disabled automatically and the operating system power option will be blank if it was set to Sleep Enable USB Wake ...

Страница 76: ...go Enabled or disabled the computer to display full screen logo if the image match screen resolution Default OFF Warnings and Errors Selects an action on encountering a warning or error during boot Default Prompt on Warnings and Errors Stop prompt and wait for user input when warnings or errors are detected NOTE Errors deemed critical to the operation of the computer hardware will always halt the ...

Страница 77: ...lt OFF Allow BIOS Downgrade Controls flashing of the system firmware to previous revisions Default ON Table 17 System setup options System Logs menu System Logs Power Event Log Displays Power events Default Keep BIOS Event Log Displays BIOS events Default Keep Thermal Event Log Displays Thermal events Default Keep Table 18 System setup options SupportAssist menu SupportAssist Dell Auto operating s...

Страница 78: ...tatus Released Updating BIOS on systems with BitLocker enabled CAUTION If BitLocker is not suspended before updating the BIOS the next time you reboot the system it will not recognize the BitLocker key You will then be prompted to enter the recovery key to progress and the system will ask for this on each reboot If the recovery key is not known this can result in data loss or an unnecessary operat...

Страница 79: ...12 one time boot menu About this task BIOS Update You can run the BIOS update file from Windows using a bootable USB key or you can also update the BIOS from the F12 One Time boot menu on the system Most Dell systems built after 2012 have this capability and you can confirm by booting your system to the F12 One Time Boot Menu to see if BIOS FLASH UPDATE is listed as a boot option for your system I...

Страница 80: ...f the system could make the system fail to boot Steps 1 From a power off state insert the USB key where you copied the flash into a USB port of the system 2 Power on the system and press the F12 key to access the One Time Boot Menu Highlight BIOS Update using the mouse or arrow keys then press Enter 3 The flash BIOS menu will open and then click the Flash from file 4 Select external USB device 80 ...

Страница 81: ...5 Once the file is selected Double click the flash target file then press submit 6 Click the Update BIOS then system will reboot to flash the BIOS System setup 81 ...

Страница 82: ...eate a system password and a setup password to secure your computer CAUTION The password features provide a basic level of security for the data on your computer CAUTION Anyone can access the data that is stored on your computer if it is not locked and left unattended NOTE System and setup password feature is disabled Identifier GUID 84D45A70 0C01 4677 B066 55414B65F122 Version 1 Status Released A...

Страница 83: ... or change an existing System or Setup password if the Password Status is Locked About this task To enter the System Setup press F2F12 immediately after a power on or reboot Steps 1 In the System BIOS or System Setup screen select System Security and press Enter The System Security screen is displayed 2 In the System Security screen verify that Password Status is Unlocked 3 Select System Password ...

Страница 84: ...OS System Setup and System passwords About this task To clear the system or BIOS passwords contact Dell technical support as described at www dell com contactdell NOTE For information on how to reset Windows or application passwords refer to the documentation accompanying Windows or your application 84 System setup ...

Страница 85: ...sion 1 Status Released Built in self test BIST About this task There are three different types of BIST to check the performance of display power rail and system board These tests are important to evaluate if an LCD or system board needs a replacement 1 M BIST M BIST is the system board built in self test diagnostics tool that improves the diagnostics accuracy of system board embedded controller EC...

Страница 86: ... troubleshooting is required proceed with the applicable Guided Resolution for No Power No POST etc Identifier GUID C2F3CCAB 09CC 4255 ADF9 9F50CBA33665 Version 1 Status Released Display panel power rail built in self test L BIST About this task Next steps L BIST LCD Power Rail Test is an enhancement to the single LED error code diagnostics and is automatically initiated during POST L BIST isolate...

Страница 87: ...NOTE The sequence of colors may very due to different display panel vendor The user only needs to ensure that the colors are being displayed correctly without distortion or graphical anomalies 4 The computer reboots at the end of the last solid color Identifier GUID D4F2A8E7 9832 4A32 BED7 EC68B51A03BB Version 1 Status Released Outcome About this task The following table shows the outcome of runni...

Страница 88: ...Solid white Power adapter is connected and the battery has more than 5 percent charge Amber Computer is running on battery and the battery has less than 5 percent charge Off Power adapter is connected and the battery is fully charged Computer is running on battery and the battery has more than 5 percent charge Computer is in sleep state hibernation or turned off The power and battery status light ...

Страница 89: ...ne memory Reboot to complete enabling your Intel Optane memory NOTE Applications may take up to three subsequent launches after enablement to see the full performance benefits Identifier GUID CD2E8B90 160E 43C9 BA9D F0F6C6BAA458 Version 3 Status Released Disabling Intel Optane memory About this task CAUTION After disabling Intel Optane memory do not uninstall the driver for Intel Rapid Storage Tec...

Страница 90: ...Remove the battery 4 Press and hold the power button for 15 seconds to drain the flea power 5 Install the battery 6 Install the base cover 7 Turn on your computer Identifier GUID B4DD52FB C0FE 4818 9D7C A0D2BF4491D7 Version 1 Status Released WiFi power cycle About this task If your computer is unable to access the internet due to WiFi connectivity issues a WiFi power cycle procedure may be perform...

Страница 91: ...ubject or keyword in the Search box 3 Click Search to retrieve the related articles Learn and know the following information about your product Product specifications Operating system Setting up and using your product Data backup Troubleshooting and diagnostics Factory and system restore BIOS information See Me and My Dell at www dell com support manuals To locate the Me and My Dell relevant to yo...

Отзывы: