background image

Install the S60 System

|

14

Insert Optional Modules

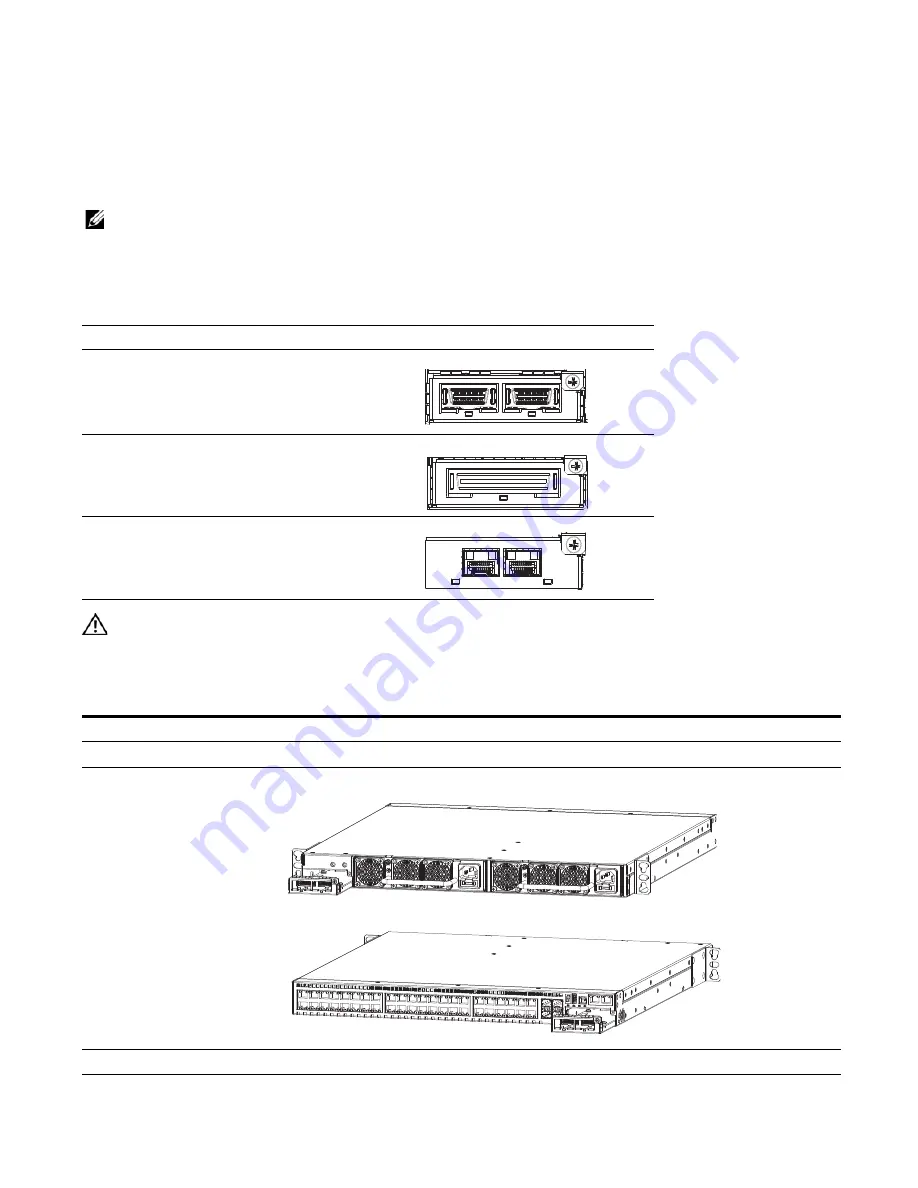
The S60 system has expansion slots at the front left and rear right of the system that you can use for 
stacking modules or for Small Form-Factor Pluggable Plus (SFP+) devices. 

Table 3-1

 lists the optional 

modules that you can install into these expansion slots. The optional modules are hot-swappable.


NOTE: 

Pre-configuring the interfaces for the optical module preserves the configuration if and when you 

remove an optical module. The optional 10G optical module is automatically recognized and the interfaces are 
created when you insert the module into the slot. However, if the system is not already configured for the 
interfaces, when you remove the optional module, the interfaces and their configurations are removed as well.


WARNING: 

ESD damage can occur if the components are mishandled. Always wear an ESD-preventive wrist 

or heel ground strap when handling the S60 system and its components.

To install an optional module, follow these steps:  

Table 3-1.

Optional Modules

Module Description

2-port, 12G stacking module

1-port, 24G stacking module

2-port, 10G SFP+ optical module

Step

Task

1

Remove the faceplate covering the module slot located at the rear left or front right of the S60 system. 

2

Remove the optional module from its packaging.

3

 Slide the optional module into the slot. 

4

Secure the captive screw on the side of the optional module. 

Содержание Force10 S60 Series

Страница 1: ...Installing the S60 System Publication Date December 2013 ...

Страница 2: ...e trademarks of Advanced Micro Devices Inc Microsoft Windows Windows Server Internet Explorer MS DOS Windows Vista and Active Directory are either trademarks or registered trademarks of Microsoft Corporation in the United States and or other countries Red Hat and Red Hat Enterprise Linux are registered trademarks of Red Hat Inc in the United States and or other countries Novell and SUSE are regist...

Страница 3: ...sert Optional Modules 14 Install the SFP and SFP Optics 15 Connect Stacking Ports Optional 15 Important Points to Know 15 Connect Two S60 Systems 17 Connect Three or More S60 Systems 18 Supply Power and Power Up the System 19 Power Up Sequence 19 AC Power 20 DC Power 20 Hot swap Units in a Stack 21 4 Power Supplies Components 22 Install an AC or DC Power Supply 23 Replace an AC or DC Power Supply ...

Страница 4: ...l Communications Commission FCC Statement 33 Canadian Department of Communication Statement 33 European Union EMC Directive Conformance Statement 34 European Community Contact 34 Japan VCCI Compliance for Class A Equipment 34 Korea Compliance 35 China Compliance 35 Safety Standards and Compliance Agency Certifications 35 Electromagnetic Compatibility EMC 36 Product Recycling and Disposal 36 SD Car...

Страница 5: ... the S60 system WARNING Only trained and qualified personnel can install the S60 system Read this guide before installing and powering up this equipment The S60 system contains two power cords Disconnect both power cords before servicing WARNING This equipment contains optical transceivers which comply with the limits of Class 1 laser radiation WARNING When no cable is connected visible and invisi...

Страница 6: ...ts and the grounding connectors The rear of the S60 Figure 2 2 contains the 44 ethernet ports optional module ports management ports and displays for alarms and stacking identification Figure 2 1 The Front of the S60 System Figure 2 2 The Rear of the S60 System NOTE The ethernet ports are labeled 0 43 When cabling these ports be sure not to interfere with the airflow from the small vent holes abov...

Страница 7: ...luded Copper fiber cables Other optional components are Additional PSU Additional fan module Optional modules if needed Stacking cables if stacking Hardware S60 44 port 10 100 1000 Base T with 4 SFP ports and 2 modular slots S60 44 port 10 100 1000 Base T with 4 SFP ports 2 modular slots 1 AC PSU and 1 fan subsystem S60 44 port 10 100 1000 Base T with 4 SFP ports 2 modular slots 1 DC PSU and 1 fan...

Страница 8: ... stacking modules Console port Universal Serial Bus USB A port USB B port System Status You can view S60 status information in several ways including physical displays and boot menu options You can also view status information through the Command Line Interface CLI show commands and with Simple Network Management Protocol SNMP traps For more information about these options refer to the FTOS Comman...

Страница 9: ...e 2 1 From left to right they are power alarm PSU0 PSU1 Table 2 1 System LED Displays Label LED Color Display Description Power PWR Green Blinking Green Yellow System is booting up System power supply is OK System power supply is operating outside the expected parameters Power Supply PSU0 Green Yellow All fans are OK At least one fan is operating outside the expected parameters Power Supply PSU1 G...

Страница 10: ...rt Green Link up on this port full traffic Blinking Green Activity transmitting or receiving packet at this port Off No traffic SFP Port LED Link Activity LED Green Link up on this port no activity taking place Blinking Green Activity transmitting or receiving packet at this port Off No link detected at this port Stacking Module LEDs Link Activity LED Green Link up on this port no activity taking ...

Страница 11: ...NING Electrostatic discharge ESD damage can occur if the components are mishandled Always wear an ESD preventive wrist or heel ground strap when handling the S60 system and its components As with all electrical devices take all the necessary safety precautions to prevent injury when installing this system Install the S60 System in a Rack or Cabinet Attach the Mounting Brackets The S60 system is sh...

Страница 12: ...teps Step Task 1 Take the brackets and screws out of their packaging 2 Attach the brackets to the rear sides of the chassis using four screws for each bracket Attach the bracket so that the ear faces to the rear and the outside of the chassis Step Task NOTE Dell Networking recommends one person holding the S60 chassis in place while another person attaches the brackets to the posts 1 Attach the br...

Страница 13: ...free from contamination NOTE The rack installation ears are not suitable for grounding CAUTION Grounding conductors must be made of copper Do not use aluminum conductors To connect the ground cable to the system follow these steps Step Task 1 Take the two 10 32 screws from the package 2 Cut the cable to the desired length The cable length must facilitate the proper operation of the fault interrupt...

Страница 14: ...e into the slot However if the system is not already configured for the interfaces when you remove the optional module the interfaces and their configurations are removed as well WARNING ESD damage can occur if the components are mishandled Always wear an ESD preventive wrist or heel ground strap when handling the S60 system and its components To install an optional module follow these steps Table...

Страница 15: ... are powered down or up Both ring topology and cascade topology connections are supported Figure 3 1 and Figure 3 2 The stacking ports are bi directional If you use the 2 port 12G stacking module the stacking ports are labeled 48 49 on the rear ethernet port side and 50 51 on the front PSU side If you use the 2 port 24G stacking module the stacking ports are labeled 48 on the rear ethernet port si...

Страница 16: ...rt connections rack mount the stacking systems or insert them into a cabinet Insert one end of the stacking cable into a stacking port and insert the other end into a stacking port of the adjacent switch To ensure the cable is secure in the connector hand tighten all the captive screws Ring Topology with 2 port 12G modules Switch 1 Switch 2 Switch 3 Cascade Topology with 2 port 12G modules Switch ...

Страница 17: ...equires the S60 systems be cabled across the front ports to rear port or vice versa Figure 3 4 To connect 1 port 24G stacking modules starting with the S60 at the bottom of the stack Figure 3 4 Two S60 Systems with 1 port 24G Stacking Modules Connected in a Ring Topology Step Task 1 Insert one end of the first cable into Stack Port 48 or 50 2 Insert the other end of the cable into Stack Port 48 or...

Страница 18: ... 1 Insert one end of the first cable into Stack Port 48 or 50 2 Insert the other end of the cable into Stack Port 48 or 50 of the middle S60 system 3 Insert the second cable into Stack Port 49 or 51 of the middle and top S60 systems 4 Use the remaining cable to connect the top and bottom S60 systems by inserting one end of the cable into the open Stack Port 49 or 51 of the bottom S60 system and th...

Страница 19: ...perature is within the limits specified for the S60 system there is sufficient airflow around the system the input circuits are correctly sized for the loads and that you use sufficient over current protection devices all the protective covers are in place you have installed blank panels if you did not install optional modules NOTE A US AC power cable is included in the shipping container for powe...

Страница 20: ...e 3 7 Ensure the power cord is secure As soon as the cable is connected between the S60 system and the power source the system is powered up there is no on off switch Figure 3 7 AC Power Connection DC Power To connect DC power Figure 3 8 follow these steps Figure 3 8 DC power connection Step Task 1 Remove the small plastic cover from the DC connectors 2 Attach the connectors to both the DC PSUs at...

Страница 21: ...w unit to the stack the unit will be gracefully added as Unit last the lowest unused number with the current configuration Attaching the unit causes each unit in the stack to reload and the subsequent configuration file in each unit includes the awareness of the new unit If you have a pre configured unit that you want to add to the stack but you want to make sure the configuration does not overrid...

Страница 22: ...nstalled and running you can remove and replace one PSU while the other PSU is running without disrupting traffic WARNING To prevent electrical shock ensure the S60 system is grounded properly If you do not ground your system correctly excessive emissions may result Use a qualified electrician to ensure that the power cables meet your local electrical requirements WARNING Electrostatic discharge E...

Страница 23: ...E For a Network Equipment Building System NEBS compliant installation to protect the AC power supplies from damage due to excessive power line surges the AC power connections must use a Surge Protection Device SPD NOTE To comply with the GR 1089 Lightning Criteria for Equipment Interfacing with AC Power Ports use an external SPD at the AC input of the router NOTE You must isolate the DC power retu...

Страница 24: ...nd disconnect the power cord from the PSU 2 For DC PSUs remove the small plastic cover over the DC connectors Do not throw the cover away you will put it back on when you complete the PSU replacement CAUTION You must complete steps 3 and 4 within one minute or the system powers down 3 Use the grab handle to slide the PSU out of the power supply bay 4 Use the grab handle on the replacement PSU to s...

Страница 25: ...e for example new equipment installation CAUTION Check the fan air filters at six month intervals and replace them as necessary In order to accurately determine air filter replacement intervals regularly monitor the speeds of the cooling fans An increase in overall fan speed may indicate a clogged filter You must replace the S60 fan filters with new filters you cannot clean and reuse the fan filte...

Страница 26: ... in a single piece with the fans For the procedure to replace the entire PSU refer to Chapter 4 Power Supplies To install a fan module follow these steps Replace a Fan Module Dell Networking recommends replacing the fan tray within five minutes If the fan tray is left out for too long the system may experience traffic disruption Step Task 1 Take the fan module out of the shipping box 2 Use the gra...

Страница 27: ...rs pop into the fan guards on the module There is no need to unscrew the filter guard To install a fan filter follow these steps Step Task 1 Loosen the securing screw at the top of the fan module CAUTION You must complete steps 2 and 3 within five minutes or the system powers down If a fan module is not installed in each slot either as part of the PSU or as an independent fan module the system pow...

Страница 28: ...on the upper right hand side on the rear of the S60 system Figure 6 1 S60 Serial Console Port Connector For the console port pin assignments refer to Table 6 1 To access the RJ 45 console port follow these steps Step Task 1 Install an RJ 45 copper cable into the console port Use a rollover cable to connect the S60 console port to a terminal server 2 Connect the other end of the cable to the DTE te...

Страница 29: ...ports on the rear of the S60 system Figure 6 2 S60 USB B Port Connector When you connect both the console port and the USB B port the S60 system defaults to the USB B port If the USB B port is connected the console connection is considered inactive NOTE Before starting this procedure be sure you have a terminal emulation program already installed on your PC You will also require the appropriate dr...

Страница 30: ...ble into the USB B console port on the S60 system 4 Power on the S60 system 5 Install the necessary USB device drivers an internet connection is required For assistance contact Dell Networking Technical Support 6 Open your terminal software emulation program to access the S60 system 7 Set the terminal connection settings as follows 9600 baud rate No parity 8 data bits 1 stop bit No flow control 8 ...

Страница 31: ...required Front 5 inches 12 7 cm Rear 5 inches 12 7 cm Thermal dissipation 597 BTU hr Power consumption 175 Watts nominal 225 Watts maximum Parameter Specifications Temperature 32 to 122 F 0 to 50 C 40 to 158 F 40 to 70 C non operating Maximum altitude No performance degradation to 10 000 feet 3 048 meters Relative humidity 10 to 85 non condensing 5 to 95 non condensing non operating Shock MIL STD ...

Страница 32: ... at both ends You can only use reverse airflow configurations in a NEBS compliant installation Use only supported Dell S60 AC power supply units DC power supply units and fans You must fit the Power Supply Units PSUs and fan modules with the supported Dell S60 filter kits You must replace the fan filters on a regular basis Use this equipment with an external second level 6kV lightning Surge Protec...

Страница 33: ...o provide reasonable protection against harmful interference when the equipment is operated in a commercial environment This equipment generates uses and can radiate radio frequency energy If it is not installed and used in accordance to the instructions it may cause harmful interference to radio communications Operation of this equipment in a residential area is likely to cause harmful interferen...

Страница 34: ...e derived for commercial and industrial environments to provide reasonable protection against interference with licensed communication equipment WARNING This is a Class A product In a domestic environment this device may cause radio interference in which case you may be required to take adequate measures European Community Contact For regulatory compliance refer to www dell com regulatory_complian...

Страница 35: ... Compliance Safety Standards and Compliance Agency Certifications CUS UL 60950 1 1st Edition CSA 60950 1 03 2nd Edition EN 60950 1 2nd Edition EN 60825 1 1st Edition EN 60825 1 Safety of Laser Products Part 1 Equipment Classification Requirements and User s Guide ...

Страница 36: ...equency Conducted Immunity Product Recycling and Disposal You must recycle or discard this system according to the applicable local and national regulations Dell Networking encourages owners of information technology IT equipment to responsibly recycle their equipment when it is no longer needed Dell Networking offers a variety of product return programs and services in several countries to assist...

Страница 37: ...mation on Dell Networking product recycling offerings see the WEEE Recycling instructions at http www euro dell com recycling For more information contact the Dell Networking Technical Assistance Center TAC see Contacting the Technical Assistance Center SD Card Removal To support high security environments you can remove and re install the SD card Dell Networking recommends only removing the card ...

Страница 38: ... its components As with all electrical devices take all the necessary safety precautions to prevent injury when installing this system To remove the battery follow these steps 4 Remove the card Step Task 1 Remove the small Phillips screws that connect the top to the body There are three evenly spaced screws across the rear and three evenly spaced screws along each side 2 Slide the top backwards un...

Страница 39: ...n the battery Pb for lead Hg for mercury and Cd for cadmium Users of batteries and accumulators must not dispose of batteries and accumulators as unsorted municipal waste but use the collection framework available to customers for the return recycling and treatment of batteries and accumulators Customer participation is important to minimize any potential effects of batteries and accumulators on t...

Страница 40: ...terial Special handling may apply See http www dtsc ca gov hazardouswaste perchlorate The foregoing notice is provided in accordance with California Code of Regulations Title 22 Division 4 5 Chapter 33 Best Management Practices for Perchlorate Materials ...

Страница 41: ...open and manage your Technical Assistance Center TAC cases Dell Networking iSupport provides integrated secure access to these services Accessing iSupport Services The URL for iSupport is https www force10networks com CSPortal20 Main SupportMain aspx To access iSupport services you must have a userid and password If you do not have one you can request one at the website To request a userid and pas...

Страница 42: ...g eventlog unit command where unit is the stack ID of the member unit that experienced the failure This report is included as a section in the output of show tech support non paged command Console captures showing the error messages Console captures showing the troubleshooting steps taken Saved messages to a syslog server if you use one Managing Your Case Log in to iSupport and select the Service ...

Страница 43: ...g information when using E mail or phone Part number description and serial number of the component Your name organization name telephone number fax number and E mail address Shipping address for the replacement component including a contact name phone number and E mail address A description of the failure including log messages This generally include Output from the show tech support non paged co...

Страница 44: ......

Страница 45: ...www de ll com sup por t de ll com Printed in the U S A ...

Отзывы: