


1 - 199
Chapter 1 Troubleshooting
FIP-1. 19 016-300/016-301/016-302/016-313/016-315/016-317/016-323/016-327/016-340/
016-344/016-345/016-346/016-347 Restart Printer
Reference_1:
1. Make sure that the printer is connected to the computer via USB port (remove the network cable).
Then, try downloading as follows:
1) Power on the printer while pressing the <X Cancel> and <
3
> buttons.
2) The printer goes into the Download Mode with a message "Download Mode Ready". Then,
activate firmware update tool and follow the instruction displayed.
While the firmware download is being executed, the printer displays a message
"Writing...USB F/W" and the computer displays a progress bar and may be
restarted during the downloading process. Never power off the printer or the
computer until the downloading process completes, and never interrupt the
downloading process.
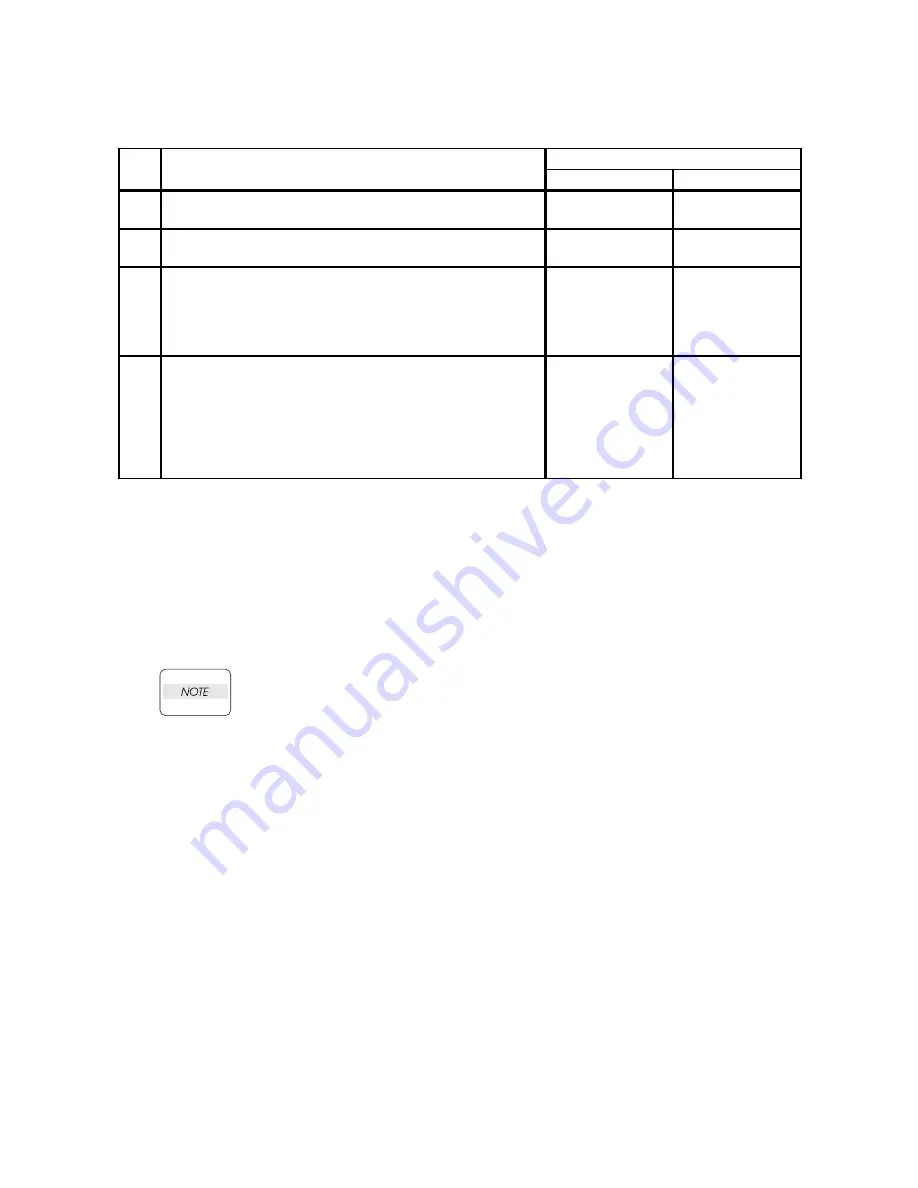
Step
Check
Remedy
Yes
No
Possible causative parts:
PWBA ESS (PL8.1.7)
1
Checking the error code.
Error code is 016-317 or 016-340?
Go to step 2.
Go to step 3.
2
Download the latest version of the firmware from the Dell
support website, and update the firmware with "F/W
Download DL Mode" .(Refer to Refernce_1.)
Does the error still occur when the power is turned off and
on?
Replace the
PWBA ESS.
(Refer to Removal
42/ Replacement
12.)
End of work.
3
Check whether the version of the firmware is the latest,
referring to the Printer Information via the Tool Box.
Checked by [Printer Information] of the [Printer Settings
Report] tab in Tool Box.
For the latest version information, refer to the Dell Support
Web Site.
Is the firmware the latest version?
Replace the
PWBA ESS.
(Refer to Removal
42/ Replacement
12.)
Download the
latest version of
the firmware from
the Dell Support
Web Site.
Содержание Color Laser Printer 2130cn
Страница 1: ...Dell 2130cn Service Manual 22 April 2010 ...
Страница 10: ...vii 4 5 2 Caution label for toner cartridges Rio00006KA ...
Страница 11: ...viii Wsb00007KA ...
Страница 12: ...ix Rio Service Manual Version 1 2008 02 29 4 5 3 Caution label for SSI and tray Rio00008KA ...
Страница 13: ...x 4 5 4 Caution label for ROS Rio00009KA ...
Страница 14: ...xi 4 5 5 Caution label for transfer belt and PHD unit Rio00005KA ...
Страница 15: ...xii Rio00012KA ...
Страница 16: ...xiii 4 5 6 Caution label for duplex Rio00013KA ...
Страница 17: ...xiv Blank Page ...
Страница 19: ...xvi Rio00011KB ...
Страница 335: ...1 309 Chapter 1 Troubleshooting Wsb02025KA ...
Страница 341: ...1 315 Chapter 1 Troubleshooting Chart Parallelism Perpendicularity ...
Страница 342: ...1 316 Chapter 1 Troubleshooting Skew Linearity Magnification Error Registration ...
Страница 406: ...Chapter 2 Operation of Diag Chapter 2 Operation of Diag CONTENTS ...
Страница 409: ...2 3 Chapter 2 Operation of Diag Blank Page ...
Страница 465: ...Chapter 3 Removal and Replacement Procedures RRPs 3 14 5 Lift up the FUSER ASSY move the FUSER ASSY to the right side ...
Страница 474: ...Chapter 3 Removal and Replacement Procedures RRPs 3 23 8 Remove the PWBA LVPS from the printer ...
Страница 480: ...Chapter 3 Removal and Replacement Procedures RRPs 3 29 10 Disengage the connector P J141 of the LED ASSY ERASE ...
Страница 497: ...Chapter 3 Removal and Replacement Procedures RRPs 3 46 15 Remove the SPRING ACT SSI from the ACTUATOR SSI ...
Страница 510: ...Chapter 3 Removal and Replacement Procedures RRPs 3 59 18 Remove the BUTTON LATCH FRONT from the LATCH ASSY FRONT ...
Страница 548: ...Chapter 3 Removal and Replacement Procedures RRPs 3 97 30 Remove the PWBA MCU from the printer ...
Страница 561: ...Chapter 3 Removal and Replacement Procedures RRPs 3 110 26 Lift up the ROS ASSY slowly from the printer ...
Страница 719: ...Chapter 5 Parts List Chapter 5 Parts List CONTENTS ...
Страница 726: ...5 7 Chapter 5 Parts List Blank Page ...
Страница 727: ...5 8 Chapter 5 Parts List Engineering parts list PL1 1 Cover 1 2 Illustration Rio05001KB 1 2 3 6 7 19 ...
Страница 729: ...5 10 Chapter 5 Parts List PL1 2 Cover 2 2 Illustration ...
Страница 731: ...5 12 Chapter 5 Parts List PL2 1 Paper Cassette Illustration ...
Страница 733: ...5 14 Chapter 5 Parts List PL3 1 Paper Feeder 1 2 Illustration ...
Страница 735: ...5 16 Chapter 5 Parts List PL3 2 Paper Feeder 2 2 Illustration ...
Страница 739: ...5 20 Chapter 5 Parts List PL5 1 Dispenser Illustration ...
Страница 741: ...5 22 Chapter 5 Parts List PL6 1 Transfer Fuser Illustration ...
Страница 743: ...5 24 Chapter 5 Parts List PL7 1 Drive Illustration ...
Страница 745: ...5 26 Chapter 5 Parts List PL8 1 Electrical 1 2 Illustration ...
Страница 747: ...5 28 Chapter 5 Parts List PL8 2 Electrical 2 2 Illustration ...
Страница 749: ...5 30 Chapter 5 Parts List PL9 1 Harness Illustration ...
Страница 753: ...5 34 Chapter 5 Parts List PL11 2 Duplex Option 2 2 Illustration Rio05014KA J604 J602 J603 1 2 3 10 5 9 6 7 8 6 7 7 7 9 ...
Страница 757: ...5 38 Chapter 5 Parts List PL12 2 250 Feeder Option 2 5 Illustration ...
Страница 763: ...5 44 Chapter 5 Parts List PL12 5 250 Feeder Option 5 5 Illustration ...
Страница 775: ...6 9 Chapter 6 Principles of Operation Blank Page ...
Страница 777: ...6 11 Chapter 6 Principles of Operation Kmy06007KA ...
Страница 782: ...6 16 Chapter 6 Principles of Operation 2 Paper Path 2 1 Paper Path Rio06010KA ...
Страница 787: ...6 21 Chapter 6 Principles of Operation Blank Page ...
Страница 799: ...6 33 Chapter 6 Principles of Operation Blank Page ...
Страница 803: ...6 37 Chapter 6 Principles of Operation 3 8 2 Reference diagram Rio06027KA DRIVE ASSY SUB DRIVE ASSY MAIN DRIVE ASSY PH ...
Страница 808: ...6 42 Chapter 6 Principles of Operation Blank Page ...
Страница 825: ...6 59 Chapter 6 Principles of Operation Blank Page ...
Страница 831: ...6 65 Chapter 6 Principles of Operation Blank Page ...
Страница 874: ...Chapter 8 Printer Specifications Chapter 8 Printer Specifications CONTENTS ...


