


24
|
RPMs and Line Cards
www.dell.com | support.dell.com
Removing RPMs and Line Cards
WARNING:
After removing an RPM, place a panel blank in the empty slot before powering up the chassis.
Blanks are required to control airflow and electromagnetic interference.
NOTE:
The C7004/C150 requires at least one RPM to operate. The system enters a software-defined power-
down state if you remove the only RPM.
To remove a C7004/C150 RPM or line card:
Step
Task
1
Unplug any network interface cables connected to the card.
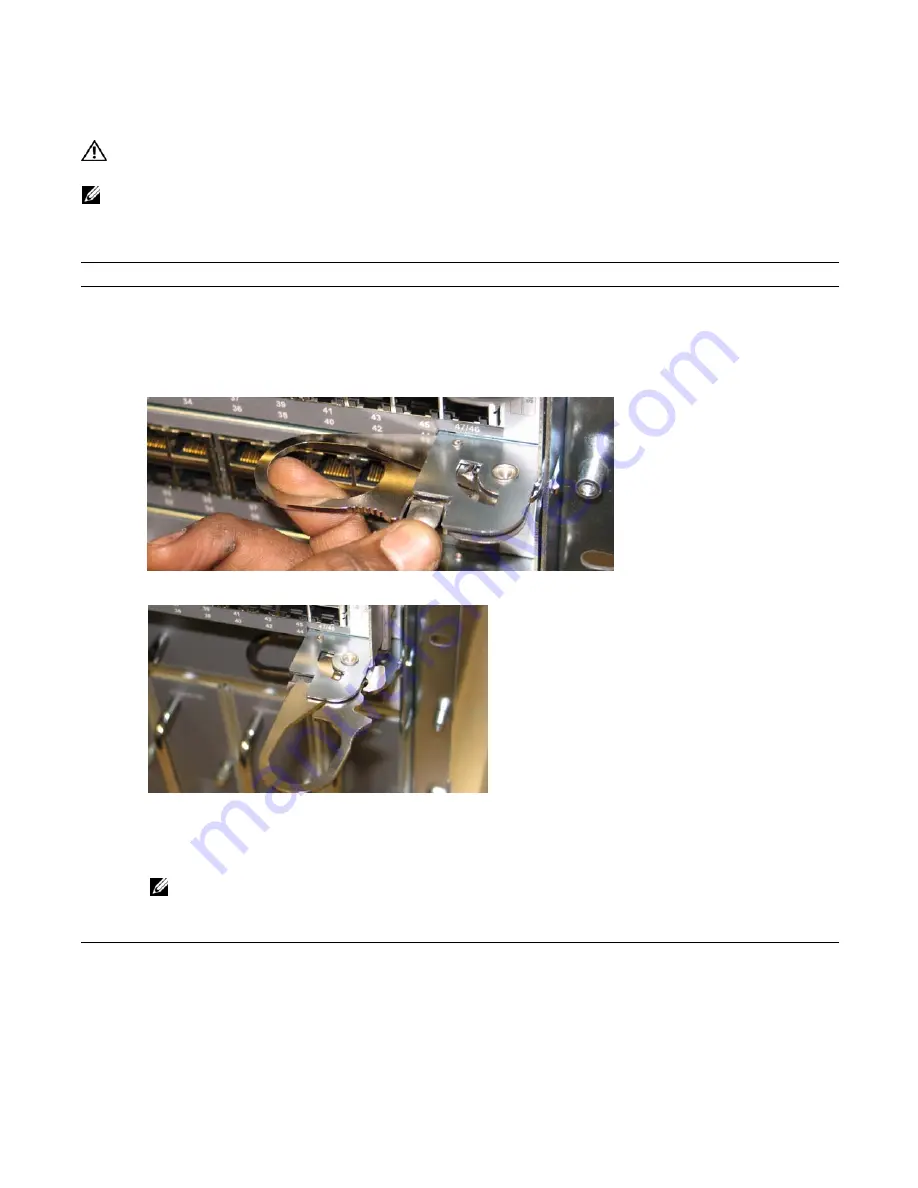
2
Extend the left and right card levers by first pressing gently down on the thumb tabs (see
levers and then pulling the ejector levers simultaneously until they are in the open position. See
.
Figure 5-7. Depressing the Thumb Tabs
Figure 5-8. Extending the Levers
3
Pull the card by the card levers until it is out of the slot. Avoid touching the printed circuit board and connector
pins.
4
Install a blank panel in all slots that do not have a card, and secure it with the screws provided.
NOTE:
The blank panels for RPMs and line cards are different sizes (RPM blanks are smaller); be sure that
blank panels are installed in the correct slots.
5
If you are replacing the card, follow the instructions in
Installing RPMs and Line Cards on page 21
.
Содержание C7004/C150
Страница 1: ...Installing and Maintaining the C7004 C150 System ...
Страница 6: ...6 Contents w w w d e l l c o m s u p p o r t d e l l c o m ...
Страница 14: ...14 Preparing the Site w w w d e l l c o m s u p p o r t d e l l c o m ...
Страница 18: ...18 Installing the C7004 C150 Chassis w w w d e l l c o m s u p p o r t d e l l c o m ...
Страница 28: ...28 Management Cable Pinout w w w d e l l c o m s u p p o r t d e l l c o m ...
Страница 40: ...40 Installing DC Power Entry Modules w w w d e l l c o m s u p p o r t d e l l c o m ...
Страница 44: ...44 Powering Up w w w d e l l c o m s u p p o r t d e l l c o m ...
Страница 61: ...System Specifications 61 Figure B 2 Chassis Dimensions Depth 15 5 inches ...
Страница 70: ...70 Contacting Technical Support w w w d e l l c o m s u p p o r t d e l l c o m ...
Страница 71: ......
Страница 72: ...w w w d ell com support dell com Printed in the U S A ...


