background image

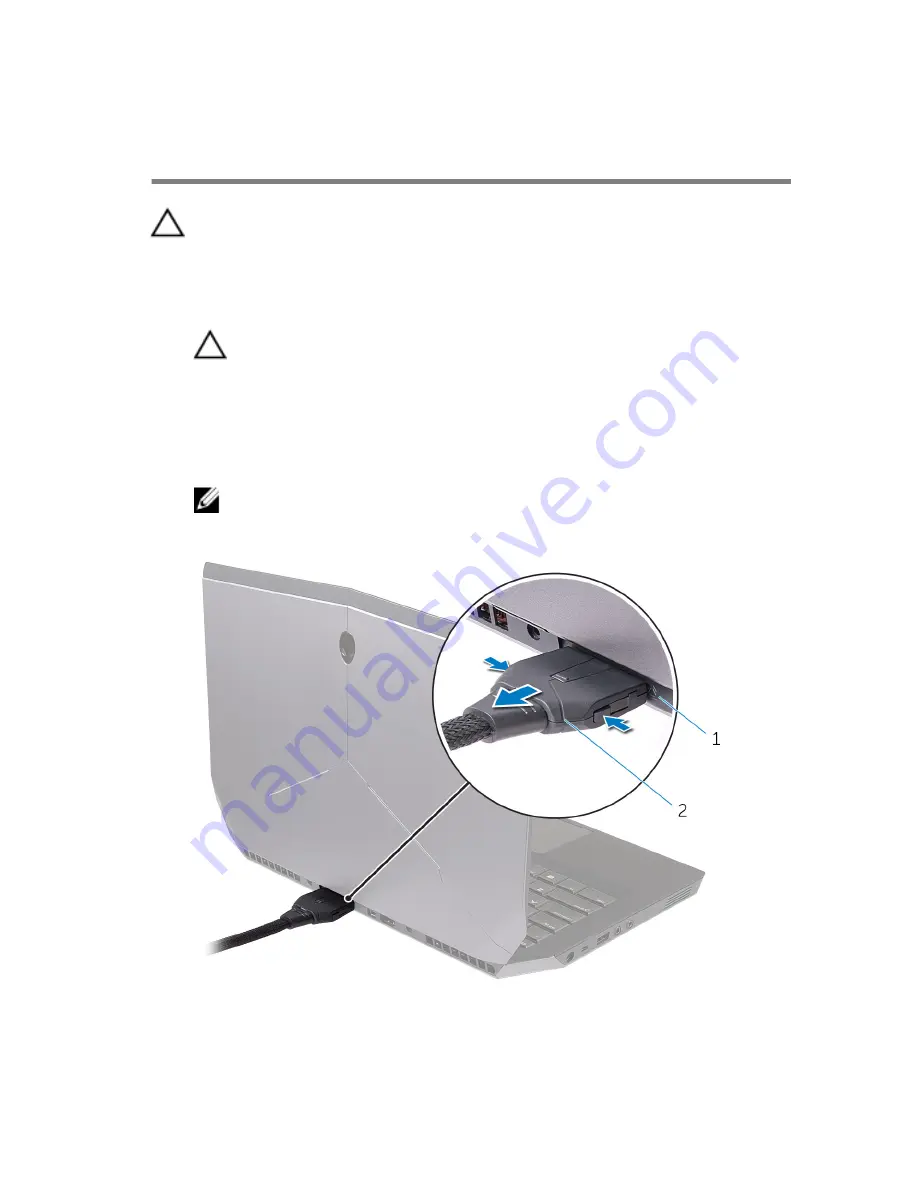
Disconnecting Alienware 

Graphics Amplifier

CAUTION: Do not disconnect the graphics cable until the computer 
has shut down and the light on the graphics cable has turned off.

Save and close all open files and exit all open applications.

Shut down your computer.

CAUTION: Do not disconnect the graphics cable until the 
computer has shut down and the light on the graphics cable has 
turned off.

After the light on the graphics cable has turned off, press the release clips 

on the graphics cable to disconnect it from the external graphics port on 

the computer.

NOTE: Shut down your computer before you disconnect the 
graphics cable.

1

external graphics port

2

graphics cable

31

Содержание Alienware Graphics Amplifier

Страница 1: ...Alienware Graphics Amplifier User s Guide Regulatory Model Z01G Regulatory Type Z01G001 ...

Страница 2: ...problem WARNING A WARNING indicates a potential for property damage personal injury or death Copyright 2014 Dell Inc All rights reserved This product is protected by U S and international copyright and intellectual property laws Dell and the Dell logo are trademarks of Dell Inc in the United States and or other jurisdictions All other marks and names mentioned herein may be trademarks of their res...

Страница 3: ...ns 11 Using the Alienware Graphics Amplifier 13 Installing the Graphics Card 14 Removing the Graphics Card 21 Setting Up Your Alienware Graphics Amplifier 27 Computer is Turned On 29 Disconnecting Alienware Graphics Amplifier 31 Alternate Methods to Disconnect Alienware Graphics Amplifier 32 Using Keyboard Shortcut 32 Using the Undock Button on the Graphics Cable 32 Undock Button Settings 33 Insta...

Страница 4: ...Troubleshooting 35 Getting Help and Contacting Alienware 36 Self Help Resources 36 Contacting Alienware 36 ...

Страница 5: ...your device Safety Instructions Use the following safety guidelines to protect your device from potential damage and ensure your personal safety WARNING Before working inside your device read the safety information that ships with your device For more safety best practices see the Regulatory Compliance home page at dell com regulatory_compliance WARNING Disconnect all power sources before opening ...

Страница 6: ...o dissipate static electricity which could harm internal components CAUTION When you disconnect a cable pull on its connector or on its pull tab not on the cable itself Some cables have connectors with locking tabs or thumb screws that you must disengage before disconnecting the cable When disconnecting cables keep them evenly aligned to avoid bending any connector pins When connecting cables make...

Страница 7: ...crews and make sure that no stray screws remain inside your device 2 Connect any external devices peripherals and cables you removed before working on your device 3 Replace any media cards discs and any other part s that you removed before working on your device 4 Connect your device and all attached devices to their electrical outlets 5 Turn on your device 7 ...

Страница 8: ...Views This chapter lists out the features available on your Alienware Graphics Amplifier Front View 1 AlienHead Docking status light 2 Service Tag Regulatory labels 8 ...

Страница 9: ...Back View 1 Release latch 2 Power port 3 Power supply diagnostic button 4 Power supply status light 5 USB 3 0 ports 4 6 External graphics port 7 Graphics card slot 9 ...

Страница 10: ...Graphics Cable 1 Release clips 2 2 Undock button 3 Docking status light 4 Graphics cable 10 ...

Страница 11: ...phics port Internal Graphics Card Graphics card slot Device Environment Feature Specification Temperature range Operating 0 C to 40 C 32 F to 104 F Storage 40 C to 65 C 40 F to 149 F Relative humidity maximum Operating 10 to 90 non condensing Storage 0 to 95 non condensing Vibration maximum Operating 0 66 GRMS Storage 1 30 GRMS Shock maximum Operating 110 G Storage 160 G 11 ...

Страница 12: ...vice Environment Feature Specification Altitude Operating 15 20 m to 3048 m 50 ft to 10 000 ft Storage 15 20 m to 10 668 m 50 ft to 35 000 ft Airborne contaminant level G1 as defined by ISA S71 04 1985 12 ...

Страница 13: ...ifier This section will provide procedures on how to install and uninstall the Graphics card WARNING Disconnect all cables before working inside your device CAUTION Handle the components with care Hold the graphics card at its edges 13 ...

Страница 14: ...Installing the Graphics Card NOTE The graphics card is sold separately 1 Slide the release latch to release the cover 1 release latch 2 cover 14 ...

Страница 15: ...ft the cover and open it as far as possible 1 cover 3 Remove the screws that secure the graphics card fillers to the chassis NOTE Remove only one filler if you are installing a single width graphics card 15 ...

Страница 16: ...4 Lift the graphics card fillers away from the chassis 1 screws 2 2 graphics card fillers 2 16 ...

Страница 17: ...nect the power cables from the slots on the device 1 power cables 2 2 slots 2 6 Align the connector on the graphics card with the slot on the system board and press down the card until it locks into position 17 ...

Страница 18: ...7 Replace the screws that secure the graphics card to the chassis 1 screws 2 2 graphics card 18 ...

Страница 19: ...nect the power cables to the power cable connectors on the graphics card NOTE The location of the power cable connectors may be different on your graphics card 1 power cables 2 2 power cable connectors 2 19 ...

Страница 20: ...9 Close the cover and press down until it locks into position 1 cover 20 ...

Страница 21: ...Removing the Graphics Card 1 Slide the release latch to release the cover 1 release latch 2 cover 21 ...

Страница 22: ...2 Lift the cover and open it as far as possible 1 cover 22 ...

Страница 23: ...nnect the power cables from the graphics card 1 power cables 2 2 tabs 2 4 Remove the screws that secure the graphics card to the chassis 5 Press the release latch to release the graphics card from the slot on the system board 23 ...

Страница 24: ...cs card away from the chassis 1 release latch 2 screws 2 3 graphics card 7 Slide the graphics card fillers into the slots on the graphics card 8 Replace the screws that secure the graphics card fillers to the chassis 24 ...

Страница 25: ...9 Connect the power cables to the slots on the device 1 screws 2 2 graphics card fillers 25 ...

Страница 26: ...10 Close the cover and press down until it locks into position 1 cover 26 ...

Страница 27: ... Up Your Alienware Graphics Amplifier 1 Install the graphics card See Installing the Graphics Card 2 Connect the power cable to the power port on the Alienware graphics amplifier 1 power port 2 power cable 27 ...

Страница 28: ... Graphics Amplifier to your computer and then powering on the computer to dock with the graphics amplifier Press the release clips and connect one end of the graphics cable to the external graphics port on the Alienware graphics amplifier 1 external graphics port 2 release clips 2 3 graphics cable 28 ...

Страница 29: ...phics port on your computer The light on the graphics cable turns on indicating the Alienware Graphics Amplifier is connected and ready to use NOTE If required connect the display to the Alienware graphics amplifier 1 external graphics port 2 graphics cable 3 release clips Computer is Turned On 1 Save and close all open files and exit all open applications 29 ...

Страница 30: ... logo on the Alienware Graphics Amplifier lights up and a dialog box appears on the computer asking you to restart the computer NOTE The AlienHead docking status light will not turn on if you are connecting the graphics cable for the first time Enable the docking status light using AlienFX in the Alienware Command Center 3 Click YES to restart the computer NOTE The light on the graphics cable turn...

Страница 31: ... 2 Shut down your computer CAUTION Do not disconnect the graphics cable until the computer has shut down and the light on the graphics cable has turned off 3 After the light on the graphics cable has turned off press the release clips on the graphics cable to disconnect it from the external graphics port on the computer NOTE Shut down your computer before you disconnect the graphics cable 1 extern...

Страница 32: ...aphics cable has turned off press the release clips to disconnect the graphics cable from the computer Using the Undock Button on the Graphics Cable 1 Save and close all open files and exit all open applications 2 Press the undock button on the graphics cable For the location of the undock button on the graphics cable see Graphics Cable NOTE Depending on how the undock button is configured the com...

Страница 33: ... Click Start All Programs Alienware Command Center AlienAdrenaline 2 On the AlienAdrenaline window click Graphics Amplifier Undock Button NOTE Save and close all open files and exit all open applications before pressing the undock button on the graphics cable 3 Use the following options to configure the computer s behavior when the undock button on the graphics cable is pressed Always Prompt Optio...

Страница 34: ... s Service Tag type your computer s Service Tag and click Submit If you do not have your computer s Service Tag click Detect My Product to allow automatic detection of the Service Tag NOTE If the Service Tag cannot be detected automatically select your product under the product categories 4 Click Drivers and downloads 5 In the Operating System drop down menu select the operating system installed o...

Страница 35: ...e Graphics Amplifier For more information see the document that came with the video card you purchased NOTE The graphics card is sold separately The video ports and the display on your computer will be disabled when a dual core graphics card is used The output will be from Alienware Graphics Amplifier only Your device is working as designed 35 ...

Страница 36: ...s product specifications technical help blogs drivers software updates and so on See alienware com gamingservices Videos providing step by step instructions to service your computer see youtube com Alienwareservices Contacting Alienware To contact Alienware for sales technical support or customer service issues see Alienware com NOTE Availability varies by country and product and some services may...

Отзывы: