background image

Product-Notes

Manual

Article No.: 843003

Deko-Light Elektronik-Vertriebs GmbH  

26.11.2018

www.deko-light.com / [email protected]

Technical Data can be changed without advance notice. Errors excepted. 

3/9

Dear customer,

thank you for deciding to purchase our product. The product fulfils the requirements of effective European and

national guidelines.

To maintain the condition of the product and to ensure safe operation, you - as the user - must observe the

product notes and the operation manual! They contain important information for the start-up and handling. It is

important, therefore, that these documents are archived carefully for referring to information at a later stage.

aufbewahren.

1.  Safety Instructions

We are not responsible for any property damage or personal injury caused by failure to observe these 

productnotes and manual, improper handling or unauthorised modifications.
It can only be installed by a qualified electrician.

Make sure that the item has not been damaged during transport before putting the light into operation. It 

maynot be operated if there are any damages to electrical parts.
It may only be operated once removed from the packaging.
The type plate must not be removed.
The connection lines in the building must be disconnected before installation and secured against 

beingswitched back on. For this, trip the corresponding fuse switch in the building installation.

Make sure the electrical specifications for the connection lines correspond with the specifications given on 

thenameplate of this product.
Please take care during installing for the correct polarity (V+, V-) and do also use the right power supplies 

with the following safety measures: SELV = Safety Extra Low Voltage, overload protection and short-circuit 

protection.
Make sure that the cables and plugs are not subject to tension or torsional forces and do not bend the cables.

Protect all cables and insulation against possible damages.
Output lines should be laid separately and spaced apart from other lines. The power supply cables and 

thelamp feeders must not cross each other.

Do not allow the product to come into contact with extreme heat or naked flames.

Use the supplied fastening material only when it is suited for the installation background.
The product must not be covered with objects (decorations) or thermally insulating coverings /similar materials.
Before disposal of the packaging material make sure that all components are removed.
Keep packaging material away from the reach of children and pets. The packaging contains small parts 

thatmay be swallowed by children.

Содержание ART-9

Страница 1: ...ise Bedienungsanleitung Artikel Nr 843003 Deko Light Elektronik Vertriebs GmbH 26 11 2018 www deko light com deko deko light com Technische Daten k nnen ohne Vorank ndigung ge ndert werden Irrt mer vo...

Страница 2: ...herheitshinweise Seite 3 Bestimmungsgem e Verwendung Seite 4 Pflege und Wartung Seite 4 Funktionsst rung Seite 4 Lagerung und Entsorgung Seite 4 Lieferumfang Seite 4 Technische Daten Seite 5 Bedienfel...

Страница 3: ...hild darf nicht entfernt werden Vor der Installation m ssen die geb udeseitigen Anschlussleitungen spannungsfrei geschaltet und gegen Wiedereinschalten gesichert werden L sen Sie hierzu den entspreche...

Страница 4: ...n Zur Reinigung verwenden Sie ein trockenes oder leicht angefeuchtetes Tuch Zur Reinigung verwenden Sie niemals Chemikalien brennbare Reiniger oder Scheuermittel Diese k nnen die Oberfl chen und oder...

Страница 5: ...2 x 15 5 mm Gewicht 150 g 200 g 8 Bedienfeld Anschl sse 1 Power Taste 1 Link In Ein Ausschalten 4 pin Anschluss 2 C Taste Farbe 2 DMX Out Auswahl der Farbe 4 pin Anschluss 3 P Taste Programm 3 PWM Out...

Страница 6: ...m den ART 9RGBW zu starten Um die Kurzwahl An Aus zu l schen halten Sie die Tasten P und Power gleichzeitig f r etwa 10 Sekunden gedr ckt bis alle Tasten einmal blinken 9 2 Einstellung der Fade Zeit f...

Страница 7: ...egen den Uhrzeigersinn nimmt die Geschwindigkeit ab Bei erreichen der 10 min folgt ein Tastenton und vier Ziferntasten blinken wiederholt auf Sie k nnen Geschwindigkeiten durch bet tigen einer Taste e...

Страница 8: ...9 Szenen k nnen auf den Zifferntasten abgespeichert werden Dr cken Sie die Taste P oder S f r 1 Sekunde um den Automatik Modus zu aktivieren Es folgt ein Tastenton und die Anzeige leuchtet Drehen Sie...

Страница 9: ...rundeinstellungen des ART 9RGBW wiederherzustellen halten Sie die Tasten P und B f r 10s gedr ckt Alle Benutzereinstellungen werden gel scht 17 Online Kontrolle Jedes ART 9RGBW kann ber den Link IN OU...

Страница 10: ...nual Controller DMX wall control ART 9 Article No 843003 Deko Light Elektronik Vertriebs GmbH 26 11 2018 www deko light com deko deko light com Technical Data can be changed without advance notice Err...

Страница 11: ...9 Contents Safety Instructions page 3 Proper Use page 4 Care page 4 Faulty Function page 4 Storage and Disposal page 4 Purchased parts package page 4 Technical data page 5 Controll Panel Connections...

Страница 12: ...t be removed The connection lines in the building must be disconnected before installation and secured against beingswitched back on For this trip the corresponding fuse switch in the building install...

Страница 13: ...tened cloth for cleaning Never use any chemicals flammable cleaning agents or abrasives These may cause damage to the surface coating and or the insulators 4 Faulty Function Are the luminaires to be c...

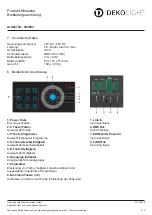
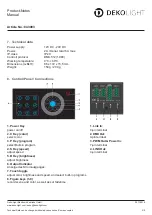
Страница 14: ...40 C Dimensions LxBxH 86 x 172 x 15 5 mm Weight 150 g 200 g 8 Controll Panel Connections 1 Power Key 1 Link In power on off 4 pin terminal 2 C Key color 2 DMX Out select color 4 pin terminal 3 P Key p...

Страница 15: ...blink once Release the Power button and the button flashes repeatedly Choose one of these buttons 1 9 P C B or S according to set the fade time as in the table Key 1 2 3 4 5 6 7 8 9 P C B S Fade Time...

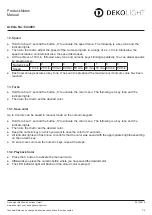
Страница 16: ...d is produced the maximum or minimum value has been reached 13 Farbe Hold for about 1 second the button S to activate the color menu The following is a key tone and the indicator lights Then turn the...

Страница 17: ...Press the P or S button for 1 second to activate the automatic mode The following is a key tone and the indicator lights Turn the dial to selct the desired program or adjust the speed Keep the numeri...

Страница 18: ...al Settings To restore the basic settings of the ART 9RGBW press and hold the P and B buttons for 10s All user settings will be lost 17 Online Control Each ART 9RGBW can be connected at the rear of th...

Отзывы: