Operator’s Manual
5
come internally pressurized, which may be potential-
ly dangerous. Additionally, if the power remains on
when the camera has partially flooded, it is possible
for electrolytic generation of an explosive mixture of
hydrogen and oxygen gases. If a camera appears
flooded upon removal from the water, it should be
treated as potentially dangerous. Point the camera
away from persons and valuable equipment and
make sure that the power is disconnected. See the
Flooding Repair Procedure for more information.
Operation Instructions
1. Prepare a power supply with 9-36V DC output.
2. Plug the red [po)] and black [negative(-)]
banana plugs of the camera cable into their
respective jacks on the power supply.
3. Plug the BNC connector on the topside of the
cable into the monitor or VCR video-in jack (a
BNC-to-RCA adapter may be required by the
monitor/VCR in use).
4. Lubricate the camera bulkhead connector with an
appropriate silicone lubricant (spray type rec-
ommended), and using a linear motion plug the
female inline connector into the male bulkhead
connector on the back of the camera.
5. Screw the locking sleeves together firmly (hand
tight-do not use tools). The camera is now ready
for operation; switch the power supply ON to
power the camera. The camera draws approx-
imately 2W of power during operation, and will
work when supplied between 9-36 volts DC.
Flooding Repair Procedure
If the camera stops working while underwater,
you should assume that it has been flooded. When
working on a potentially flooded camera, it is important
to use appropriate personal protective equipment to
include, at a minimum, eye and hand protection.
1. Immediately turn off the power to the unit.
2. Open the housing by removing the rear end
cap-retaining ring. Grasp the rear end cap in one
hand and the camera housing in the other. With
care, separate the two components using a linear
motion. If required gently twist components while
separating.
3. Pour out any water trapped in the housing.
4. If the camera is completely flooded, rinse the in-
ternal components with clean fresh water in order
to minimize contamination and corrosion.
5. Allow parts to dry in air or a convection oven set
at 60° C (190° F).
IMPORTANT! DeepSea Power & Light cannot
be responsible for any damage incurred during
emergency field repairs. Such repairs should be
undertaken only as a last resort and by qualified
personnel.
Troubleshooting
1. If the camera stops working while underwater
assume that it has been flooded. See Flooding
Repair procedure.
2. Once it has been determined that the camera
is not flooded, or if it does not turn on during
pre-deployment checks, troubleshoot in the fol-
lowing sequence:
a. Check the cable/inline connector to make
sure that correct voltage and current
are being supplied, and that the correct
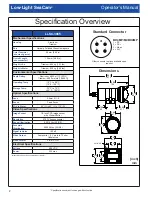
sockets are being used. See page 2 of this
manual for electrical specs and connector
pin-outs.
b. Remove the connector. Inspect the as-
sembly for visual signs of wear. Use a
multi-meter check for continuity or shorts
in the connector. Try a spare connector, if
available.
c. Check the wires that go from the power
supply to the camera base for wear. If they
appear worn, replace them.
d. Check to make sure that the power supply
board is securely attached to the camera. If
it is loose, check for damage on the board.
If there appears to be no damage, reattach
the board to the camera. Try using a spare
driver board if available.
e. If the camera still does not work, return it to
DSPL using the RMA Procedure.
RMA Procedure for Repair
Should it be necessary to return your camera to the fac-
tory, follow the procedure for the Flooded Camera Repair
above, and by leaving the connector partially unscrewed.
For warranty and non-warranty repairs please contact
DeepSea Power & Light for a RMA number prior to re-
turning your item. Please have your light model number,
serial number and any other pertinent information along
with a description of the problem, on hand when you
call, or include them in a fax or e-mail. When shipping
your item, be sure that the freight is pre-paid (CODs will
not be accepted) and that the RMA number is clearly
printed on the outside of the box. All shipments should
be sent to the address below:
Low-Light SeaCam
®


