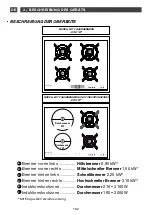
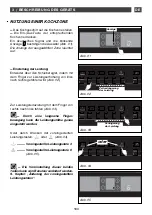
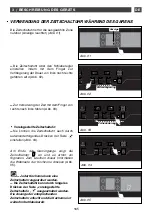
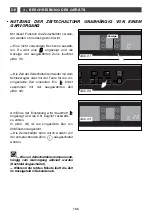
background image

176

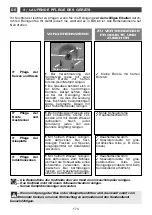
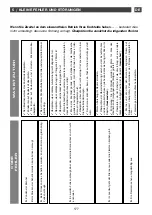
Wenn Sie Zweifel an dem einwandfreien Betrieb Ihres Kochfelds haben ... 

... bedeutet dies

nicht unbedingt, dass eine Störung vorliegt. 

Überprüfen Sie zunächst die folgenden Punkte:

Der be

tr

of

fene Brenner kann nicht

benutzt wer

den.

Der andere Brenner kann jedoch

benutzt wer

den.

Bei N

utzung bei einer U

m

g

ebungs

te

m

peratur unt

er 1

0

 °C kann die

F

unktion des K

o

chfelds zeitweise blockier

t sein.

Zum Löschen des F

ehlers die T

a

s

te „

Allg

emeine Gasausschaltung“

drück

en.

Sollt

e der F

ehler f

o

rtbes

tehen, den K

undendiens

t benachr

ichtig

en.

zeigt 

EC

an und

eine der Anzeig

en der

Brenner leucht

e

t.

Die elektr

onischen Schaltkreise sind

über

hitzt.

Den Einbau über

prüfen.

Zum Löschen der Anzeig

E1

die T

a

s

te „

Allg

emeine

Gasausschaltung“ drück

en.

Sollt

e der F

ehler f

o

rtbes

tehen, den K

undendiens

t benachr

ichtig

en.

zeigt 

E1

oder eine

Reihe v

on —— an

Die Zonen funktionieren nicht mehr

.

Zum Löschen des F

ehlers die T

a

s

te „

Allg

emeine Gasausschaltung“

drück

en.

Sollt

e der F

ehler f

o

rtbes

tehen, den K

undendiens

t benachrichtig

en.

zeigt einen F

ehler

vom T

yp 

E

d

C

an, der

vo

rs

tehend nicht er

w

ähnt

wur

de.

W

AS GESC

HIEHT?

W

AS IS

T ZU TUN?

CODE 

FEHLER

DE

5 / KLEINE FEHLER UND STÖRUNGEN

Содержание DTI 1127 X

Страница 1: ...D UTILISATION EN GUIDE FOR INSTALLATION AND USE ES MANUAL DE INSTALACIÓN Y UTILIZACIÓN PT GUIA DE INSTALAÇÃO E DE UTILIZAÇÃO DE EINBAU UND GEBRAUCHSANWEISUNG Table de cuisson Cooking Hob Placa de cocción Placa de cozinha Kochfeld ...

Страница 2: ...la réalisation de produits de haute facture au service de l art culinaire une passion partagée par tous les amoureux de la cuisine Nous vous souhaitons beaucoup de satisfaction dans l utilisation de ce nouvel appareil et serons heureux de recueillir vos suggestions et de répondre à vos questions Nous vous invitons à les formuler auprès de notre service consommateur ou sur notre site internet Nous ...

Страница 3: ...n d une zone de cuisson 19 Utilisation de la minuterie pendant la cuisson 21 Utilisation de la minuterie indépendante 22 Utilisation de la fonction ELAPSED TIME 23 Utilisation des présélections de puissance 24 Sécurité enfants 25 Clean Lock 25 Sécurité en fonctionnement 26 Récipients adaptés pour les brûleurs gaz 27 Choix de la casserolerie Sécurité induction 28 4 ENTRETIEN COURANT DE VOTRE APPARE...

Страница 4: ... être déconnectée de l alimentation électrique et gaz avant toute intervention En branchant des appareils électriques sur une prise de courant située à proximité assurez vous que le câble d alimentation ne soit pas en contact avec les zones chaudes Par mesure de sécurité après utilisation n oubliez pas de fermer le robinet de commande générale du gaz distribué par canalisation ou le robinet de la ...

Страница 5: ...rvice Après Vente et Relations Consommateurs cette page vous explique également où les trouver sur votre appareil Cet appareil n est pas prévu pour être utilisé par des personnes y compris les enfants dont les capacités physiques sensorielles ou mentales sont réduites ou des personnes dénuées d expérience ou de connaissance sauf si elles ont pu bénéficier par l intermédiaire d une personne respons...

Страница 6: ...u de brûleur Tête de brûleur Injecteur C D Bougie d allumage Thermocouple E FR 1 1 A L ATTENTION DE L UTILISATEUR P00319 D C B A E MODÈLE 4 BRÛLEURS GAZ D DT TG G1 11 12 27 7 MODÈLE 2 BRÛLEURS GAZ ET 2 FOYERS INDUCTION D DT TI I1 11 12 27 7 ...

Страница 7: ...T DROIT TOUCHE DE SÉLECTION DU FOYER AVANT GAUCHE VOYANTS DE LA ZONE SÉLECTIONNÉE FOYERS AVANT GAUCHE ET AVANT DROIT TOUCHE DE SÉLECTION DU FOYER ARRIÈRE GAUCHE Ces touches servent à mettre en marche ou à arrêter les zones de cuisson quand une zone est sélectionnée le ou les voyant s correspondant s allum ent vous pouvez alors régler ses paramètres TOUCHES DE SELECTION Ces touches permettent de ré...

Страница 8: ...lation A ce sujet la combustion n étant possible que grâce à l oxygène de l air il est nécessaire que cet air soit renouvelé en permanence et que les produits de la combustion soient évacués un débit d air minimum de 2 m3 h par kW de puissance gaz est nécessaire Exemple Puissance totale 0 85 1 5 2 25 3 1 7 7 kW 7 7 kW x 2 15 4 m3 h de débit d air minimum Ces tables sont conformes aux échauffements...

Страница 9: ...on dans le compartiment qui pourrait exister sous la table Placez la table de cuisson dans l ouverture du meuble support en prenant soin de tirer la table vers soi Placez les grilles support casserole les chapeaux et les têtes de brûleurs Raccordez le câble d alimentation de la table à l installation électrique de votre cuisine voir Raccordement électrique de la table de cuisson Vous pouvez immobi...

Страница 10: ...oint assure l étanchéité entre le verre et le plan de travail 4 Replacez les têtes de brûleurs les chapeaux de brûleurs et les grilles ENCASTREMENT AU DESSUS D UN MEUBLE AVEC PORTE OU TIROIR voir dessin ci contre L encastrement de votre table au dessus d un four nécessite à l avant un passage d air de 4 mm minimum sur toute la largeur de la table Il est déconseillé d installer votre table au dessu...

Страница 11: ...oupure de courant prolongée un codage lumineux s affiche Ces informations disparaitront après 20 secondes RACCORDEMENT ELECTRIQUE SECTION DU CÂBLE À UTILISER Le fil de protection vert jaune est relié à la borne de terre de l appareil et doit être relié à la borne de terre de l installation Si ce cordon d alimentation est endommagé il ne doit être remplacé que par le fabricant son Service Après Ven...

Страница 12: ...table de cuisson est installée au dessus d un four ou si la proximité d autres éléments chauffants risque de provoquer un échauffement du raccordement il est impératif de réaliser celui ci en tube rigide Si un tuyau flexible ou un tube souple cas du gaz butane est utilisé il ne doit pas entrer en contact avec une partie mobile du meuble ni passer dans un endroit susceptible d être encombré Attenti...

Страница 13: ...ues vissables conforme à la norme XP D 36 112 dont la durée de vie est de 10 ans Fig 02 Dans une installation existante un tube souple équipé de ses colliers de serrage conforme à la norme XP D 36 110 dont la durée de vie est de 5 ans peut être utilisé Il est nécessaire dans ce cas d utiliser un about sans oublier de mettre en place un joint d étanchéité entre l about et le coude de la table Fig 0...

Страница 14: ...eurs du gaz correspondant conformément au repérage des injecteurs et au tableau des caractéristiques gaz en fin de chapitre pour cela Vissez les d abord manuellement jusqu au blocage de l injecteur Engagez à fond la clé sur l injecteur Tracez une ligne sur la plaque d âtre à l aide d un crayon à l endroit indiqué Fig 03 Tournez la clé dans le sens des aiguilles d une montre jusqu à ce que la ligne...

Страница 15: ...suivent Appuyez 2 fois sur la touche Fig 02 Un signal sonore indique votre sélection L afficheur du foyer arrière droit indique le type de gaz préselectionné Indication 1 GAS POUR LE GAZ NATUREL Fig 03 Indication 2 GAS POUR LE GAZ BUTANE PROPANE Fig 04 Pour modifier le type de gaz utilisez le slider de puissance en glissant votre doigt vers la gauche ou vers la droite Le type de gaz est validé aut...

Страница 16: ... 10 3 10 Débit calorifique réduit kW 0 830 0 870 0 870 Débit horaire g h 229 225 Débit horaire l h 295 343 BRÛLEUR SEMI RAPIDE Repère marqué sur l injecteur 62 62 94 94 Débit calorifique nominal kW 1 50 1 50 1 50 1 50 Débit calorifique réduit kW 0 620 0 615 0 615 Débit horaire g h 109 107 Débit horaire l h 143 166 BRÛLEUR AUXILIAIRE Repère marqué sur l injecteur 45 45 63 63 Débit calorifique nomin...

Страница 17: ... 62 Repérage des injecteurs ÉLECTRICITÉ Alimentation 220 240 V 50 Hz Puissance totale absorbée 3100 W 1 Dimensions de la table Largeur 650 mm Profondeur 520 mm Masse 11 4 kg Dimensions du caisson Largeur 549 mm Hauteur 59 mm Profondeur 470 mm FR 2 2 INSTALLATION DE VOTRE APPAREIL 137 94 P00319 88A 62 137 94 1R 63 88A 62 7R 45 MODÈLE 4 BRÛLEURS GAZ D D T T G G 1 1 1 1 2 2 7 7 MODÈLE 2 BRÛLEURS GAZ ...

Страница 18: ...eur rapide 2 25 kW Brûleur arrière droit brûleur grand rapide 3 10 kW Foyer induction diamètre 210 3100 W Foyer induction diamètre 160 2000 W Puissances obtenues en gaz naturel G20 A C D B P00319 D B E F Diam 210 Diam 160 MODÈLE 4 BRÛLEURS GAZ D DT TG G1 11 12 27 7 MODÈLE 2 BRÛLEURS GAZ ET 2 FOYERS INDUCTION D DT TI I1 11 12 27 7 FR 3 3 UTILISATION DE VOTRE APPAREIL ...

Страница 19: ... pour diminuer Fig 03 Un mouvement lent permet de régler plus précisément le niveau de puissance souhaité par rapport à un mouvement rapide Soit en appuyant sur les touches de puissances préréglées ou Fig 04 Puissance 3 par défaut Puissance 6 par défaut Fig 05 Ces 2 touches sont modifiables par l utilisateur Voir chapitre M Mo od di if fi ic ca at ti io on n d de es s t to ou uc ch he es s d de es...

Страница 20: ...ez alors de toucher les zones concernées Les flammes du foyer gaz sont plus petites au niveau des doigts de grille pour protéger l émail de la grille Attention En cas d extinction accidentelle exemple courants d air votre table est équipée d un système de réallumage automatique Celui ci est limité à 2 réallumages espacés de 10 secondes La température minimum d utilisation est de 10 C pour assurer ...

Страница 21: ...ssi sélectionner la touche par appuis successifs pour régler la valeur de la minuterie Fig 04 En fin de cuisson la minuterie indique et un signal sonore vous prévient Appuyez sur la touche de sélection du foyer pour effacer ces informations Fig 05 Vous pouvez affecter une minuterie à chacun des foyers La minuterie peut être arrêtée par un appui long sur la touche minuterie PRECO L affichage de la ...

Страница 22: ...t avec la touche minuterie PRECO Un clignote avec la valeur du temps choisi Fig 02 A la fin de votre réglage l affichage devient fixe et le décompte commence La Fig 03 indique une sélection de minuterie à 20 minutes Vous pouvez arrêter la minuterie en sélectionnant la zone de cuisson correspondante Vous pouvez ainsi activer jusqu à 4 minuteries indépendantes table éteinte Pendant la dernière minut...

Страница 23: ...issez votre doigt sur le slider de la minuterie pour incrémenter le temps de cuisson que vous voulez obtenir Fig 02 L affichage du temps devient fixe pendant 3 secondes puis l affichage du temps restant apparait Un signal sonore est émis pour confirmer votre choix Cette fonction existe avec ou sans la fonction minuterie Si un temps est affiché sur la minuterie il n est pas possible de changer le t...

Страница 24: ...modifier par un appui long Fig 01 La puissance préselectionnée actuelle s affiche Sur le slider de puissance réglez la nouvelle valeur de puissance en glissant votre doigt vers la gauche ou vers la droite selon votre choix Fig 02 Sélection possible entre 1 et 5 Sélection possible entre 6 et 9 Un signal sonore valide votre action après quelques instants Fig 02 FR 3 3 UTILISATION DE VOTRE APPAREIL F...

Страница 25: ...rouillage temporaire de votre table pendant un nettoyage Pour activer CLEAN LOCK Votre table doit être éteinte Faites un appui court sur la touche Fig 01 Un signal sonore est émis et le voyant clignote Après un temps prédéfini le verrou sera automatiquement annulé Un double signal sonore est émis et le voyant s éteint Fig 01 FR 3 3 UTILISATION DE VOTRE APPAREIL En mode verrouillage toute action fe...

Страница 26: ...ettoyez ou enlevez l objet puis relancez la cuisson AUTO STOP SYSTEM En cas d oubli d une cuisson en cours et selon un temps prédéfini cette fonction de sécurité coupe automatiquement votre table de 1 à 8 heures suivant la puissance AS s affiche et un bip est émis pendant environ 2 minutes Appuyez sur une touche du foyer pour effacer ces informations Un double bip confirme votre action SÉCURITÉ PE...

Страница 27: ...leurant le dessus verre Maintenez ouverts les orifices d aération naturelle ou installez un dispositif d aération mécanique hotte de ventilation mécanique Une utilisation intensive et prolongée de l appareil peut nécessiter une aération supplémentaire par exemple en ouvrant une fenêtre ou une aération plus efficace par exemple en augmentant la puissance de la ventilation mécanique si elle existe u...

Страница 28: ... déjà des récipients adaptés Récipients en acier émaillé avec ou sans anti adhérent cocotte friteuse poêle grille viande Récipients en fonte pour ne pas rayer la vitrocéramique évitez de le faire glisser sur la table ou choisissez un récipient avec un fond émaillé Récipients en inox adaptés à l induction la plupart des récipients inox conviennent à la cuisson par induction casseroles faitout poêle...

Страница 29: ...e pour tous les autres modes de cuisson Il est recommandé de ne pas déposer d objets métalliques tels que des couteaux des fourchettes des cuillères et couvercles sur le plan de cuisson car ils peuvent s échauffer multi récipients Cette zone de cuisson de 23 cm S adapte automatiquement au récipient Délivre la puissance optimale Restitue une excellente répartition de chaleur Fournie une température...

Страница 30: ...CÉDER Entretien des bougies et des injecteurs Dans le cas de taches persistantes utilisez une crème non abrasive puis rincez à l eau claire Essuyez soigneusement chaque pièce du brûleur avant de réutiliser votre table de cuisson Entretien des grilles et des brûleurs gaz Eponge sanitaire Produits spéciaux verre vitrocéramique ex Cera clen Nettoyez avec de l eau chaude puis essuyez Dans le cas de ta...

Страница 31: ...lez la mise en marche en appuyant sur affiche E4 et un des voyants du brûleur en défaut s allume quelques secondes puis disparaît Les foyers ne fonctionnent pas Défaut de positionnement de l interrupteur de changement de gaz Vérifiez la position de l interrupteur de changement de gaz et appuyez sur la touche d arrêt général gaz pour effacer le défaut Renouvelez l allumage Si le défaut persiste app...

Страница 32: ...i le défaut persiste appeler le Service Après Vente affiche EC et un des voyants des brûleurs est allumé Les circuits électroniques se sont échauffés Vérifiez les conditions d encastrement Appuyez sur la touche d arrêt général gaz pour effacer l affichage E1 Si le défaut persiste appeler le Service Après Vente affiche E1 ou une série de Les foyers ne fonctionnent plus Appuyez sur la touche d arrêt...

Страница 33: ... de changer la bouteille de gaz renouvelez plusieurs fois les opérations d allumage jusqu à l arrivée du gaz dans les brûleurs Vérifiez que l injecteur n est pas bouché et si c est le cas débouchez le avec une épingle à nourrice Allumez votre brûleur avant d y poser votre casserole Il y a des étincelles mais le ou les brûleurs ne s allument pas Evitez les courants d air violents dans la pièce Véri...

Страница 34: ... minutes 25 minutes 3 4 minutes 3 4 minutes 10 minutes PREPARATIONS Bouillons Potages épais Court bouillon Grillés Hollandaise béarnaise Béchamel aurore Endives épinards Petits pois cuisinés Tomates provençales Pommes de terre rissolées Pâtés Steack Blanquette Osso bucco Escalope à la poêle Tournedos gril fonte Frites Beignets Riz au lait Compotes de fruits Crêpes Chocolat Crème anglaise SOUPES PO...

Страница 35: ...ELATION DE LÉGUMES VIANDES VIANDES PEU EPAISSES STEAKS POÊLÉS GRILLADE GRIL FONTE FRITURE FRITES SURGELÉES FRITES FRAÎCHES VARIANTES AUTO CUISEUR DÈS LE CHUCHOTEMENT COMPOTES CRÊPES CREME ANGLAISE CHOCOLAT FONDU CONFITURES LAIT ŒUFS SUR LE PLAT PÂTES PETITS POTS DE BEBE BAIN MARIE RAGOÛTS RIZ CREOLE RIZ AU LAIT 10 7 6 5 4 3 2 1 9 8 11 12 PUISSANCE SUR ZONE DE CUISSON FRIRE CUIRE DORER PREPARATIONS...

Страница 36: ...z votre revendeur habituel ainsi que toute une ligne de produits accessoires et consommables L expertise des professionnels au service des particuliers Pour en savoir plus sur tous les produits de la marque informations conseils les points de vente les spécialistes après vente Pour communiquer nous sommes à l écoute de toutes vos remarques suggestions propositions auxquelles nous vous répondrons p...

Страница 37: ...37 ...

Страница 38: ...ogies with the best materials De Dietrich makes products of the highest quality for the benefit of all those who love cooking We hope you are extremely satisfied with this new appliance and will be happy to receive your suggestions and to answer your questions Please contact our customer service department or use our Internet site We invite you to register your product at www de dietrich com to ta...

Страница 39: ...LIANCE Description of your hob 54 Using a cooking zone 55 Using the timer while cooking 57 Using the timer on its own 58 Using the ELAPSED TIME function 56 Using the power presets 60 Child safety 61 Clean Lock 61 Operating safety 62 Cookware to be used with gas burners 63 Induction safe cookware 64 4 DAILY CARE OF YOUR APPLIANCE 66 5 SMALL FAULTS AND PROBLEMS 67 6 COOKING CHART FOR GAS BURNERS 70 ...

Страница 40: ...ics papers aerosol cans etc Your hob must be disconnected from the power supply electricity and gas before undertaking any repair work If you plug electrical appliances into a socket close to the hob ensure that no cable comes into contact with the hotplates and burners As a safety measure remember to shut off the mains gas supply or the butane propane gas cylinder when not in use The CE mark is a...

Страница 41: ...e of them on the After Sales Service and Customer Relations page this page also explains where this information may be found on your appliance This appliance is not intended for use by persons including children with impaired physical sensory or mental capacities or by inexperienced or untrained persons unless they have received prior instruction or supervision in its operation by a person respons...

Страница 42: ...B A B Burner covers Burner head Injector C D Spark igniter Thermocouple E EN 1 1 USER NOTICES P00319 D C B A E MODEL WITH 4 GAS BURNERS D DT TG G1 11 12 27 7 MODEL WITH 2 GAS BURNERS AND 2 INDUCTION ZONES D DT TI I1 11 12 27 7 ...

Страница 43: ...OUCH CONTROL FRONT LEFT ZONE SELECTION TOUCH CONTROL INDICATOR LIGHTS SHOWING THE ZONE SELECTED FRONT LEFT AND FRONT RIGHT ZONES REAR LEFT ZONE SELECTION TOUCH CONTROL These touch controls turn cooking zones on or off When a zone is selected the corresponding indicator lights up and you can then change its settings SELECTOR TOUCH CONTROLS These touch controls allow you to adjust power timer progra...

Страница 44: ...tion regulations In this regard as combustion can only take place in the presence of the oxygen in the air the latter must be continually renewed and combustion by products evacuated a minimum flow rate of 2 m3 h per kW of gas power is required Example Total power 0 85 1 5 2 25 3 1 7 7 kW 7 7 kW x 2 15 4 m3 h minimum air flow These tables comply with the heating of cabinets in accordance with stan...

Страница 45: ...mpartment that may exist under the hob Place your hob in the opening of the support cabinet carefully pulling the table towards you Reposition the pan supports burner covers and burner heads Connect the hob s power cable to your kitchen s electricity supply see Connecting to the power supply with regard to the hob If you wish you can fix the hob in place using the four mounting brackets and screws...

Страница 46: ...ide of the frame This seal ensures leaktightness between the glass and the worktop 4 Replace the burner heads burner covers and the pan supports BUILDING THE HOB INTO A CABINET WITH A DOOR OR DRAWER see diagram opposite Installing your hob above an oven requires a front air inlet of at least 4 mm across the entire width of the hob It is recommended that the hob not be installed above an oven if th...

Страница 47: ...an indicator light will be displayed on the control panel This information will disappear after 20 seconds ELECTRICAL CONNECTION CROSS SECTION OF CABLE TO BE USED The safety wire green and yellow is connected to the appliance s earth terminal and must be connected to the mains earth terminal If the power cable is damaged it must be replaced by the manufacturer the After Sales Service or a similarl...

Страница 48: ... hob is installed above an oven or if there is a risk of the gas supply line overheating due to the proximity of other heating elements a rigid pipe should be used for the gas supply If a flexible hose or tube is used as is the case with bottled butane it must not come into contact with any moving parts or be positioned where it might become snagged Note Flexible pipes and hoses with a limited gua...

Страница 49: ...nnectors compliant with the NF D 36 112 standard with a 10 year guarantee Fig 02 In an existing system a flexible pipe fitted with hose clips compliant with the XP D 36 110 standard with a 5 year guarantee may be used In this case an adaptor must be used and a sealing washer must be inserted between the adaptor and the elbow joint Fig 03 Q Q Fig 01 Fig 02 Fig 03 A B C EN 2 2 INSTALLING YOUR APPLIA...

Страница 50: ...ated under each crucible Fig 02 Replace with the new gas injectors refer to the injector positioning markers and the gas settings table at the end of this chapter The new injectors should be fitted as follows First manually tighten as far as possible Then fully engage the key onto the injector Draw a line on the burner plate using a pencil as shown Fig 03 Turn the wrench clockwise until the line a...

Страница 51: ...rms your selection Within the following 5 seconds Press touch control twice Fig 02 An audible signal confirms your selection The back right zone display indicates the type of gas selected 1 GAS FOR NATURAL GAS Fig 03 2 GAS FOR BUTANE PROPANE Fig 04 To change the gas supply type use the power slider sliding your finger to the left or to the right The gas supply type is confirmed automatically after...

Страница 52: ...A 137 137 Nominal heat release rate kW 3 15 3 15 3 10 3 10 Reduced heat release rate kW 0 830 0 870 0 870 Hourly rate g h 229 225 Hourly rate l h 295 343 SEMI FAST BURNER Marking on injector 62 62 94 94 Nominal heat release rate kW 1 50 1 50 1 50 1 50 Reduced heat release rate kW 0 620 0 615 0 615 Hourly rate g h 109 107 Hourly rate l h 143 166 AUXILIARY BURNER Marking on injector 45 45 63 63 Nomi...

Страница 53: ...injector marking 62 Identifying the injectors ELECTRICITY Power supply 220 240 V 50 Hz Total input power 3100 W 1 Hob dimensions Width 650 mm Depth 520 mm Weight 11 4 kg Dimensions of unit Width 549 mm Height 59 mm Depth 470 mm EN 2 2 INSTALLING YOUR APPLIANCE 137 94 P00319 88A 62 137 94 1R 63 88A 62 7R 45 MODEL WITH 4 GAS BURNERS D D T T G G 1 1 1 1 2 2 7 7 MODEL WITH 2 GAS BURNERS AND 2 INDUCTIO...

Страница 54: ...burner 2 25 kW Rear right burner high speed burner 3 10 kW Induction zone diameter 210 3100 W Induction zone diameter 160 2000 W Power obtained with natural gas G20 A C D B P00319 D B E F Diam 210 Diam 160 MODEL WITH 4 GAS BURNERS D DT TG G1 11 12 27 7 MODEL WITH 2 GAS BURNERS AND 2 INDUCTION ZONES D DT TI I1 11 12 27 7 EN 3 3 USING YOUR APPLIANCE ...

Страница 55: ...ng your finger from right to left Fig 03 Moving your finger slowly allows you to adjust the power more accurately than when you move it quickly Or by pressing one of the preset power touch controls or Fig 04 Power 3 by default Power 6 by default Fig 05 Both these touch controls can be changed by the user See chapter C Ch ha an ng gi in ng g t th he e p pr re es se et t p po ow we er r t to ou uc c...

Страница 56: ... this period Do not touch the zones concerned during this time The flames of the gas burner are smaller near the support to protect the enamel Note If the flames go out accidentally e g due to a gust of air your hob is equipped with an automatic relighting system This is limited to 2 re lightings separated by 10 seconds The minimum temperature for use is 10 C to ensure optimal functioning of the t...

Страница 57: ...s successively on the touch control to set the timer Fig 04 When the cooking is finished is displayed and a beep sounds Press on the selector touch control for the zone to clear this information Fig 05 You can allocate a time to each zone You can stop the timer by pressing and holding the RECOMMENDED timer touch control The corresponding timer display goes out and the zone continues to operate EN ...

Страница 58: ...NDED timer touch control A flashes with the time selected Fig 02 Once set becomes fixed and the countdown begins Fig 03 shows a time of 20 minutes has been selected You can stop the timer by selecting the corresponding cooking zone In this way you can activate up to 4 independent timers with the hob turned off During the final minute the countdown is displayed in seconds Fig 01 EN 3 3 USING YOUR A...

Страница 59: ...5 seconds slide your finger on the timer slider to increase the cooking time to the value you want Fig 02 The time display becomes fixed for 3 seconds then the remaining cooking time will appear A beep will confirm your choice This function can be used with or without the timer If a time is displayed on the timer this time cannot be modified for 5 seconds after the touch control has been pressed A...

Страница 60: ...touch control or to be changed by pressing and holding Fig 01 The current preset power level is displayed Set the new power level by sliding your finger to the left or right on the power slider as desired Fig 02 You can select between 1 and 5 You can select between 6 and 9 A beep will confirm your action after a few moments Fig 02 EN 3 3 USING YOUR APPLIANCE Fig 01 or ...

Страница 61: ...o temporarily lock your hob while cleaning To activate CLEAN LOCK Your cooking hob must be turned off Briefly press touch control Fig 01 You will hear a beep and the indicator will start flashing After a preset time the lock will automatically disengage A double beep sounds and the indicator goes out Fig 01 EN 3 3 USING YOUR APPLIANCE In locked mode any action will produce a key symbol on the disp...

Страница 62: ...n the hob or remove the object then begin cooking again AUTO STOP SYSTEM Should you forget that cooking is in progress this safety function will automatically turn the hob off after a predefined time between 1 and 8 hours depending on the power setting AS is displayed and a beep sounds for about 2 minutes Press on the main selector touch control to delete this information A beep will confirm your ...

Страница 63: ...h feet which sit on or touch the glass top Ensure that all natural ventilation is used or install a mechanical ventilation device mechanical ventilation hood Intensive prolonged use of the appliance may require additional ventilation for example by opening a window or more effective ventilation by increasing the power of any mechanical ventilation device a minimum air flow of 2 m3 hr per kW of gas...

Страница 64: ... stick coating casserole dishes deep fryers saucepans or griddle pans Cast iron pans so as not to scratch the vitroceramic surface avoid sliding pans over the hob surface or choose a pan with an enamel coated base Induction safe stainless steel pans most stainless steel pans are suitable for induction cooking saucepans casserole dishes frying pans and deep fryers Aluminium pans with special bases ...

Страница 65: ...s to any type of cooking It is recommended to avoid placing metal objects such as knives forks spoons and lids on the cooking surface as they may heat up Multiple cookware This 23 cm cooking zone Automatically adjusts to the pan Delivers the optimum power level Ensures excellent distribution of heat Provides an even cooking temperature so that whether you are cooking large pancakes a large fish et...

Страница 66: ...n operation Set all the controls to zero WHAT TO DO Maintaining spark igniters and injectors For tough stains use a non abrasive cream then rinse with clean water Carefully wipe each part of the burner before using your hob again Maintaining pan supports and gas burners Cleaning sponge Special vitroceramic glass products e g Clean with warm water and then wipe For tough stains use special vitrocer...

Страница 67: ...rly After carrying out all these checks turn it on again by pressing displays E4 and one of the indicator lights for the faulty burner comes on for a few seconds then goes off The cooking zones are not working The gas changing switch is in the wrong position Check the position of the gas changing switch and press on the overall gas stop button to erase the fault Light again If the fault continues ...

Страница 68: ...utton to clear the fault If the fault continues contact After Sales Service displays EC and one of the ring s indicator lights is on The electronic circuits are hot Check the installation Press the overall gas stop button to erase the E1 display If the fault continues contact After Sales Service displays E1 or a series of The rings are not working Press the overall gas stop button to clear the fau...

Страница 69: ...talled the hob or changed the gas cylinder repeat the operations for lighting the burners several times until gas arrives at the burners Check that the injector is not clogged if it is unclog it with a safety pin Light your burner before placing your saucepan on it There are sparks but the burner does not light Avoid strong air currents in the room Check that the correct injectors have been fitted...

Страница 70: ...2 minutes 10 minutes 25 minutes 3 4 minutes 3 4 minutes 10 minutes PREPARATIONS Bouillons Thick soups Court bouillon Barbecue Hollandaise béarnaise Béchamel aurore Chicory spinach Cooked peas Provençal tomatoes Fried potatoes Pasta Steak Blanquette Osso bucco Sautéed poultry breasts Barbecue cast iron grill French fries Fritters Rice pudding Fruit compote Pancakes Chocolate Custard SOUPS FISH SAUC...

Страница 71: ...NG OF VEGETABLES MEAT THIN CUTS OF MEAT PAN FRIED STEAKS GRILLED MEAT CAST IRON GRILL FRIED FOODS FROZEN CHIPS FRESH CHIPS OTHER PRESSURE COOKER FROM WHEN IT STARTS TO WHISTLE COMPOTES PANCAKES CUSTARD MELTED CHOCOLATE JAMS MILK FRIED EGGS PASTA JARS OF BABY FOOD BAIN MARIE RAGOÛTS CREOLE RICE RICE PUDDING 10 7 6 5 4 3 2 1 9 8 11 12 COOKING ZONE POWER LEVEL FRYING COOKING BROWNING PREPARING RETURN...

Страница 72: ...ation model type serial number This information appears on the manufacturer s nameplate Fig 01 ORIGINAL PARTS During any servicing request the use of genuine replacement parts only SERVICE CALLS CE DTI702 Fig 01 FagorBrandt SAS tenant manager SAS with share capital of 20 000 000 euros RCS Nanterre 440 303 196 EN 8 8 AFTER SALES SERVICE DEPARTMENT AND CUSTOMER RELATIONS 72 ...

Страница 73: ...73 ...

Страница 74: ...Dietrich se asegura de realizar productos de alta factura al servicio del arte culinario una pasión compartida por todos los amantes de la cocina Le deseamos una utilización de este aparato llena de satisfacciones y estaremos encantados de conocer sus sugerencias y responder a sus preguntas Le invitamos a formularlas a nuestro servicio de atención al cliente o en nuestra página web No se olvide de...

Страница 75: ...ilización del minutero durante la cocción 93 Utilización del minutero independiente 94 Utilización de la función ELAPSED TIME 95 Utilización de las preselecciones de potencia 96 Seguridad para niños 97 Clean lock 97 Seguridad en funcionamiento 98 Recipientes adecuados para los quemadores de gas 99 Elección de los recipientes Seguridad inducción 100 4 MANTENIMIENTO HABITUAL DEL APARATO 102 5 PEQUEÑ...

Страница 76: ... intervención en la placa eléctrica o a gas deberá desconectarla de la toma de alimentación Cuando conecte aparatos eléctricos en una toma de corriente situada cerca de la placa asegúrese de que el cable de alimentación no esté en contacto con zonas calientes Por medida de seguridad tras su uso no se olvide de cerrar la llave general de gas distribuido por canalización o la llave de la bombona de ...

Страница 77: ...las anote en la página Servicio Técnico y Atención al Cliente en esa página se explica en qué lugar del aparato se encuentran Este aparato no está previsto para ser utilizado por personas incluidos los niños cuyas capacidades físicas sensoriales o mentales sean reducidas o por personas privadas de experiencia o conocimiento salvo si han podido beneficiarse a través de una persona responsable de su...

Страница 78: ...a de quemador Quemador Inyector C D Bujía de encendido Termopar E ES 1 1 A LA ATENCIÓN DEL USUARIO P00319 D C B A E MODELO 4 QUEMADORES DE GAS D DT TG G1 11 12 27 7 MODELO 2 QUEMADORES DE GAS Y 2 FOCOS DE INDUCCIÓN D DT TI I1 11 12 27 7 ...

Страница 79: ...TERO DERECHO MANDO DE SELECCIÓN DEL FOCO DELANTERO IZQUIERDO INDICADORES DE LA ZONA SELECCIONADA FOCO DELANTERO IZQUIERDO Y FOCO DELANTERO DERECHO MANDO DE SELECCIÓN DEL FOCO TRASERO IZQUIERDO Estos mandos sirven para poner en marcha o detener las zonas de cocción Cuando seleccione una zona se encenderán el o los indicadores correspondientes y podrá regular sus parámetros MANDOS DE SELECCIÓN Estos...

Страница 80: ...s relativas a la ventilación En este sentido como la combustión se efectúa gracias al oxígeno del aire es necesario que el aire se renueve continuamente y que los productos de la combustión sean evacuados se necesita un caudal de aire mínimo de 2 m3 h par kW de potencia de gas Ejemplo Potencia total 0 85 1 5 2 25 3 1 7 7 kW 7 7 kW x 2 15 4 m3 h de caudal de aire mínimo Estas placas son conformes c...

Страница 81: ...partimento que pueda haber debajo de la placa Coloque la placa de cocción en la abertura del mueble soporte teniendo cuidado de tirar de ella hacia usted Coloque las parrillas de soporte de las cacerolas las tapas y los quemadores Conecte el cable de alimentación de la placa a la instalación eléctrica de la cocina consulte Conexión eléctrica de la placa de cocción Si lo desea puede inmovilizar la ...

Страница 82: ...junta garantizará que el vidrio y la encimera queden herméticos 4 Vuelva a colocar los quemadores las tapas de los quemadores y las parrillas EMPOTRAMIENTO ENCIMA DE UN MUEBLE CON PUERTA O CAJÓN ver esquema El empotramiento de la placa encima de un horno requiere dejar un paso de aire a lo largo de toda la parte delantera de al menos 4 mm Se desaconseja instalar la placa encima de un horno cuya ve...

Страница 83: ...á un código luminoso Esta información desaparecerá al cabo de 20 segundos CONEXIÓN ELÉCTRICA SECCIÓN DEL CABLE QUE SE DEBE UTILIZAR El cable de protección verde amarillo va conectado al borne de tierra del aparato y se debe conectar al borne de tierra de la instalación Si el cable de alimentación estuviera deteriorado deberá ser sustituido por el fabricante su servicio técnico o una persona de cua...

Страница 84: ...de cocción se encuentra instalada encima de un horno o si existe el riesgo de que debido a la proximidad de otros elementos calientes se produzca un calentamiento de la conexión esta se deberá realizar con un tubo rígido Si se utiliza un tubo flexible caso del gas butano este no deberá estar en contacto con ninguna parte móvil del mueble ni pasar por un lugar en el que pueda atorarse Atención Todo...

Страница 85: ...icos enroscables de acuerdo con la norma NF D 36 112 cuyo tiempo de vida es de 10 años Fig 02 En una instalación existente puede utilizarse un tubo flexible equipado con abrazaderas para tubos de conformidad con la norma XP D 36 110 cuya duración de vida es de 5 años En ese caso es necesario utilizar un empalme sin olvidar colocar una junta de estanqueidad entre el empalme y el codo de la placa Fi...

Страница 86: ...ugar los inyectores de gas correspondientes de conformidad con lo marcado en los inyectores y la tabla de las características del gas que se encuentra al final del capítulo para ello Enrósquelos primero manualmente hasta bloquear el inyector Apriete a fondo el inyector con ayuda de la llave Trace una línea en el quemador con la ayuda de un lápiz en el lugar indicado Fig 03 Gire la llave en el sent...

Страница 87: ...Fig 02 Una señal sonora indica la selección La pantalla del foco trasero indica el tipo de gas preseleccionado Indicación 1 GAS PARA EL GAS NATURAL Fig 03 Indicación 2 GAS PARA EL GAS BUTANO PROPANO Fig 04 Para modificar el tipo de gas utilice la barra de deslizamiento de la potencia deslizando el dedo hacia la izquierda o hacia la derecha El tipo de gas queda validado automáticamen te al cabo de ...

Страница 88: ... 10 Gasto calorífico reducido kW 0 830 0 870 0 870 Gasto horario g h 229 225 Gasto horario l h 295 343 QUEMADOR SEMIRRÁPIDO Indicación marcada en el inyector 62 62 94 94 Gasto calorífico nominal kW 1 50 1 50 1 50 1 50 Gasto calorífico reducido kW 0 620 0 615 0 615 Gasto horario g h 109 107 Gasto horario l h 143 166 QUEMADOR AUXILIAR Indicación marcada en el inyector 45 45 63 63 Gasto calorífico no...

Страница 89: ...alización de los inyectores ELECTRICIDAD Alimentación 220 240 V 50 Hz Potencia total absorbida 3 100 W 1 Dimensiones de la placa Anchura 650 mm Profundidad 520 mm Peso 11 4 kg Dimensiones del hueco Anchura 549 mm Altura 59 mm Profundidad 470 mm ES 2 2 INSTALACIÓN DEL APARATO 137 94 P00319 88A 62 137 94 1R 63 88A 62 7R 45 MODELO 4 QUEMADORES DE GAS D D T T G G 1 1 1 1 2 2 7 7 MODELO 2 QUEMADORES DE...

Страница 90: ...mador rápido 2 25 kW Quemador trasero derecho quemador grande rápido 3 10 kW Foco de inducción diámetro 210 3100 W Foco de inducción diámetro 160 2000 W Potencias obtenidas con gas natural G20 A C D B P00319 D B E F Diám 210 Diám 160 MODELO 4 QUEMADORES DE GAS D DT TG G1 11 12 27 7 MODELO 2 QUEMADORES DE GAS Y 2 FOCOS DE INDUCCIÓN D DT TI I1 11 12 27 7 ES 3 3 UTILIZACIÓN DEL APARATO ...

Страница 91: ...ara disminuirla Fig 03 Si el movimiento es lento regulará el nivel de potencia con mayor precisión que con un movimiento rápido O bien pulsando los mandos de potencias prerreguladas o Fig 04 Potencia 3 por defecto Potencia 6 por defecto Fig 05 Estos 2 mandos pueden ser modificados por el usuario Ver capítulo M Mo od di if fi ic ca ac ci ió ón n d de e l lo os s m ma an nd do os s d de e p pr re er...

Страница 92: ...pantalla Evite tocar esas zonas Las llamas del fuego de gas son más pequeñas a nivel de los dedos de parrilla para proteger el esmalte de la parrilla Atención En caso de que se apague accidentalmente por ejemplo por una corriente de aire su placa está equipada con un sistema de reencendido automático Está limitado en 2 reencendidos en un intervalo de 10 segundos La temperatura máxima de utilizació...

Страница 93: ...n puede seleccionar el mando y pulsar repetidas veces para regular el valor del minutero Fig 04 Al finalizar la cocción el minutero indica y una señal sonora le avisa Pulse el mando de selección del foco para borrar la información Fig 05 Puede asignar un minutero a cada uno de los focos Se puede detener el minutero manteniendo pulsado un momento el mando minutero PRECO La pantalla del minutero cor...

Страница 94: ...inutero o bien con el mando minutero PRECO Parpadea un con el valor del tiempo elegido Fig 02 Cuando se termina la regulación la pantalla vuelve a quedar fija y comienza la cuenta atrás La Fig 03 indica una selección del minutero de 20 minutos Puede detener el minutero seleccionando la zona de cocción correspondiente Puede activar hasta 4 minuteros independientes placa apagada Durante el último mi...

Страница 95: ...ran 5 segundos deslice el dedo por la barra de deslizamiento del minutero para aumentar el tiempo de cocción que desea Fig 02 La pantalla de tiempo queda fija durante 3 segundos y luego muestra el tiempo restante Se emite una señal sonora que confirma su selección Esta función existe con o sin la función de minutero Si el minutero indica un tiempo no podrá cambiarlo pulsando antes de que hayan pas...

Страница 96: ...nteniendo pulsado un momento Fig 01 Aparece en la pantalla la potencia preseleccionada actual Regule con la barra de deslizamiento de la potencia el nuevo valor de potencia que desea deslizando el dedo hacia la izquierda o hacia la derecha Fig 02 Se puede seleccionar entre 1 y 5 Se puede seleccionar entre 6 y 9 Una señal sonora valida su acción al cabo de un momento Fig 02 ES 3 3 UTILIZACIÓN DEL A...

Страница 97: ...ueo temporal de la placa durante la limpieza Para activar CLEAN LOCK La placa tiene que estar apagada Pulse brevemente el mando Fig 01 Se escucha una señal sonora y se enciende el indicador Después de un tiempo predefinido el bloqueo quedará automáticamente anulado Se escucharán dos pitidos y se apagará el indicador Fig 01 ES 3 3 UTILIZACIÓN DEL APARATO En el modo bloqueo cualquier acción hará que...

Страница 98: ...e o retire el objeto y vuelva a poner en marcha la cocción AUTO STOP SYSTEM Si se olvida de una cocción según un tiempo predefinido esta función de seguridad corta automáticamente la placa 1 a 8 horas según la potencia aparece en la pantalla AS y se escucha una señal sonora durante unos 2 minutos Pulse el mando de selección de la zona para borrar las informaciones La acción se confirma con un dobl...

Страница 99: ...Mantenga abiertos los orificios de ventilación natural de la habitación o instale un dispositivo de ventilación mecánica campana de ventilación mecánica Una utilización intensiva y prolongada del aparato podría requerir una ventilación adicional por ejemplo abriendo una ventana o una ventilación más eficaz por ejemplo aumentando la potencia de la ventilación mecánica si esta existe se necesita un ...

Страница 100: ...tes de acero esmaltado con o sin antiadherente olla a presión freidora sartén parrilla de asar carne Recipientes de fundición para no rayar la vitrocerámica evite hacerlos deslizar sobre la placa o elija un recipiente con fondo esmaltado Recipientes de acero inoxidable aptos para la inducción la mayoría de los recipientes de acero inoxidable son aptos para la cocción por inducción cacerolas cazuel...

Страница 101: ...ía estallar esta precaución es válida también para los demás modos de cocción Se recomienda no colocar objetos metálicos como cuchillos tenedores cucharas o tapas sobre la encimera ya que podrían calentarse multirrecipientes Esta zona de cocción de 23 cm Se adapta automáticamente al recipiente Aporta la potencia óptima Proporciona un excelente reparto del calor Proporciona una temperatura de cocci...

Страница 102: ...za de las bujías y los inyectores En caso de manchas persistentes utilice un detergente en crema no abrasivo y a continuación aclárelo con agua limpia Seque cuidadosamente todas las piezas del quemador antes de volver a utilizar la placa de cocción Limpieza de las parrillas y los quemadores de gas Esponja de baño Productos especiales para vitrocerámica ej Cera clen Limpie con agua caliente y séque...

Страница 103: ...lsando xxx indica E4 y uno de los indicadores del quemador con fallo se enciende unos segundos y se apaga a continuación Los focos no funcionan Fallo de posición del interruptor de cambio de gas Compruebe la posición del interruptor de cambio de gas y pulse el mando de parada general para borrar el fallo Vuelva a encender la placa Si el fallo persiste llame al Servicio Técnico se lee D2 El quemado...

Страница 104: ...fallo Si el fallo persiste llame al Servicio Técnico se lee EC y uno de los indicadores de los quemadores está encendido Los circuitos electrónicos se han recalentado Compruebe las condiciones de empotramiento Pulse el mando de parada general de gas para borrar la indicación E1 Si el fallo persiste llame al Servicio Técnico se lee E1 o una serie de Los focos han dejado de funcionar Pulse el mando ...

Страница 105: ...ca o de cambiar la bombona de gas repita varias veces las operaciones de encendido hasta que llegue gas a los quemadores Compruebe que el inyector no está obstruido y si fuera así desatásquelo con un imperdible Encienda el quemador antes de colocar la cacerola Se producen chispas pero los quemadores no se encienden Evite que se produzcan corrientes de aire violentas en la habitación Compruebe que ...

Страница 106: ...12 minutos 10 minutos 25 minutos 3 4 minutos 3 4 minutos 10 minutos PREPARACIONES Caldos Purés espesos Caldo corto Asados Holandesa bearnesa Bechamel aurora Endibias espinacas Guisantes Tomates a la provenzal Patatas doradas Pasta Filete Carne guisada Osso bucco Escalope Solomillo parrilla fundición Patatas fritas Buñuelos Arroz con leche Compota de frutas Crepes Chocolate Natilla SOPAS PESCADO SA...

Страница 107: ...DURAS CARNES CARNES POCO GRUESAS FILETE FRITO ASADO PARRILLA FUNDICIÓN FRITOS FRITOS CONGELADOS FRITOS FRESCOS VARIANTES OLLA A PRESIÓN DESDE QUE COMIENZA A HACER RUIDO COMPOTAS CREPES NATILLA CHOCOLATE FUNDIDO MERMELADAS LECHE HUEVOS AL PLATO PASTA POTITOS DE BEBÉ BAÑO MARÍA GUISADOS ARROZ ARROZ CON LECHE 10 7 6 5 4 3 2 1 9 8 11 12 POTENCIA EN ZONA DE COCCIÓN FREÍR COCER DORAR COCER PREPARACIONES...

Страница 108: ...ta información figura en la placa de características Fig 01 PIEZAS ORIGINALES Siempre que relice cualquier intervención de mantenimiento pida que se utilicen exclusivamente piezas de recambio certificadas originales INTERVENCIONES CE DTI702 Fig 01 FagorBrandt SAS arrendatario gerente SAS con un capital social de 20 000 000 euros Registro Mercantil de Nanterre 440 303 196 ES 8 8 SERVICIO TÉCNICO Y ...

Страница 109: ...109 ...

Страница 110: ...segura a realização de produtos de alta execução ao serviço da arte culinária uma paixão partilhada por todos os amantes da cozinha Desejamos lhe toda a satisfação durante a utilização deste novo aparelho e teremos todo o prazer em receber as suas sugestões e responder às suas perguntas Convidamo lo a formulá las ao nosso serviço de apoio ao cliente ou no nosso website Convidamo lo a registar o se...

Страница 111: ...nto 127 Utilização do temporizador durante a cozedura 129 Utilização do temporizador independente 130 Utilização da função ELAPSED TIME 131 Utilização das pré selecções da potência 132 Sistema de segurança para crianças 133 Clean lock bloqueio para limpeza 133 Segurança em funcionamento 134 Recipientes adaptados aos bicos de gás 135 Escolha dos acessórios Segurança na indução 136 4 MANUTENÇÃO NORM...

Страница 112: ...ação eléctrica ou a gás antes de qualquer intervenção Se ligar aparelhos eléctricos a uma tomada situada perto da placa assegure se de que o fio da alimentação não entra em contacto com as zonas quentes Por questões de segurança depois de cada utilização não se esqueça de fechar a válvula de comando geral do gás canalizado ou a válvula da botija de gás butano propano A marca CE está assinalada nes...

Страница 113: ...Serviço Pós Venda e Relações com o Consumidor esta página também lhe indica onde encontrar as referências no aparelho Este aparelho não foi criado para ser utilizado por pessoas incluindo crianças cujas capacidades físicas sensoriais ou mentais sejam reduzidas ou por pessoas com falta de experiência ou conhecimento excepto se estas tiverem a ajuda de uma pessoa responsável pela segurança supervisã...

Страница 114: ... bico Cabeça do bico Injector C D Vela de acendimento Termopar E PT 1 1 INFORMAÇÕES DESTINADAS AO UTILIZADOR P00319 D C B A E MODELO DE 4 BICOS DE GÁS D DT TG G1 11 12 27 7 MODELO DE 2 BICOS DE GÁS E 2 FOCOS POR INDUÇÃO D DT TI I1 11 12 27 7 ...

Страница 115: ...O DO FOCO DIANTEIRO DIREITO BOTÃO DE SELECÇÃO DO FOCO DIANTEIRO ESQUERDO INDICADORES LUMINOSOS DA ZONA SELECCIONADA FOCOS DIANTEIRO ESQUERDO E DIANTEIRO DIREITO BOTÃO DE SELECÇÃO DO FOCO TRASEIRO ESQUERDO Estes botões servem para ligar ou desligar as zonas de aquecimento Quando uma zona é seleccionada o s indicador es luminoso s correspondente s acende m Pode então definir os parâmetros BOTÕES DE ...

Страница 116: ...omo a combustão só é possível graças ao oxigénio é necessário que o ar seja renovado permanentemente e que os produtos da combustão sejam evacuados é necessária uma saída mínima do ar de 2 m3 h por kW de potência do gás Exemplo Potência total 0 85 1 5 2 25 3 1 7 7 kW 7 7 kW x 2 15 4 m3 h de fluxo mínimo do ar Estas placas encontram se em conformidade com o aquecimento dos móveis de acordo com a no...

Страница 117: ...b pressão no compartimento que possa eventualmente existir por baixo da placa Coloque a sua placa de cozinha na abertura do móvel de suporte tendo o cuidado de puxar a placa para si Volte a colocar as grelhas de suporte dos acessórios as tampas e as cabeças dos bicos Ligue o fio da alimentação da placa a uma tomada eléctrica na sua cozinha consulte o parágrafo Ligação eléctrica da placa de cozinha...

Страница 118: ...eabilidade entre o vidro e a bancada de trabalho 4 Volte a colocar as cabeças e as tampas dos bicos e as grelhas ENCASTRAMENTO POR CIMA DE UM MÓVEL COM PORTA OU GAVETA consulte a imagem ao lado O encastramento da sua placa por cima de um forno necessita de uma passagem de ar de 4 mm à frente em toda a largura da placa Não aconselhamos a instalar a placa por cima de um forno cuja ventilação não sej...

Страница 119: ...te prolongado aparece um código luminoso Estas informações desaparecem após 20 segundos LIGAÇÃO ELÉCTRICA SECÇÃO DO FIO A UTILIZAR O fio de protecção verde amarelo está ligado ao terminal da terra do aparelho e deve ser ligado ao terminal da terra da instalação Se o fio da alimentação estiver danificado deverá ser substituído pelo fabricante o serviço pós venda ou uma pessoa igualmente habilitada ...

Страница 120: ...orno ou se a proximidade com outros aparelhos produtores de calor puder provocar o aquecimento da ligação então esta deve ser obrigatoriamente realizada com tubos rígidos No caso de se utilizar um tubo flexível ou um tubo maleável como é o caso do gás butano este não deverá entrar em contacto com partes móveis do armário nem passar em zonas que possam ser obstruídas Atenção Todos os canos maleávei...

Страница 121: ...is de acordo com a norma XP D 36 112 cuja duração de vida é de 10 anos Imagem 02 Nas instalações já existentes é possível utilizar um tubo flexível equipado com braçadeiras de aperto conforme com a norma XP D 36 110 cujo tempo de vida é de 5 anos Nesse caso é necessário utilizar uma extremidade sem esquecer de colocar uma junta de impermeabilidade entre a referida extremidade e o cotovelo da placa...

Страница 122: ...espondente no lugar de acordo com as indicações dos injectores e com a tabela de características dos gases apresentada no final do capítulo Para isso Aperte os à mão até que o injector fique bloqueado Aperte bem o injector com a chave Com um lápis faça uma linha na placa do forno no local indicado Imagem 03 Rode a chave no sentido dos ponteiros do relógio até que a linha apareça do outro lado Imag...

Страница 123: ...al sonoro indica a sua escolha O visor do foco traseiro direito indica o tipo de gás pré seleccionado Indicação 1 GAS PARA O GÁS NATURAL Imagem 03 Indicação 2 GAS PARA O GÁS BUTANO PROPANO Imagem 04 Para modificar o tipo de gás utilize o botão deslizante da potência fazendo deslizar o seu dedo para a esquerda ou para a direita O tipo de gás é validado automaticamente passados 5 segundos Imagem 05 ...

Страница 124: ... 137 137 Débito calorífico nominal kW 3 15 3 15 3 10 3 10 Débito calorífico reduzido kW 0 830 0 870 0 870 Débito horário g h 229 225 Débito horário l h 295 343 BICO SEMI RÁPIDO Marcação no injector 62 62 94 94 Débito calorífico nominal kW 1 50 1 50 1 50 1 50 Débito calorífico reduzido kW 0 620 0 615 0 615 Débito horário g h 109 107 Débito horário l h 143 166 BICO AUXILIAR Marcação no injector 45 4...

Страница 125: ...o do injector 62 Marcação dos injectores ELECTRICIDADE Alimentação 220 240 V 50 Hz Potência total absorvida 3100 W 1 Dimensões da placa Largura 650 mm Profundidade 520 mm Peso 11 4 kg Dimensões da caixa Largura 549 mm Altura 59 mm Profundidade 470 mm PT 2 2 INSTALAÇÃO DO SEU APARELHO 137 94 P00319 88A 62 137 94 1R 63 88A 62 7R 45 MODELO DE 4 BICOS DE GÁS D D T T G G 1 1 1 1 2 2 7 7 MODELO DE 2 BIC...

Страница 126: ... rápido 2 25 kW Bico traseiro direito bico grande rápido 3 10 kW Foco por indução diâmetro 210 3100 W Foco por indução diâmetro 160 2000 W Potências obtidas com gás natural G20 A C D B P00319 D B E F Diâm 210 Diâm 160 MODELO DE 4 BICOS DE GÁS D DT TG G1 11 12 27 7 MODELO DE 2 BICOS DE GÁS E 2 FOCOS POR INDUÇÃO D DT TI I1 11 12 27 7 PT 3 3 UTILIZAÇÃO DO SEU APARELHO ...

Страница 127: ...iminuir Imagem 03 Um movimento lento permite regular de modo mais preciso o nível de potência desejado em relação a um movimento rápido Ou prima os botões de potências pré reguladas ou Imagem 04 Potência 3 predefinida Potência 6 predefinida Imagem 05 Estes 2 botões podem ser modificados pelo utilizador Consulte o Capítulo M Mo od di if fi ic ca aç çã ão o d do os s b bo ot tõ õe es s d da as s p p...

Страница 128: ...e esse tempo Evite pois tocar nas zonas indicadas As chamas do bico a gás são mais pequenas ao nível das pontas da grelha para proteger o esmalte da grelha Atenção Em caso de extinção acidental ex Correntes de ar a sua placa vem equipada com um sistema de ligação automática Este está limitado a 2 ligações automáticas no espaço de 10 segundos A temperatura mínima de utilização é de 10 ºC para asseg...

Страница 129: ...Também pode seleccionar o botão premindo sucessivamente para regular o valor do temporizador Imagem 04 No final da cozedura o temporizador indica e um sinal sonoro avisa o Prima o botão de selecção do foco para apagar estas informações Imagem 05 Pode atribuir um temporizador a cada um dos focos O temporizador pode ser parado mantendo premido o botão temporizador recomendado A visualização do tempo...

Страница 130: ...do temporizador recomendado Um pisca com o valor do tempo escolhido Imagem 02 No fim da regulação a visualização fica fixa e começa a contagem decrescente A Imagem 03 indica uma escolha do temporizador com 20 minutos Pode parar o temporizador seleccionando a zona de cozedura correspondente Assim pode activar até 4 temporizadores independentes placa desligada Durante o último minuto a contagem decr...

Страница 131: ... seu dedo no botão deslizante do temporizador para aumentar o tempo de cozedura que deseja obter Imagem 02 A apresentação do tempo fica fixa durante 3 segundos e depois a apresentação do tempo restante aparece É emitido um som para confirmar a sua escolha Esta função existe com ou sem a função do temporizador Se for apresentado um tempo no temporizador não pode mudar este tempo nos 5 segundos após...

Страница 132: ... para modificar mantendo premido Imagem 01 A potência pré seleccionada actual é apresentada No botão deslizante da potência regule o novo valor da potência fazendo deslizar o seu dedo para a esquerda ou direita à sua escolha Imagem 02 Escolha possível entre 1 e 5 Escolha possível entre 6 e 9 Um som valida a sua acção após um momento Imagem 02 PT 3 3 UTILIZAÇÃO DO SEU APARELHO Imagem 01 ou ...

Страница 133: ...o permite bloquear temporariamente a sua placa durante a limpeza Para activar o CLEAN LOCK A sua placa tem de estar desligada Prima o botão Imagem 01 É emitido um som e o indicador luminoso começa a piscar Após um tempo predefinido o bloqueio desliga se automaticamente É emitido um som duplo e o indicador luminoso desliga se Imagem 01 PT 3 3 UTILIZAÇÃO DO SEU APARELHO No modo de bloqueio em qualqu...

Страница 134: ...tido um som Limpe a placa ou retire o objecto e comece de novo a cozedura AUTO STOP SYSTEM Caso se esqueça da placa ligada com um tempo predefinido esta função de segurança corta automaticamente a alimentação da sua placa de 1 a 8 horas de acordo com a potência AS é apresentado e é emitido um som durante cerca de 2 minutos Prima um botão do fogão para apagar estas informações Um som duplo confirma...

Страница 135: ...dos ou raspando na parte superior do vidro Mantenha abertos os orifícios de ventilação natural ou instale um dispositivo de ventilação mecânico exaustor de ventilação mecânica O uso intensivo e prolongado do aparelho pode necessitar de uma ventilação complementar como abrir a janela ou criar uma ventilação mais eficaz ou ainda aumentar a potência da ventilação mecânica se esta existir é necessário...

Страница 136: ...m ou sem revestimento antiaderente Cataplana fritadeira frigideira sertã Recipientes de ferro fundido Para não riscar a vitrocerâmica evite deslizar o acessório por cima da placa ou escolha um recipiente com um fundo esmaltado Recipientes em inox adaptados para indução A maior parte dos recipientes em inox são adequados para a cozedura por indução caçarolas panelas diversas frigideiras fritadeiras...

Страница 137: ...de rebentar esta precaução também é válida para todos os outros modos de cozedura Recomendamos que não coloque objectos metálicos como facas garfos colheres e tachos no local da cozedura pois estes podem aquecer multi recipientes Esta zona de cozedura de 23 cm Adapta se automaticamente ao recipiente Oferece uma potência optimizada Distribui de modo excelente o calor Fornece uma temperatura de coze...

Страница 138: ...nchas persistentes utilize um detergente em creme não abrasivo e depois enxagúe com água limpa Limpe cuidadosamente as diversas peças do bico antes de voltar a utilizar a placa de cozinha Manutenção das grelhas e bicos do gás Esponja sanitária Produtos especiais de vidro vitrocerâmico por ex Cera clean Limpe com água quente e enxagúe No caso de nódoas resistentes utilize produtos especiais para vi...

Страница 139: ...ar premindo Aparece E4 e um dos indicadores luminosos do bico acende alguns segundos e depois desaparece Os bicos não funcionam Problema no posicionamento do interruptor de mudança de gás Verifique a posição do interruptor de mudança do gás e prima o botão de paragem geral do gás para eliminar o problema Repita a ligação Se o problema continuar contacte o Serviço Pós Venda aparece D2 Esse bico est...

Страница 140: ...lema continuar contacte o Serviço Pós Venda apresenta EC e um dos indicadores luminosos dos bicos acende Os circuitos electrónicos aqueceram se Verifique as condições de encastramento Prima o botão de paragem geral do gás para apagar a apresentação E1 Se o problema continuar contacte o Serviço Pós Venda apresenta E1 ou uma série de Os bicos não funcionam Prima o botão de paragem geral do gás para ...

Страница 141: ...aca ou de substituir a botija do gás carregue no botão e mantenha o na posição de abertura máxima até o gás chegar aos bicos Verifique se o injector não está bloqueado e se for o caso desbloqueie o com uma agulha Acenda o bico antes de colocar a panela Existem faíscas mas os bicos não se acendem Evite correntes de ar fortes na unidade Verifique a correspondência entre o gás utilizado e os injector...

Страница 142: ...5 minutos 3 4 minutos 3 4 minutos 10 minutos PREPARAÇÕES Caldos Sopas de legumes espessas Molho de escabeche Grelhado Holandês bearnês Bechamel aurora Endívias espinafres Ervilhas cozinhadas Tomates à moda provençal Batatas alouradas Massas Bife Guisado de vitela Osso bucco Escalopes fritos Turnedôs grelha em ferro fundido Batatas fritas Rissóis Arroz doce Compotas de fruta Crepes Chocolate Creme ...

Страница 143: ...BÚRGUERES NA FRIGIDEIRA GRELHADOS GRELHADOR EM FERRO FUNDIDO FRITOS FRITOS CONGELADOS FRITOS FRESCOS VARIANTES PANELA DE PRESSÃO ATÉ COMEÇAR A APITAR COMPOTAS CREPES CREME INGLÊS CHOCOLATE DERRETIDO DOCES LEITE OVOS ESTRELADOS MASSAS PEQUENOS RECIPIENTES DE COMIDA PARA BEBÉ GUISADOS ARROZ CRIOULO ARROZ DOCE 10 7 6 5 4 3 2 1 9 8 11 12 POTÊNCIA NA ZONA DE COZEDURA FRITAR COZER DOURAR PREPARAÇÕES NOV...

Страница 144: ...tipo número de série Estas informações figuram na placa informativa Imagem 01 PEÇAS DE ORIGEM Durante uma intervenção de manutenção peça a utilização exclusiva de peças sobresselentes certificadas de origem INTERVENÇÕES CE DTI702 Imagem 01 FagorBrandt SAS locatário gerente SAS com o capital social de 20 000 000 Euros RCS Nanterre 440 303 196 PT 8 8 SERVIÇO PÓS VENDA E RELAÇÕES COM O CONSUMIDOR 144...

Страница 145: ...145 145 ...

Страница 146: ...ntwickelter Technologie mit edlen Materialien schafft De Dietrich hochwertige Produkte für kulinarische Genüsse eine Leidenschaft die alle Gourmets teilen Wir wünschen Ihnen mit Ihrem neuen Gerät viel Freude und würden uns über Anregungen freuen Gerne beantworten wir auch Ihre Fragen die Sie im Internet an unseren Verbraucherservice stellen können Um die Vorteile der Marke nutzen zu können registr...

Страница 147: ...der Zeitschaltuhr während des Garens 21 Nutzung der Zeitschaltuhr unabhängig von einem Garvorgang 22 Nutzung der Funktion ELAPSED TIME 23 Einstellung der voreingestellten Leistungen 24 Kindersicherung 25 Clean Lock 25 Sicherheit während des Betriebs 26 Für Gasbrenner geeignetes Kochgeschirr 27 Auswahl der Kochtöpfe Induktionssicherung 28 4 LAUFENDE PFLEGE DES GERÄTS 30 5 KLEINE FEHLER UND STÖRUNGE...

Страница 148: ...aydosen etc zu nutzen Ihr Kochfeld muss vor jedem Eingriff von seinen Energiequellen Strom und Gas getrennt werden Beim Anschluss elektrischer Geräte an eine Steckdose in Herdnähe sicher stellen dass das Stromkabel nicht mit warmen Kochzonen in Berührung kommen kann Aus Sicherheitsgründen sollten Sie den Haupthahn der Gasleitung oder den Hahn an der Butan oder Propan Gasflasche nach jedem Gebrauch...

Страница 149: ...uf dieser Seite wird auch erklärt wo sich diese Angaben auf Ihrem Gerät befinden Dieses Gerät ist nicht dafür geeignet von Personen einschließlich Kindern mit kör perlich sensorisch oder mental einge schränkten Fähigkeiten oder von Menschen ohne Erfahrung oder Kenntnis benutzt zu werden außer wenn sie von einer für ihre Sicherheit verantwortlichen Person über wacht werden oder zuvor in die Geräteb...

Страница 150: ...EIBUNG DES KOCHFELDS A B Brennerkappe Brennerkopf Düse C D Zündkerze Thermoelement E DE 1 FÜR DEN BENUTZER P00319 D C B A E MODELL MIT 4 GASBRENNERN DTG1127 MODELL MIT 2 GASBRENNERN UND 2 INDUKTIONSZONEN DTI1127 ...

Страница 151: ...AHLTASTE DER ZONE VORNE LINKS ANZEIGEN DER AUSGEWÄHLTEN ZONE ZONEN VORNE LINKS UND VORNE RECHTS WAHLTASTE DER ZONE HINTEN LINKS Diese Tasten dienen zum Ein und Ausschalten der Kochzonen Wenn eine Zone ausgewählt wurde leuchtet die entsprechende Anzeigelampe auf und die Parameter können eingestellt werden WAHLTASTEN Mit diesen Tasten können die Leistungsparameter die Zeitschaltuhr die Programmierun...

Страница 152: ... sind besonders zu beachten Da die Verbrennung nur durch den Sauerstoff in der Luft erfolgen kann ist es erforderlich dass die Luft ständig erneuert wird und dass die Verbrennungsprodukte abgeführt werden eine Luftmenge von mindestens 2 m3 h pro kW Gasleistung ist erforderlich Beispiel Gesamtleistung 0 85 1 5 2 25 3 1 7 7 kW 7 7 kW x 2 15 4 m3 h Mindestluftmenge In Bezug auf die Erhitzung von Möbe...

Страница 153: ...weisen In keinem Fall Spraydosen oder Druckbehälter im Bereich unter dem Kochfeld aufbewahren Das Kochfeld in den Ausschnitt des Einbaumöbels legen und nach vorne ziehen Topfauflageroste Brennerkappen und Brennerköpfe einsetzen Das Netzkabel des Kochfelds an die Elektroinstallation Ihrer Küche anschließen s Elektrischer Anschluss des Kochfelds Sie können das Kochfeld auch mit den vier Laschen die ...

Страница 154: ...wischen Glasfeld und Arbeitsplatte 4 Brennerköpfe Brennerkappen und Roste wieder auflegen EINBAU ÜBER EINEM MÖBELSTÜCK MIT TÜR ODER SCHUBLADE s nebenstehende Abbildung Beim Einbau des Kochfelds über einem Backofen muss vorne ein Luftspalt von min destens 4 mm über die gesamte Breites des Kochfelds verbleiben Es wird davon abgeraten das Kochfeld über einem Backofen einzubauen dessen Belüftung nicht...

Страница 155: ...usfall erscheint ein Leuchtcode Diese Informationen ver schwinden nach 20 Sekunden ELEKTRISCHER ANSCHLUSS ZU VERWENDENDER KABELQUERSCHNITT Der Schutzleiter grün gelb ist an die Erdungsklemme des Gerätes angeschlossen und muss mit der Erdungsklemme der Installation verbun den werden Um jegliche Gefahr auszuschließen muss ein beschädigtes Netzkabel vom Hersteller dessen Kundendienst oder einer ähnli...

Страница 156: ...wird oder die Nähe anderer heizender Teile zur Erhitzung des Anschlusses führen könnte muss der Anschluss unbedingt über ein festes Rohr erfolgen Wird ein Schlauch oder ein flexibles Rohr bei Butangas verwendet darf es nicht mit einem beweglichen Teil des Möbels in Berührung kommen oder durch eine Stelle geführt werden die hinterher schwer zugänglich ist Achtung Alle biegsamen Rohre und Schläuche ...

Страница 157: ... mit Anschlussver schraubungen gemäß der Norm NF D 36 103 dessen Lebensdauer 10 Jahre beträgt Abb 02 In einer bestehenden Installation kann ein Schlauch mit Rohrschellen gemäß Norm XP D 36 110 und einer Lebensdauer von 5 Jahren verwendet werden In diesem Fall muss ein Schlauchstutzen verwendet und eine Dichtung zwischen Schlauchstutzen und Rohrbogen des Kochfelds eingesetzt werden Abb 03 Q Q Abb 0...

Страница 158: ...bb 02 An Stelle der Düsen die passenden Gasdüsen entsprechend der Kennzeichnung der Düsen und der Tabelle der technischen Daten des Gases siehe Kapitelende erset zen Hierzu Erst von Hand schrauben bis die Düse blo ckiert Den Schlüssel ganz auf die Düse setzen An der angegebenen Stelle mit einem Bleistift eine Linie auf der Kochstelle ziehen Abb 03 Den Schlüssel im Uhrzeigersinn drehen bis dieser S...

Страница 159: ...l an In den folgenden 5 Sekunden Zweimal die Taste drücken Abb 02 Ein akustisches Signal zeigt die Auswahl an Die Anzeige der Zone hinten rechts zeigt die vorgewählte Gasart an Anzeige 1 GAS FÜR ERDGAS Abb 03 Anzeige 2 GAS FÜR BUTANE PROPANE Abb 04 Um die Gasart zu wechseln mit dem Finger auf dem Schieberegler nach links oder rechts fahren Die Gasart wird automatisch nach 5 Sekunden bestätigt Abb ...

Страница 160: ... Wärmeabgabe kW 3 15 3 15 3 10 3 10 Reduzierte Wärmeabgabe kW 0 830 0 870 0 870 Stündliche Leistung g h 229 225 Stündliche Leistung l h 295 343 BRENNER MITTELSCHNELL Kennzeichen auf der Gasdüse 62 62 94 94 Nominale Wärmeabgabe kW 1 50 1 50 1 50 1 50 Reduzierte Wärmeabgabe kW 0 620 0 615 0 615 Stündliche Leistung g h 109 107 Stündliche Leistung l h 143 166 HILFSBRENNER Kennzeichen auf der Gasdüse 4...

Страница 161: ...s Beispiel Kennzeichnung Düse 62 Kennzeichnung der Düsen STROMVERSORGUNG Stromanschluss 220 240 V 50 Hz Aufgenommene Gesamtleistung 3100 W 1 Abmessungen des Kochfelds Breite 650 mm Tiefe 520 mm Gewicht 11 4 kg Gehäusemaße Breite 549 mm Höhe 59 mm Tiefe 470 mm DE 2 EINBAU DES GERÄTS 137 94 P00319 88A 62 137 94 1R 63 88A 62 7R 45 MODELL MIT 4 GASBRENNERN DTG1127 MODELL MIT 2 GASBRENNERN UND 2 INDUKT...

Страница 162: ...hnellbrenner 2 25 kW Brenner hinten rechts Hochschneller Brenner 3 10 kW Induktionskochzone Durchmesser 210 3100 W Induktionskochzone Durchmesser 160 2000 W Mit Erdgas G20 erzielte Leistung A C D B P00319 D B E F Durchmesser 210 Durchmesser 160 MODELL MIT 4 GASBRENNERN DTG1127 MODELL MIT 2 GASBRENNERN UND 2 INDUKTIONSZONEN DTI1127 DE 3 BESCHREIBUNG DES GERÄTS ...

Страница 163: ...ungsreduzierung mit dem Finger von rechts nach links fahren Abb 03 Durch eine langsame Finger bewegung kann die Leistungsstärke genau eingestellt werden Oder durch Drücken der voreingestellten Leistungstasten oder Abb 04 Voreingestellte Leistungsstufe 3 Voreingestellte Leistungsstufe 6 Abb 05 Die Voreinstellung dieser beiden Tasten kann vom Benutzer verändert werden S Kapitel Änderung der voreinge...

Страница 164: ...chenden Zonen nicht berühren An den Roststäben sind die Flammen der Kochzone zum Schutz der Emaillierung des Rostes kleiner Achtung Für ein unbeabsichtigtes Erlöschen z B durch Durchzug der Flamme verfügt das Kochfeld über ein automatisches Zündsystem Dieses Zündsystem ist auf 2 Neuzündungen innerhalb von 10 Sekunden begrenzt Zur Gewährleistung der optimalen Funktion des Hahnes beträgt die Mindest...

Страница 165: ...tschaltuhr auch durch aufeinanderfolgendes Drücken der Taste einstellen Abb 04 Am Ende des Garvorgangs zeigt die Zeitschaltuhr an und es ertönt ein Signalton Zum Löschen dieser Information die Wahltaste der Kochzone drücken Abb 05 Jeder Kochzone kann eine Zeitschaltuhr zugeordnet werden Die Zeitschaltuhr kann durch längeres Drücken der Taste voreingestellte Zeitschaltuhr ausgeschaltet werden Die A...

Страница 166: ...r eingestellte Zeit einstellen Ein blinkt zusammen mit der ausgewählten Zeit Abb 02 Am Ende der Einstellung wird dauerhaft angezeigt und die Uhr beginnt rückwärts zu zählen In Abb 03 ist die eingestellte Zeit von 20 Minuten dargestellt Die Zeitschaltuhr kann durch Anwahl von der entsprechenden Zone ausgeschaltet werden Bis zu 4 Zeitschaltuhren können unab hängig vom Garvorgang aktiviert werden Koc...

Страница 167: ... innerhalb von 5 Sekunden mit dem Finger über den Schieberegler fahren um die Dauer der Garzeit zu erhöhen Abb 02 Nach 3 Sekunden geht die Zeitanzeige in eine dauerhafte Anzeige über und die Restzeit wird angezeigt Zur Bestätigung der Eingabe ertönt ein Signalton Diese Funktion ist mit und ohne Zeitschaltuhr verfügbar Wenn auf der Zeitschaltuhr eine Zeit angezeigt wird kann diese Zeit 5 Sekunden l...

Страница 168: ...rch langes Drücken die zu ändernden Tasten oder auswählen Abb 01 Die derzeit voreingestellte Leistungsstufe wird angezeigt Durch Gleiten über den Leistungs schieberegler nach links oder rechts einen neuen Wert einstellen Abb 02 Wahl zwischen 1 und 5 möglich Wahl zwischen 6 und 9 möglich Kurz danach wird der Vorgang durch einen Signalton bestätigt Abb 02 DE 3 BESCHREIBUNG DES GERÄTS Abb 01 oder ...

Страница 169: ...e Verriegelung Ihres Kochfelds zum Reinigen Aktivierung von CLEAN LOCK Das Kochfeld muss ausgeschaltet sein Kurz die Taste drücken Abb 01 Es ertönt ein Signalton und die Anzeige blinkt Nach einer vorgegebenen Zeit wird die Verriegelung automatisch aufgehoben Es ertönt ein doppelter Signalton und die Anzeige erlischt Abb 01 DE 3 BESCHREIBUNG DES GERÄTS Im verriegelten Zustand erscheint bei jeder Ak...

Страница 170: ...enstand entfernen anschlie ßend den Kochvorgang erneut starten AUTO STOPP SYSTEM Falls ein laufender Garvorgang vergessen wird und eine vorgegebene Zeit abgelaufen ist schaltet diese Sicherheitsfunktion das Kochfeld automatisch ab 1 8 Stunden leis tungsabhängig AS wird angezeigt und ein etwa 2 Minuten anhaltender Signalton ertönt Zum Löschen dieser Informationen eine Taste der Kochzone drücken Ein...

Страница 171: ...rliche Belüftungslöcher offen lassen oder mechanische Belüftung einrich ten mechanische Dunstabzugshaube Bei intensiver und längerer Nutzung des Geräts kann eine Zusatzbelüftung z B ein offenes Fenster oder eine wirksamere Belüftung erforderlich werden z B durch Erhöhung der mechanischen Ventilationskraft falls vorhanden pro kW Gasleistung ist eine Luftmenge von 2 m3 h pro kW notwendig Beispiel fü...

Страница 172: ...tbeschichtung Schnellkochtopf Fritteuse Pfanne Fleischgrill Gefäße aus Gusseisen Um Kratzer auf dem glaskeramischen Kochfeld zu vermei den sollten diese Gefäße nicht über das Feld geschoben oder Gefäße mit emailliertem Boden verwendet werden Für Induktionskochfelder geeignete Edelstahltöpfe Die meisten Edelstahltöpfe eignen sich für das Kochen mit Induktions wärme Töpfe schwere Kochtöpfe Pfanne Fr...

Страница 173: ...t auch für alle anderen Garmethoden Es wird empfohlen keine Metallgegen stände wie Messer Gabeln Löffel und Deckel auf das Kochfeld zu legen sie können heiß werden Verschiedene Gefäßgrößen Diese Kochzone mit 23 cm Passt sich automatisch an das Gefäß an Liefert die optimale Heizleistung Gewährleistet eine hervorragende Wärme verteilung Liefert eine einheitliche Gartemperatur folg lich können Sie gr...

Страница 174: ...elemente auf Null drehen VORGEHENSWEISE Pflege der Kerzen und Düsen Bei hartnäckigen Flecken eine nicht scheuernde Creme ver wenden und mit klarem Wasser nachspülen Nach jeder Benutzung jedes Teil des Brenners sorgfältig reinigen Pflege der Roste und Gasbrenner Haushaltsschwamm Spezialprodukte für glas keramisches Glas z B Cera Clean Mit heißem Wasser reinigen dann abtrocknen Bei hart näckigen Fle...

Страница 175: ...ers leuchtet auf und erlischt nach einigen Sekunden wieder Die Zonen funktionieren nicht Falsche Position des Schalters für die Umstellung auf eine andere Gasart Die Position des Schalters für die Umstellung auf eine andere Gasart überprüfen und die Taste Allgemeine Gasausschaltung drücken um den Fehler zu löschen Erneut zünden Sollte der Fehler fortbestehen den Kundendienst benachrichtigen zeigt ...

Страница 176: ...r Fehler fortbestehen den Kundendienst benachrichtigen zeigt EC an und eine der Anzeigen der Brenner leuchtet Die elektronischen Schaltkreise sind überhitzt Den Einbau überprüfen Zum Löschen der Anzeige E1 die Taste Allgemeine Gasausschaltung drücken Sollte der Fehler fortbestehen den Kundendienst benachrichtigen zeigt E1 oder eine Reihe von an Die Zonen funktionieren nicht mehr Zum Löschen des Fe...

Страница 177: ...iert oder die Gasflasche gerade erst ausgetauscht wurde mehrmals zünden bis Gas an den Brennern angekommen ist Überprüfen dass die Düse nicht verstopft ist ansonsten mit einer Sicherheitsnadel reinigen Den Brenner anzünden bevor ein Topf auf die Kochstelle gestellt wird Es werden Funken erzeugt aber der oder die Brenner lassen sich nicht anzünden Starken Durchzug im Raum vermeiden Überprüfen der Ü...

Страница 178: ...uten 10 Minuten 25 Minuten 3 4 Minuten 3 4 Minuten 10 Minuten ZUBEREITUNGEN Brühe Dicke Suppen Würzige Brühe Grillgut Hollandaise Béarnaise Bechamel Aurore Sauce Chicoree Spinat Erbsen Provenzalische Tomaten Röstkartoffeln Teigwaren Steak Ragout Osso bucco Schnitzel in der Pfanne Tournedos Gusseisengrill Pommes frites Krapfen Milchreis Obstkompott Crêpes Schokolade Englische Creme SUPPEN FISCH SAU...

Страница 179: ...UFTAUEN VON GEMÜSE FLEISCH DÜNNES FLEISCH GEBRATENES STEAK GRILLGUT GRILL AUS GUSSEISEN FRITTIERTES TIEFGEFRORENEN POMMES FRISCHE POMMES VERSCHIEDENES SCHNELLKOCHTOPF AB DEM ZISCHEN KOMPOTT CRÊPES ENGLISCHE CREME GESCHMOLZENE SCHOKOLADE MARMELADE MILCH SPIEGELEIEr NUDELN BABYGLÄSCHEN WASSERBAD RAGOUT KREOLISCHER REIS MILCHREIS 10 7 6 5 4 3 2 1 9 8 11 12 HEIZSTUFE DER KOCHZONE FRITTIEREN KOCHEN BRÄ...

Страница 180: ...eben Diese Angaben finden Sie auf dem Typenschild Abb 01 ORIGINALERSATZTEILE Bitten Sie bei Reparaturarbeiten darum dass ausschließlich zertifizierte Original Ersatzteile verwendet werden REPARATURARBEITEN CE DTI702 Abb 01 FagorBrandt SAS vereinfachte Aktiengesellschaft mit einem Grundkapital von 20 000 000 Euro Handelsregister Nanterre 440 303 196 CZ5701046 09 11 DTG1127 DTI1127 DE 8 KUNDENDIENST...

Отзывы: