background image

3.1.6.

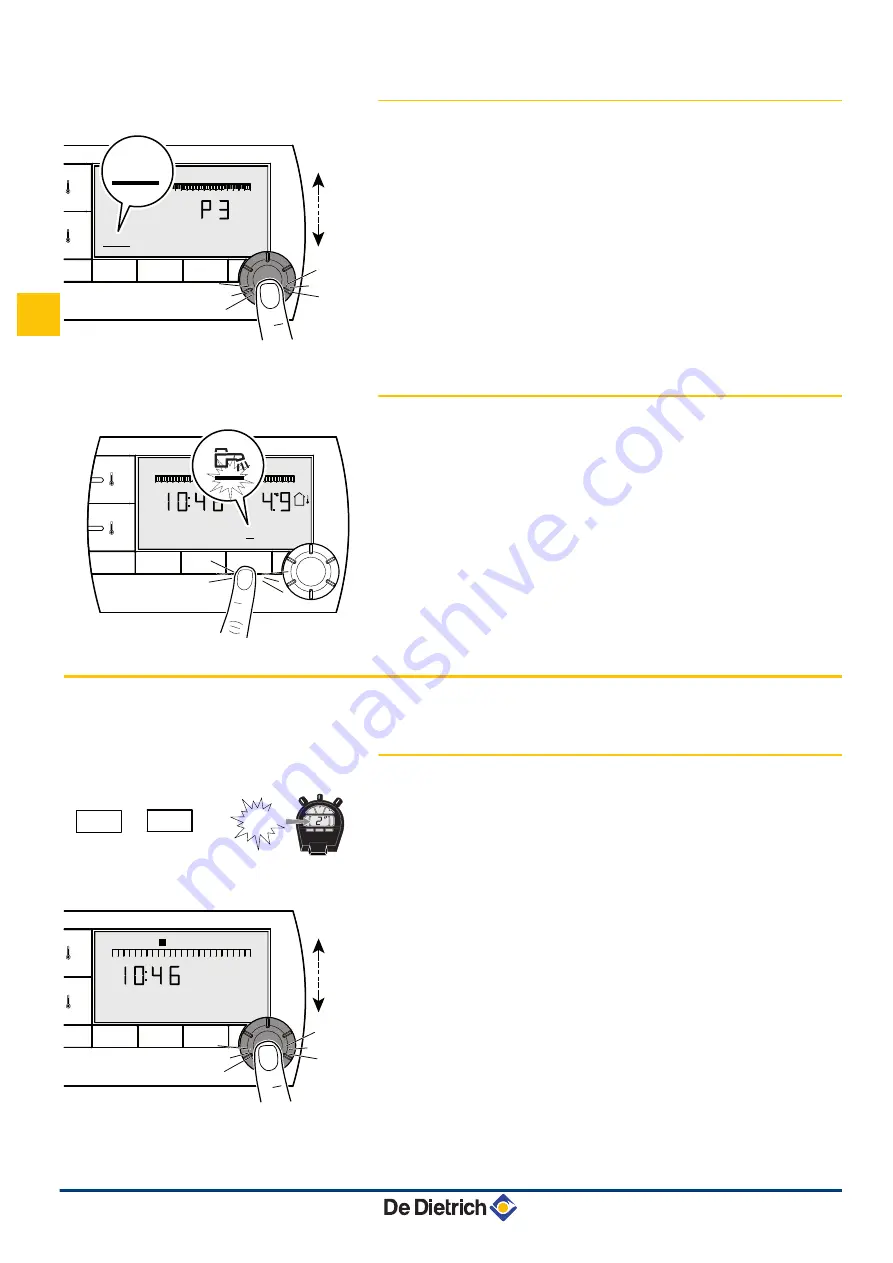
Selezionare un programma orario

1. Premere ripetutamente il pulsante 

MODE

 fino a quando l'icona

AUTO

 viene sottolineata.

2. Per selezionare il programma orario desiderato (P1, P2, P3 oppure

P4), ruotare la manopola regolabile.

3. Per confermare, premere la manopola.

3.1.7.

Forzare la produzione di acqua calda
sanitaria

4

Per una produzione temporanea di acqua calda sanitaria della

durata di 1 ora, premere il pulsante 

r

. Il trattino che sottolinea

l'icona 

r

 lampeggia.

4

Per una produzione permanente di acqua calda sanitaria, premere

per 5 secondi il pulsante 

r

. Il trattino che sottolinea l'icona 

r

 è fisso.

Per annullare l'esclusione, premere il pulsante 

r

. Il trattino che

sottolinea l'icona 

r

 non viene più visualizzato.

3.2

Utilizzo esteso dell'apparecchio

3.2.1.

Impostazione della data e dell'ora

1. Premere contemporaneamente per 2 secondi i pulsanti 

MODE

 et

r

. L'ora viene visualizzata.

2. Premere la manopola.
3.

I minuti lampeggiano.

Per modificare i minuti, ruotare la manopola regolabile.

Per confermare, premere la manopola.

4.

Le ore lampeggiano.

Per modificare le ore, ruotare la manopola regolabile.

Per confermare, premere la manopola.

5.

Il numero relativo al giorno lampeggia.

Per modificare il giorno (1=lunedì, 2=martedì, ecc), ruotare la

manopola regolabile.

Per confermare, premere la manopola.

6. Per tornare alla schermata principale, premere il pulsante 

MODE

oppure attendere 20 secondi.

C002392-C

MODE

r

AUTO

x

1

4

5

6

7

0

2

4

6

8

10

12

14

16

18

22

24

20

c

2

ÿ

AUTO

3

C002397-E

MODE

r

r

b

AUTO

x

0

2

4

6

8

10

12

14

16

18

22

24

20

°C

c

A000858-A

2"

+

MODE

r

A000853-A

MODE

r

x

0

2

4

6

8

10

12

14

16

18

22

24

20

c

1x

1

2

3

4

5

6

7

ÿ

3. Utilizzo

CDR4 - Collo AD253 - Collo AD284

74

23/06/2011  - 300020530-001-C

IT

Содержание AD253

Страница 1: ...FR DE EN NL IT ES PL Commande à distance radio CDR4 Colis AD253 Colis AD284 C002331 A Notice d installation d utilisation et d entretien 300020530 001 C FR ...

Страница 2: ...difier la température confort ou réduit 8 3 1 3 Activer temporairement le mode confort x 9 3 1 4 Activer temporairement le mode réduit m 9 3 1 5 Activer le mode vacances g 9 3 1 6 Sélectionner un programme horaire 10 3 1 7 Forcer la production d eau chaude sanitaire 10 3 2 Utilisation étendue de l appareil 10 3 2 1 Régler l heure et la date 10 3 2 2 Personnaliser un programme horaire 11 3 2 3 Cali...

Страница 3: ...age en mode confort ou production ECS autorisée 4 Zone claire v Période chauffage en mode réduit ou production ECS non autorisée G Le chiffre en surbrillance indique le jour courant 1 lundi H Afficheur de température 4 I Température extérieure 4 O Température ambiante I Affichage numérique heure courante valeurs réglées paramètres etc u Le symbole s affiche lorsque le système solaire si raccordé e...

Страница 4: ...on permanente g Mode Vacances Le symbole s affiche lorsqu une dérogation VACANCES antigel est activée 4 Le symbole clignote Mode Vacances programmé 4 Le symbole est fixe Mode Vacances actif w Mode Refroidissement Le symbole s affiche lorsqu une dérogation RAFRAICHISSEMENT est activée en été 4 Le symbole clignote Dérogation temporaire 4 Le symbole est fixe Dérogation permanente p Mode ETE Le chauff...

Страница 5: ... ou des piles alcalines du commerce type LR 6 AA 1 5 V Ne pas utiliser de piles rechargeables Lorsque le symbole D clignote sur l afficheur remplacer les piles 2 1 3 Appairer la commande à distance avec le module chaudière radio Colis AD252 Chaque commande à distance radio intègre d usine un numéro d identification unique qui permet au module chaudière radio de la reconnaître Le numéro d identific...

Страница 6: ...ès quelques secondes le niveau de réception s affiche à droite de l afficheur 0 Niveau de réception le plus faible 10 Niveau de réception le plus élevé 4 Choisir un emplacement pour la commande à distance pour lequel le niveau de réception radio affiché est supérieur à 8 4 Des problèmes de réception peuvent apparaître en fonction des matériaux de construction de la maison épaisseur des murs ou dal...

Страница 7: ...4 Mettre en place la commande à distance C002341 A 4 CDR4 Colis AD253 Colis AD284 2 Installation 23 06 2011 300020530 001 C 7 FR ...

Страница 8: ...a valeur programmée 3 1 2 Modifier la température confort ou réduit Pour modifier la température confort procéder comme suit 1 Appuyer sur la touche Cx 2 L afficheur indique à gauche la température confort et à droite la température ambiante mesurée La barre graphique affiche le programme chauffage du jour courant Pour modifier la température confort tourner le bouton rotatif 3 Pour valider appuye...

Страница 9: ...ourner le bouton rotatif vers la droite pour modifier l heure de fin de dérogation Pour une dérogation permanente sélectionner 24 24 en tournant le bouton rotatif vers la gauche 3 Pour valider appuyer sur le bouton rotatif 3 1 5 Activer le mode vacances g Pour activer le mode vacances et régler les dates des vacances procéder comme suit 1 Appuyer plusieurs fois sur la touche MODE jusqu à ce que le...

Страница 10: ...te 1 Appuyer simultanément pendant 2 secondes sur les touches MODE et r L heure s affiche 2 Appuyer sur le bouton rotatif 3 Les minutes clignotent Pour modifier les minutes tourner le bouton rotatif Pour valider appuyer sur le bouton rotatif 4 Les heures clignotent Pour modifier les heures tourner le bouton rotatif Pour valider appuyer sur le bouton rotatif 5 Le chiffre du jour clignote Pour modif...

Страница 11: ...est fixe le mode de sélection des plages horaires en confort est actif Pour sélectionner une plage horaire en confort tourner le bouton rotatif vers la droite Sur la barre graphique la zone sélectionnée s affiche en b v Sélection en mode réduit Appuyer sur la touche Cm Le symbole v est fixe le mode de sélection des plages horaires en réduit est actif Pour sélectionner une plage horaire en réduit t...

Страница 12: ...menu 0 s affiche 2 Appuyer sur le bouton rotatif pour faire apparaître le menu 1 Pour revenir à l affichage précédent appuyer sur la touche r 3 Pour modifier le réglage tourner le bouton rotatif 4 Pour revenir à l affichage principal appuyer sur la touche MODE ou attendre 20 secondes 3 2 5 Choisir l affichage principal D usine l affichage principal affiche l heure courante et la température extéri...

Страница 13: ... appuyer sur la touche r 3 Pour modifier le réglage tourner le bouton rotatif I Température extérieure O Température ambiante I puis O Température extérieure en alternance avec température ambiante 4 Pour revenir à l affichage principal appuyer sur la touche MODE ou attendre 20 secondes A000857 A 5 MODE r C002390 A MODE r x 2 4 5 6 7 0 2 4 6 8 10 12 14 16 18 22 24 20 c 1 3 ÿ CDR4 Colis AD253 Colis...

Страница 14: ...ondes sur les touches MODE et r 2 Le menu 0 s affiche Appuyer 3 fois sur le bouton rotatif pour faire apparaître le menu 3 La version de mémoire s affiche à droite de l afficheur Pour revenir à l affichage précédent appuyer sur la touche r 3 Pour revenir à l affichage principal appuyer sur la touche MODE ou attendre 20 secondes 4 3 Vérifier la version de mémoire du module chaudière radio Avant de ...

Страница 15: ...droite de l afficheur Pour revenir à l affichage précédent appuyer sur la touche r 3 Pour revenir à l affichage principal appuyer sur la touche MODE ou attendre 20 secondes C002589 B MODE r x 2 4 5 6 7 0 2 4 6 8 10 12 14 16 18 22 24 20 c 1 3 CDR4 Colis AD253 Colis AD284 4 En cas de dérangement 23 06 2011 300020530 001 C 15 FR ...

Страница 16: ...4 En cas de dérangement CDR4 Colis AD253 Colis AD284 16 23 06 2011 300020530 001 C FR ...

Страница 17: ...Funkfernbedienung CDR4 Kolli AD253 Kolli AD284 C002331 A Installations Bedienungs und Wartungsanleitung 300020530 001 C DE ...

Страница 18: ...rs einstellen 24 3 1 2 Komfort oder Absenktemperatur ändern 24 3 1 3 Vorübergehend den Komfortmodus x aktivieren 25 3 1 4 Vorübergehend den Absenkmodus m aktivieren 25 3 1 5 Aktivieren des Ferienmodus g 25 3 1 6 Ein Programm auswählen 26 3 1 7 Warmwasserproduktion erzwingen 26 3 2 Erweiterte Funktionen des Geräts 26 3 2 1 Zeit und Datum einstellen 26 3 2 2 Anpassung eines Programms an die eigenen ...

Страница 19: ...fortmodus in dem die Warmwassererzeugung autorisiert ist 4 Heller Bereich v Zeitraum der Heizung im Absenkmodus in dem die Warmwassererzeugung nicht autorisiert ist G Die markierte Ziffer zeigt den Wochentag an 1 Montag H Temperaturanzeige 4 I Außentemperatur 4 O Raumtemperatur I Zahlenanzeige Tageszeit eingestellte Daten Parameter usw u Das Symbol wird angezeigt wenn die Solaranlage sofern angesc...

Страница 20: ...as Symbol wird angezeigt wenn eine FERIEN Abweichung Frostschutz aktiviert ist 4 Blinkendes Symbol Ferienmodus ist programmiert 4 Dauernd angezeigtes Symbol Ferienmodus ist aktiviert w Kühlmodus Das Symbol wird angezeigt wenn im Sommer eine Abweichung KÜHLEN aktiviert ist 4 Blinkendes Symbol Vorübergehende Abweichung 4 Dauernd angezeigtes Symbol Permanente Abweichung p Sommerbetrieb Die Heizung wi...

Страница 21: ...i Batterien des Typs LR 6 AA 1 5 V verwenden Keine wiederaufladbaren Batterien verwenden Wenn das Symbol D auf dem Display blinkt die Batterien auswechseln 2 1 3 Fernbedienung und Heizkessel Funkmodul auf einander abstimmen Kolli AD252 Jede Funkfernbedienung besitzt werksseitig eine unverwechselbare Identifikationsnummer die dem Heizkessel Funkmodul ermöglicht sie zu erkennen Die Identifikationsnu...

Страница 22: ...sten MODE und r gleichzeitig drücken Das Menü 0 wird angezeigt 3 Nach einigen Sekunden zeigt die Empfangsstärke rechts auf dem Display an 0 Geringste Empfangsstärke 10 Höchste Empfangsstärke 4 Eine Anbaustelle für die Fernbedienung wählen an der die angezeigte Stärke des Funksignals größer als 8 ist 4 Auf Grund der für das Gebäude verwendeten Baumaterialien Stärke der Mauern oder Platten Art der e...

Страница 23: ...4 Anbringung der Fernbedienung C002341 A 4 CDR4 Kolli AD253 Kolli AD284 2 Anlage 23 06 2011 300020530 001 C 23 DE ...

Страница 24: ...eingestellt 3 1 2 Komfort oder Absenktemperatur ändern Zum Ändern der Komforttemperatur wie folgt vorgehen 1 Die Taste Cx drücken 2 Das Display zeigt links den Temperatursollwert Komforteinstellung Tagestemperatur Sollwert und rechts die gemessene Raumtemperatur an Die Balkenanzeige gibt das Heizungsprogramm für den aktuellen Tag an Zum Ändern des Tagtemperatures den Drehknopf drehen 3 Zum Bestäti...

Страница 25: ...nach rechts drehen um den Endzeitpunkt der Abweichung zu ändern Für eine permanente Abweichung durch Drehen des Drehknopfs nach links 24 24 auswählen 3 Zum Bestätigen den Drehknopf drücken 3 1 5 Aktivieren des Ferienmodus g Zum Aktivieren des Ferienmodus und Einstellen der Feriendaten wie folgt vorgehen 1 Mehrmals die Taste MODE drücken bis das Symbol g unterstrichen ist 2 Den Drehknopf nach recht...

Страница 26: ...en lang auf die Tasten MODE und r gleichzeitig drücken Die Uhrzeit wird angezeigt 2 Drehknopf drücken 3 Die Minuten blinken Zum Ändern der Minuten den Drehknopf drehen Zum Bestätigen den Drehknopf drücken 4 Die Stunden blinken Zum Ändern der Stunden den Drehknopf drehen Zum Bestätigen den Drehknopf drücken 5 Die Wochentagnummer blinkt Zum Ändern des Wochentags 1 Montag 2 Dienstag usw den Drehknopf...

Страница 27: ...erioden im Komfortmodus ist aktiv Um eine Stundenperiode im Komfortmodus auszuwählen den Drehknopf nach rechts drehen Auf dem Balkendiagramm wird die ausgewählte Zeitperiode als b angezeigt v Nachtbetrieb Absenkmodus auswählen Die Taste Cm drücken Das Symbol v steht fest der Auswahlmodus für die Stundenperioden im Absenkmodus ist aktiv Um eine Stundenperiode im Absenkmodus auszuwählen den Drehknop...

Страница 28: ...ufen Zur Rückkehr zur vorherigen Anzeige die Taste r drücken 3 Zum Ändern der Einstellung den Drehknopf drehen 4 Zur Rückkehr zur Hauptanzeige die Taste MODE drücken oder 20 Sekunden warten 3 2 5 Auswählen der Hauptanzeige Bei Auslieferung ist als Hauptanzeige die Uhrzeit und die Außentemperatur eingestellt Andere Einstellmöglichkeiten 4 Uhrzeit und Raumtemperatur 4 Uhrzeit und alle 5 Sekunden abw...

Страница 29: ...ng den Drehknopf drehen I Außentemperatur O Raumtemperatur I dann O abwechselnd Außentemperatur und Raumtemperatur 4 Zur Rückkehr zur Hauptanzeige die Taste MODE drücken oder 20 Sekunden warten C002390 A MODE r x 2 4 5 6 7 0 2 4 6 8 10 12 14 16 18 22 24 20 c 1 3 ÿ CDR4 Kolli AD253 Kolli AD284 3 Verwendung 23 06 2011 300020530 001 C 29 DE ...

Страница 30: ...eichzeitig drücken 2 Das Menü 0 wird angezeigt 3 Mal den Drehknopf drücken um das Menü 3 aufzurufen Die Speicherversion wird rechts im Display angezeigt Zur Rückkehr zur vorherigen Anzeige die Taste r drücken 3 Zur Rückkehr zur Hauptanzeige die Taste MODE drücken oder 20 Sekunden warten 4 3 Überprüfen der Speicherversion des Heizkessel Funkmoduls Bevor Sie den Fachhandwerker kontaktieren lesen Sie...

Страница 31: ...echts im Display angezeigt Zur Rückkehr zur vorherigen Anzeige die Taste r drücken 3 Zur Rückkehr zur Hauptanzeige die Taste MODE drücken oder 20 Sekunden warten C002589 B MODE r x 2 4 5 6 7 0 2 4 6 8 10 12 14 16 18 22 24 20 c 1 3 CDR4 Kolli AD253 Kolli AD284 4 Bei Störungen 23 06 2011 300020530 001 C 31 DE ...

Страница 32: ...4 Bei Störungen CDR4 Kolli AD253 Kolli AD284 32 23 06 2011 300020530 001 C DE ...

Страница 33: ...Radio remote control CDR4 Package AD253 Package AD284 C002331 A Installation User and Service Manual 300020530 001 C EN ...

Страница 34: ...2 Modifying the comfort or reduced temperature 40 3 1 3 Temporarily activating the comfort mode x 41 3 1 4 Temporarily activating the reduced mode m 41 3 1 5 Activating the holiday mode g 41 3 1 6 Selecting a timer programme 42 3 1 7 Forcing domestic hot water production 42 3 2 Extended use of the appliance 42 3 2 1 Setting the time and date 42 3 2 2 Customising a timer programme 43 3 2 3 Calibrat...

Страница 35: ...omfort mode or DHW production enabled 4 Light area v Heating period in reduced mode or DHW production not enabled G The highlighted figure indicates the current day 1 Monday H Temperature display 4 I Outside temperature 4 O Ambient temperature I Number display current time adjusted values parameters etc u The symbol is displayed when the solar system if connected is running T Reception level betwe...

Страница 36: ... symbol Permanent override g Holiday mode The symbol is displayed when a HOLIDAY override antifreeze is activated 4 Flashing symbol Holiday mode programmed 4 Steady symbol Holiday mode active w Cooling mode The symbol is displayed when a COOLING override is activated in summer 4 Flashing symbol Temporary override 4 Steady symbol Permanent override p Summer mode The heating is off Domestic hot wate...

Страница 37: ...ally available alkaline batteries LR 6 AA 1 5 V Do not use rechargeable batteries When the symbol D flashes on the display replace the batteries 2 1 3 Pairing the remote control with the boiler radio module Package AD252 Each radio remote control is given a unique identifying number in the factory which enables the boiler s radio module to recognise it The identifying number is transmitted to the ...

Страница 38: ... the reception level is displayed on the right of the display 0 Weakest reception level 10 Strongest reception level 4 Choose a location for the remote control for which the radio reception level displayed is higher than 8 4 Reception problems may occur depending on the construction materials used in the house thickness of walls or floors type of materials used 4 A hand may interfere with receptio...

Страница 39: ...4 Installing the remote control C002341 A 4 CDR4 Package AD253 Package AD284 2 Installation 23 06 2011 300020530 001 C 39 EN ...

Страница 40: ...o the programmed value 3 1 2 Modifying the comfort or reduced temperature To modify the comfort temperature proceed as follows 1 Press the Cx key 2 On the left of the display you can see the comfort temperature and on the right the room temperature measured The bar graph displays the heating programme for the current day To modify the comfort temperature turn the rotary button 3 To confirm press t...

Страница 41: ...e right to modify the end time of the override For a permanent override select 24 24 by turning the rotary button to the left 3 To confirm press the rotary button 3 1 5 Activating the holiday mode g To activate the holiday mode and set the dates of your holiday proceed as follows 1 Press the MODE key several times until the symbol g is underlined 2 Turn the rotary button to the right to change the...

Страница 42: ...e MODE and r keys simultaneously for 2 seconds The time is displayed 2 Press the rotary button 3 The minutes flash To modify the minutes turn the rotary button To confirm press the rotary button 4 The hours flash To modify the hours turn the rotary button To confirm press the rotary button 5 The number of the day flashes To modify the day 1 Monday 2 Tuesday etc turn the rotary button To confirm pr...

Страница 43: ...election mode for the comfort time ranges is active To select a comfort time range turn the rotary button to the right The zone selected is displayed under b on the graphic bar v Reduced mode selection Press the Cm key The symbol v is steady the selection mode for the reduced time ranges is active To select a reduced time range turn the rotary button to the right The zone selected is displayed und...

Страница 44: ...e previous display press the key r 3 To modify the setting turn the rotary button 4 To return to the principal display press the MODE key or wait 20 seconds 3 2 5 Selecting the principal display In the factory the principal display is set to show the current time and the outside temperature Other settings available 4 The current time and the room temperature 4 The current time and alternately ever...

Страница 45: ...utton I Outside temperature O Ambient temperature I then O Outside temperature alternating with room temperature 4 To return to the principal display press the MODE key or wait 20 seconds C002390 A MODE r x 2 4 5 6 7 0 2 4 6 8 10 12 14 16 18 22 24 20 c 1 3 ÿ CDR4 Package AD253 Package AD284 3 Operating instructions 23 06 2011 300020530 001 C 45 EN ...

Страница 46: ...aneously for 5 seconds 2 The 0 menu is displayed Press the rotary button 3 times to display the menu 3 The memory version is shown to the right of the display To go back to the previous display press the key r 3 To return to the principal display press the MODE key or wait 20 seconds 4 3 Checking the memory version of the boiler radio module Before contacting the installer make a note of the versi...

Страница 47: ...n to the right of the display To go back to the previous display press the key r 3 To return to the principal display press the MODE key or wait 20 seconds C002589 B MODE r x 2 4 5 6 7 0 2 4 6 8 10 12 14 16 18 22 24 20 c 1 3 CDR4 Package AD253 Package AD284 4 Troubleshooting 23 06 2011 300020530 001 C 47 EN ...

Страница 48: ...4 Troubleshooting CDR4 Package AD253 Package AD284 48 23 06 2011 300020530 001 C EN ...

Страница 49: ...Interactieve draadloze afstandsbediening CDR4 Colli AD253 Colli AD284 C002331 A Installatie gebruikers en servicehandleiding 300020530 001 C NL ...

Страница 50: ... of nachttemperatuur wijzigen 56 3 1 3 Activeer tijdelijk de comfortstand x 57 3 1 4 Activeer tijdelijk de nachttemperatuur m 57 3 1 5 Activeren van het vakantieprogramma g 57 3 1 6 Een programma selecteren 58 3 1 7 Forceer de productie van het sanitair warm water 58 3 2 Uitgebreid gebruik van het apparaat 58 3 2 1 De tijd en de datum instellen 58 3 2 2 Een programma aanpassen 59 3 2 3 Het ijken v...

Страница 51: ...agmodus of SWW productie toegestaan 4 Lichte zone v Verwarmingsperiode in de nachtmodus of SWW productie niet toegestaan G Het gemarkeerde cijfer geeft de huidige dag aan 1 maandag H Display temperatuur 4 I Buitentemperatuur 4 O Omgevingstemperatuur I Numerieke display lopende uurtijd ingestelde waarden parameters enz u Het symbool wordt weergegeven wanneer het zonnesysteem indien aangesloten werk...

Страница 52: ... weergegeven wanneer een VAKANTIE afwijking vorstbeveiliging is geactiveerd 4 Knipperend symbool Vakantiemodus geprogrammeerd 4 Vast symbool Vakantiemodus ingeschakeld w Koelmodus Het symbool wordt weergegeven wanneer een afwijking VERKOELING in de zomer ingeschakeld is 4 Knipperend symbool Tijdelijke afwijking 4 Vast symbool Permanente afwijking p Zomermodus De verwarming is uitgeschakeld Voor sa...

Страница 53: ...egeleverde of de commercieel verkrijgbare alkaline batterijen type LR 6 AA 1 5 V Gebruik geen oplaadbare batterijen Wanneer het symbool D knippert op de display moeten de batterijen vervangen worden 2 1 3 Koppel de afstandbediening aan de radiomodule van de ketel Colli AD252 Iedere radioafstandsbediening bezit standaard een uniek identificatienummer waarmee de radiomodule van de ketel hem herkenne...

Страница 54: ...weergegeven 3 Na enkele seconden wordt rechts van de display het ontvangstniveau weergegeven 0 Het zwakste ontvangstniveau 10 Het sterkste ontvangstniveau 4 Kies een plaats voor de afstandsbediening waarvoor het weergegeven radio ontvangstniveau hoger is 8 4 Ontvangstproblemen kunnen verschijnen aan de hand van de bouwmaterialen van het huis dikte van de muren of tegels gebruikte materiaalsoorten ...

Страница 55: ...4 Plaatsing van de afstandbediening C002341 A 4 CDR4 Colli AD253 Colli AD284 2 Installatie 23 06 2011 300020530 001 C 55 NL ...

Страница 56: ...onkelijke waarde 3 1 2 De dag of nachttemperatuur wijzigen Ga voor het wijzigen van de dagtemperatuur als volgt te werk 1 Druk op de toets Cx 2 Het display toont links de comforttemperatuur en rechts de gemeten kamertemperatuur De grafische balk geeft het verwarmingsprogramma van de huidige dag weer Draai voor het wijzigen van de comfort temperatuur aan de draaiknop 3 Druk op de draaiknop om te va...

Страница 57: ...iknop naar rechts om de tijd te wijzigen waarop de afwijking eindigt Selecteer voor een permanente afwijking 24 24 door de draaiknop naar links te draaien 3 Druk op de draaiknop om te valideren 3 1 5 Activeren van het vakantieprogramma g Voor het activeren van het vakantieprogramma en het instellen van de vakantiedata ga als volgt te werk 1 Druk meerdere malen op de toets MODE totdat het symbool g...

Страница 58: ...van het apparaat 3 2 1 De tijd en de datum instellen 1 Houd tegelijkertijd 2 seconden de toetsen MODE en r ingedrukt De tijd wordt weergegeven 2 Druk op de draaiknop 3 De minuten knipperen Draai aan de draaiknop om de minuten te wijzigen Druk op de draaiknop om te valideren 4 De uren knipperen Draai aan de draaiknop om de uren te wijzigen Druk op de draaiknop om te valideren 5 Het cijfer van de da...

Страница 59: ...programma knippert 5 b Selectie in de dagmodus Druk op de toets Cx Het symbool b knippert niet de selectiemodus voor de periodes in de dagmodus is ingeschakeld Draai voor het selecteren van een periode in de dagmodus de draaiknop naar rechts Op de balk wordt de geselecteerde zone in b weergegeven v Selectie in nachtmodus Druk op de toets Cm Het symbool v knippert niet de selectiemodus van de perio...

Страница 60: ...ter als volgt te werk 1 Houd tegelijkertijd 5 seconden de toetsen MODE en r ingedrukt Het menu 0 wordt weergegeven 2 Druk op de draaiknop om het menu 1 op te roepen Druk op de toets r om terug te keren naar het vorige scherm 3 Draai aan de draaiknop om de afstelling te wijzigen 4 Druk om terug te keren naar de standaard display op de toets MODE of wacht 20 seconden 3 2 5 Kies de standaard display ...

Страница 61: ... keren naar het vorige scherm 3 Draai aan de draaiknop om de afstelling te wijzigen I Buitentemperatuur O Omgevingstemperatuur I vervolgens O Buitentemperatuur afwisselend met de kamertemperatuur 4 Druk om terug te keren naar de standaard display op de toets MODE of wacht 20 seconden A000857 A 5 MODE r C002390 A MODE r x 2 4 5 6 7 0 2 4 6 8 10 12 14 16 18 22 24 20 c 1 3 ÿ CDR4 Colli AD253 Colli AD...

Страница 62: ...en MODE en r ingedrukt 2 Het menu 0 wordt weergegeven Druk 3 keer op de draaiknop om het menu 3 weer te geven De geheugenversie wordt rechts op de display weergegeven Druk op de toets r om terug te keren naar het vorige scherm 3 Druk om terug te keren naar de standaard display op de toets MODE of wacht 20 seconden 4 3 Controleer de geheugenversie van de radiomodule van de ketel Noteer alvorens con...

Страница 63: ...op de display weergegeven Druk op de toets r om terug te keren naar het vorige scherm 3 Druk om terug te keren naar de standaard display op de toets MODE of wacht 20 seconden C002589 B MODE r x 2 4 5 6 7 0 2 4 6 8 10 12 14 16 18 22 24 20 c 1 3 CDR4 Colli AD253 Colli AD284 4 Bij storing 23 06 2011 300020530 001 C 63 NL ...

Страница 64: ...4 Bij storing CDR4 Colli AD253 Colli AD284 64 23 06 2011 300020530 001 C NL ...

Страница 65: ...Comando a distanza radio CDR4 Collo AD253 Collo AD284 C002331 A Istruzioni di installazione uso e manutenzione 300020530 001 C IT ...

Страница 66: ...2 3 1 3 Attivare provvisoriamente la modalità comfort x 73 3 1 4 Attivare provvisoriamente la modalità ridotta m 73 3 1 5 Attivare la modalità vacanze g 73 3 1 6 Selezionare un programma orario 74 3 1 7 Forzare la produzione di acqua calda sanitaria 74 3 2 Utilizzo esteso dell apparecchio 74 3 2 1 Impostazione della data e dell ora 74 3 2 2 Personalizzazione di un programma orario 75 3 2 3 Calibra...

Страница 67: ...iodo riscaldamento in modalità comfort o produzione acs autorizzata 4 Area chiara v Periodo riscaldamento in modalità ridotta o produzione acs non autorizzata G La cifra luminosa indica il giorno in corso 1 lunedì H Display della temperatura 4 I Temperatura esterna 4 O Temperatura ambiente I Visualizzazione numerica ora attuale valori corretti parametri ecc u L icona viene visualizzata quando il s...

Страница 68: ...Vacanze L icona viene visualizzata quando viene attivata la modalità VACANZE antigelo 4 Simbolo lampeggiante Modalità Vacanze programmata 4 Simbolo fisso Modalità vacanze attiva w Modalità Raffreddamento L icona viene visualizzata quando viene attivata la modalità RAFFREDDAMENTO in estate 4 Simbolo lampeggiante Richiesta provvisoria 4 Simbolo fisso Richiesta permanente p Modalità Estate Il riscald...

Страница 69: ...pile alcaline reperibili in commercio di tipo LR 6 AA 1 5 V Non utilizzare pile ricaricabili Quando l icona D lampeggia sul display sostituire le pile 2 1 3 Associare il comando a distanza al modulo caldaia radio Collo AD252 Ogni comando a distanza radio riporta di serie un numero identificativo univoco che consente al modulo caldaia radio di riconoscerlo Il numero identificativo viene trasmesso a...

Страница 70: ... secondi il livello di ricezione viene visualizzata sul lato destro del display 0 Livello di ricezione più debole 10 Livello di ricezione più alto 4 Scegliere un ubicazione per il comando a distanza dove il livello di ricezione radio visualizzato sia superiore a 8 4 È possibile che si verifichino problemi di ricezione a seconda dei materiali di costruzione dell abitazione spessore dei muri o solet...

Страница 71: ...4 Installare il comando a distanza C002341 A 4 CDR4 Collo AD253 Collo AD284 2 Installazione 23 06 2011 300020530 001 C 71 IT ...

Страница 72: ...lore programmato 3 1 2 Modificare la temperatura comfort o ridotta Per modificare la temperatura comfort procedere nel modo seguente 1 Premere il tasto Cx 2 Il display indica sulla sinistra la temperatura comfort e sulla destra la temperatura ambiente rilevata La barra grafica visualizza il programma di riscaldamento del giorno corrente Per modificare la temperatura diurna ruotare la manopola rego...

Страница 73: ...lineata 2 Ruotare la manopola regolabile verso destra per modificare l orario di fine esclusione Per un esclusione permanente selezionare 24 24 ruotando la manopola regolabile verso sinistra 3 Per confermare premere la manopola 3 1 5 Attivare la modalità vacanze g Per attivare la modalità vacanze e regolare i periodi delle vacanze procedere nel modo seguente 1 Premere ripetutamente il pulsante MOD...

Страница 74: ...arecchio 3 2 1 Impostazione della data e dell ora 1 Premere contemporaneamente per 2 secondi i pulsanti MODE et r L ora viene visualizzata 2 Premere la manopola 3 I minuti lampeggiano Per modificare i minuti ruotare la manopola regolabile Per confermare premere la manopola 4 Le ore lampeggiano Per modificare le ore ruotare la manopola regolabile Per confermare premere la manopola 5 Il numero relat...

Страница 75: ...a grafica del programma orario lampeggia 5 b Selezione in modalità comfort Premere il tasto Cx L icona b è fissa la modalità di selezione degli intervalli orari comfort è attiva Per selezionare un intervallo orario comfort ruotare la manopola regolabile verso destra Sulla barra grafica la zona selezionata sarà visualizzata in b v Selezione in modalità ridotta Premere il tasto Cm L icona v è fissa ...

Страница 76: ...te 1 Premere contemporaneamente per 5 secondi i pulsanti MODE et r Verrà visualizzato il menù 0 2 Premere la manopola regolabile per visualizzare il menù 1 Per tornare alla schermata precedente premere il pulsante r 3 Per modificare la regolazione ruotare la manopola regolabile 4 Per tornare alla schermata principale premere il pulsante MODE oppure attendere 20 secondi 3 2 5 Scegliere la schermata...

Страница 77: ...ecedente premere il pulsante r 3 Per modificare la regolazione ruotare la manopola regolabile I Temperatura esterna O Temperatura ambiente I e poi O Temperatura esterna alternata alla temperatura ambiente 4 Per tornare alla schermata principale premere il pulsante MODE oppure attendere 20 secondi A000857 A 5 MODE r C002390 A MODE r x 2 4 5 6 7 0 2 4 6 8 10 12 14 16 18 22 24 20 c 1 3 ÿ CDR4 Collo A...

Страница 78: ...e per 5 secondi i pulsanti MODE et r 2 Verrà visualizzato il menù 0 Premere 3 volte la manopola regolabile per far comparire il menù 3 La versione di memoria verrà visualizzata sulla destra del display Per tornare alla schermata precedente premere il pulsante r 3 Per tornare alla schermata principale premere il pulsante MODE oppure attendere 20 secondi 4 3 Verificare la versione di memoria del mod...

Страница 79: ...ulla destra del display Per tornare alla schermata precedente premere il pulsante r 3 Per tornare alla schermata principale premere il pulsante MODE oppure attendere 20 secondi C002589 B MODE r x 2 4 5 6 7 0 2 4 6 8 10 12 14 16 18 22 24 20 c 1 3 CDR4 Collo AD253 Collo AD284 4 In caso di cattivo funzionamento 23 06 2011 300020530 001 C 79 IT ...

Страница 80: ...4 In caso di cattivo funzionamento CDR4 Collo AD253 Collo AD284 80 23 06 2011 300020530 001 C IT ...

Страница 81: ...Mando a distancia vía radio CDR4 Bulto AD253 Bulto AD284 C002331 A Instrucciones de instalación utilización y mantenimiento 300020530 001 C ES ...

Страница 82: ...mperatura de confort o reducida 88 3 1 3 Activar temporalmente el modo confort x 89 3 1 4 Activar temporalmente el modo reducido m 89 3 1 5 Activar el modo vacaciones g 89 3 1 6 Seleccionar un programa horario 90 3 1 7 Forzar la producción de agua caliente sanitaria 90 3 2 Uso extendido del aparato 90 3 2 1 Ajuste de hora y fecha 90 3 2 2 Personalizar un programa horario 91 3 2 3 Calibrar la sonda...

Страница 83: ...cción en modo confort o producción de acs autorizada 4 Zona clara v Periodo de calefacción en modo reducido o producción de acs no autorizada G El valor más brillante indica el día actual 1 lunes H Visualizador de temperatura 4 I Temperatura exterior 4 O Temperatura ambiente I Visualización numérica hora actual valores ajustados parámetros etc u El símbolo aparece en pantalla cuando el sistema sol...

Страница 84: ...es El símbolo aparece en pantalla cuando se activa una derogación de VACACION antihielo 4 Símbolo intermitente Modo Vacaciones programado 4 Símbolo fijo Modo Vacaciones activo w Modo Enfriamiento El símbolo aparece en pantalla cuando se activa una derogación de ENFRIAMIENTO en verano 4 Símbolo intermitente Derogación temporal 4 Símbolo fijo Derogación permanente p Modo Verano La calefacción se cor...

Страница 85: ...l comercio de tipo LR 6 AA 1 5 V No utilizar pilas recargables Cambiar las pilas cuando parpadee en pantalla el símbolo D 2 1 3 Emparejar el mando a distancia con el módulo de caldera por radio Bulto AD252 Todos los mandos a distancia llevan de fábrica un número de identificación único que permite que el módulo de caldera por radio los reconozca El número de identificación se transmite al módulo d...

Страница 86: ...a el menú 0 3 A los pocos segundos aparece a la derecha de la pantalla el nivel de recepción 0 Nivel de recepción más bajo 10 Nivel de recepción más alto 4 Elegir un emplazamiento del mando a distancia en el cual el nivel de recepción vía radio visualizado sea superior a 8 4 Pueden aparecer problemas de recepción según el tipo de materiales de construcción de la casa espesor de las paredes o suelo...

Страница 87: ...4 Instalar el mando a distancia C002341 A 4 CDR4 Bulto AD253 Bulto AD284 2 Instalación 23 06 2011 300020530 001 C 87 ES ...

Страница 88: ...or programado 3 1 2 Modificar la temperatura de confort o reducida Para modificar la temperatura de confort hacer lo siguiente 1 Pulsar la tecla Cx 2 La pantalla indica la temperatura de confort a la izquierda y la temperatura ambiente medida a la derecha La barra gráfica muestra el programa de calefacción del día actual Para modificar la temperatura confort girar el botón giratorio 3 Para validar...

Страница 89: ... hacia la derecha para modificar la hora de finalización de la derogación Para una derogación permanente seleccionar 24 24 girando el botón giratorio hacia la izquierda 3 Para validar apretar el botón giratorio 3 1 5 Activar el modo vacaciones g Para activar el modo de vacaciones y ajustar las fechas de vacaciones hacer lo siguiente 1 Pulsar varias veces la tecla MODE hasta que el símbolo g esté s...

Страница 90: ...ste de hora y fecha 1 Pulsar simultáneamente durante 2 segundos las teclas MODE y r Aparece en pantalla la hora 2 Pulsar el botón giratorio 3 Los minutos parpadean Para modificar los minutos girar el botón giratorio Para validar apretar el botón giratorio 4 Las horas parpadean Para modificar las horas girar el botón giratorio Para validar apretar el botón giratorio 5 El número del día parpadea Par...

Страница 91: ...horario parpadea 5 b Selección en modo confort Pulsar la tecla Cx El símbolo b se queda fijo y se activa el modo de selección de bandas horarias de confort Para seleccionar una banda horaria de confort girar el botón giratorio hacia la derecha La banda seleccionada aparece en b en la barra gráfica v Selección en modo reducido Pulsar la tecla Cm El símbolo v se queda fijo y se activa el modo de sel...

Страница 92: ...iguiente 1 Pulsar simultáneamente durante 5 segundos las teclas MODE y r Aparece en pantalla el menú 0 2 Pulsar el botón giratorio para acceder al menú 1 Para volver a la pantalla anterior pulsar la tecla r 3 Para modificar el ajuste girar el botón giratorio 4 Para volver a la pantalla principal pulsar la tecla MODE o esperar 20 segundos 3 2 5 Seleccionar la pantalla principal De fábrica la pantal...

Страница 93: ...a anterior pulsar la tecla r 3 Para modificar el ajuste girar el botón giratorio I Temperatura exterior O Temperatura ambiente I seguido de O Temperatura exterior alternando con la temperatura ambiente 4 Para volver a la pantalla principal pulsar la tecla MODE o esperar 20 segundos A000857 A 5 MODE r C002390 A MODE r x 2 4 5 6 7 0 2 4 6 8 10 12 14 16 18 22 24 20 c 1 3 ÿ CDR4 Bulto AD253 Bulto AD28...

Страница 94: ...egundos las teclas MODE y r 2 Aparece en pantalla el menú 0 Pulsar 3 veces el botón giratorio para que aparezca el menú 3 La versión de la memoria se indica a la derecha de la pantalla Para volver a la pantalla anterior pulsar la tecla r 3 Para volver a la pantalla principal pulsar la tecla MODE o esperar 20 segundos 4 3 Comprobar la versión de la memoria del módulo de caldera por radio Antes de l...

Страница 95: ...e indica a la derecha de la pantalla Para volver a la pantalla anterior pulsar la tecla r 3 Para volver a la pantalla principal pulsar la tecla MODE o esperar 20 segundos C002589 B MODE r x 2 4 5 6 7 0 2 4 6 8 10 12 14 16 18 22 24 20 c 1 3 CDR4 Bulto AD253 Bulto AD284 4 En caso de avería 23 06 2011 300020530 001 C 95 ES ...

Страница 96: ...4 En caso de avería CDR4 Bulto AD253 Bulto AD284 96 23 06 2011 300020530 001 C ES ...

Страница 97: ...Zdalne sterowanie bezprzewodowe CDR4 Pakiet AD253 Pakiet AD284 C002331 A Instrukcja instalowania obsługi i konserwacji 300020530 001 C PL ...

Страница 98: ...Zmiana temperatury komfortu lub obniżonej 104 3 1 3 Aktywowanie tymczasowo trybu komfortu x 105 3 1 4 Aktywowanie tymczasowo trybu obniżonej temperatury m 105 3 1 5 Aktywowanie trybu urlopowego g 105 3 1 6 Wybór programu 106 3 1 7 Wymuszenie wytwarzania ciepłej wody użytkowej 106 3 2 Funkcje rozszerzone urządzenia 106 3 2 1 Nastawa czasu daty 106 3 2 2 Dopasowanie programu do własnych potrzeb 107 ...

Страница 99: ...wolone jest wytwarzanie c w u 4 Strefa jasna v Przedział czasowy ogrzewania w trybie temperatury obniżonej lub wytwarzanie c w u nie jest dozwolone G Zaznaczona liczba wskazuje dzień tygodnia 1 poniedziałek H Wyświetlacz temperatury 4 I Temperatura zewnętrzna 4 O Temperatura pomieszczenia I Wyświetlanie liczb godzina wartości nastaw parametry itp u Symbol jest wyświetlany gdy instalacja solarna pr...

Страница 100: ... ciągle odstąpienie stałe g Tryb wakacyjny symbol jest wyświetlany gdy aktywne jest odstąpienie WAKACJE ochrona przeciwzamrożeniowa jest aktywna 4 Symbol migający tryb wakacyjny jest zaprogramowany 4 Symbol wyświetlany ciągle tryb wakacyjny jest aktywny w Tryb chłodzenia Symbol jest wyświetlany gdy w lecie aktywne jest odstąpienie CHŁODZENIE 4 Symbol migający odstąpienie tymczasowe 4 Symbol wyświe...

Страница 101: ... w handlu baterie alkaliczne typu LR 6 AA 1 5 V Nie wolno używać akumulatorków Jeżeli na ekranie miga symbol D wymienić baterie 2 1 3 Kojarzenie zdalnego sterowania z modułem radiowym kotła Pakiet AD252 Każde zdalne sterowanie bezprzewodowe posiada nadany fabrycznie unikalny numer identyfikacyjny który umożliwia rozpoznanie go przez moduł radiowy kotła Numer identyfikacyjny jest przekazywany do mo...

Страница 102: ...e 2 Naciskać równocześnie przez 5 sek przyciski MODE i r Wyświetlone zostanie menu 0 3 Po paru sekundach z prawej strony ekranu zostanie wyświetlony symbol mocy sygnału 0 Minimalna moc sygnału 10 Maksymalna moc sygnału 4 Wybrać miejsce w którym dobry odbiór sygnału radiowego jest 8 4 Mogą pojawić się zakłócenia odbioru wynikające z zastosowanych w budynku materiałów budowlanych grubość ścian lub s...

Страница 103: ...4 Umieszczenie zdalnego sterowania C002341 A 4 CDR4 Pakiet AD253 Pakiet AD284 2 Instalacja 23 06 2011 300020530 001 C 103 PL ...

Страница 104: ...komfortu lub obniżonej Aby zmienić temperaturę komfortu należy postępować następująco 1 Nacisnąć przycisk Cx 2 Po lewej stronie ekranu wyświetlana jest temperatura zadana nastawa komfortu wartość zadana temperatury dziennej a po prawej stronie zmierzona temperatura pomieszczenia Wskaźnik paskowy pokazuje program grzewczy dla aktualnego dnia Obracać pokrętłem aby zmienić temperaturę dzienną 3 Nacis...

Страница 105: ...zie podkreślony 2 Obrócić pokrętło w prawo aby zmienić godzinę zakończenia odstąpienia Aby wybrać stałe odstąpienie obrócić pokrętło w lewo na 24 24 3 Nacisnąć pokrętło dla potwierdzenia 3 1 5 Aktywowanie trybu urlopowego g Dla aktywowania trybu urlopowego i nastawienia daty urlopu postępować w sposób nastepujacy 1 Nacisnąć kilkakrotnie przycisk MODE aż symbol g będzie podkreślony 2 Obrócić pokręt...

Страница 106: ...ć równocześnie przez 2 sek przyciski MODE i r Zostanie wyświetlony czas 2 Nacisnąć pokrętło 3 Migają minuty Pokręcać pokrętłem aby zmienić minuty Nacisnąć pokrętło dla potwierdzenia 4 Migają godziny Pokręcać pokrętłem aby zmienić godziny Nacisnąć pokrętło dla potwierdzenia 5 Miga numer dnia tygodnia Pokręcać pokrętłem aby zmienić dzień tygodnia 1 poniedziałek 2 wtorek itd Nacisnąć pokrętło dla pot...

Страница 107: ... Cx Symbol b wyświetlany jest ciągle aktywny jest tryb wyboru przedziału czasu dla trybu komfortu Obrócić pokrętło w prawo aby wybrać przedział czasu w trybie komfortu Wybrany przedział czasu jest wyświetlany na pasku graficznym jako b v Wybrać pracę w nocy tryb pracy z obniżoną temperaturą Nacisnąć przycisk Cm Symbol v wyświetlany jest ciągle aktywny jest tryb wyboru przedziału czasu w trybie tem...

Страница 108: ...sek przyciski MODE i r Wyświetlone zostanie menu 0 2 Nacisnąć pokrętło aby wywołać menu 1 Nacisnąć przycisk r aby powrócić do poprzedniego wyświetlenia 3 Dla zmiany nastawy obracać pokrętłem 4 Aby powrócić do wyświetlenia głównego nacisnąć przycisk MODE lub poczekać 20 sekund 3 2 5 Wybór wyświetlenia głównego W stanie dostawy jako wyświetlenie główne nastawione jest na godziny i temperaturę zewnęt...

Страница 109: ...wyświetlenia 3 Dla zmiany nastawy obracać pokrętłem I Temperatura zewnętrzna O Temperatura pomieszczenia I następnie O na zmianę temperatura zewnętrzna i temperatura pomieszczenia 4 Aby powrócić do wyświetlenia głównego nacisnąć przycisk MODE lub poczekać 20 sekund A000857 A 5 MODE r C002390 A MODE r x 2 4 5 6 7 0 2 4 6 8 10 12 14 16 18 22 24 20 c 1 3 ÿ CDR4 Pakiet AD253 Pakiet AD284 3 Zastosowani...

Страница 110: ...ek przyciski MODE i r 2 Wyświetlone zostanie menu 0 Nacisnąć 3 razy pokrętło aby wywołać menu 3 Numer wersji pojawi się z prawej strony ekranu Nacisnąć przycisk r aby powrócić do poprzedniego wyświetlenia 3 Aby powrócić do wyświetlenia głównego nacisnąć przycisk MODE lub poczekać 20 sekund 4 3 Sprawdzenie wersji pamięci w module radiowym kotła Przed skontaktowaniem się z instalatorem odczytać wers...

Страница 111: ...y ekranu Nacisnąć przycisk r aby powrócić do poprzedniego wyświetlenia 3 Aby powrócić do wyświetlenia głównego nacisnąć przycisk MODE lub poczekać 20 sekund C002589 B MODE r x 2 4 5 6 7 0 2 4 6 8 10 12 14 16 18 22 24 20 c 1 3 CDR4 Pakiet AD253 Pakiet AD284 4 Wyszukiwanie usterek 23 06 2011 300020530 001 C 111 PL ...

Страница 112: ...43 04 7 495 988 43 04 dedietrich nnt ru Schemmerlstrasse 66 70 A 1110 WIEN 43 0 50406 61624 43 0 50406 61569 dedietrich oeag at ch klima waltermeier com DE DIETRICH www dedietrich heating com CN Room 512 Tower A Kelun Building 12A Guanghua Rd Chaoyang District C 100020 BEIJING 86 0 106 581 4017 86 0 106 581 4018 86 0 106 581 7056 86 0 106 581 4019 contactBJ dedietrich com cn Serviceline 41 0 8 00 ...

Отзывы: