background image


Decoflame ApS  Danmark. ~ [email protected] 

 ~ tel. +45 96 3048 00 ~ 


We recommend that you clean all parts of your fireplace frequently with a lint-free cloth or kitchen paper 
towel and a non-abrasive detergent, some bioethanol or another alcohol-based product. Regarding polished 
steel surfaces use only a soft and clean cloth as the surfaces will easily be scratched by e.g. paper towels. 


INSTALLATION 


Please refer and adhere to the detailed installation guide on your technical drawing which 
has been generated for your specific custom-made decoflame® fireplace. You will find all 
dimensions and a step-by-step installation instruction there. It is advisable to install your 
decoflame® fireplace only once all decoration work in the room has been finished. 

 
Walls surrounding the built-in bioethanol fireplace must be constructed of or at least covered with non-
flammable material like fibre plasterboards (e.g. Fermacell, GypRock FireLine) or bricks.  
 
The supports to the left and right inside the cut-out on which the fireplace will rest must be made of sturdy 
non-flammable material like metal, concrete or brick. The supports must be perfectly in level. 
 
If you have the slightest doubt of how to install the fireplace and which screws to use for your type of wall, 
you should contact a skilled craftsman who is able to carry out the installation correctly. 
 
Please note that the electronically controlled decoflame

®

 e-ribbon Fire needs a connection to the mains in 

order to work. Therefore, a power socket needs to be present inside the cut-out into which the fireplace will 
be fitted. 
 
When installing your decoflame

®

 built

-in 

fireplace you will need:  

 
Power drill/Screwdriver 
Drill/bit (suitable for the type of material to which you wish to fix the top and bottom plates of your fireplace) 
Spirit level 
Tape measure 
Screws (at least Ø 5mm, suitable for the type of wall) 
Wall plugs or expansion bolts (suitable for the type of wall) 


Creating the wall cut-out for made to measure decoflame

® 

fireplaces with e-Ribbon Fire 

 
The wall cut-out needs to contain a working, earthed power socket to which the electricity cable of the 
decoflame

®

 e-Ribbon Fire must be connected. 

 
Plasterboard walls – Stud-walls 
Walls surrounding the built-in bioethanol fireplace must be constructed of or at least covered with non-
flammable material like fibre plasterboards (e.g. Fermacell, GypRock FireLine) or bricks.  
 
Stone/Brick walls 
The cut-out is made according to the attached drawing. The wall itself is non-flammable which makes it safe 
to install the bioethanol fireplace directly within the cut-out. 


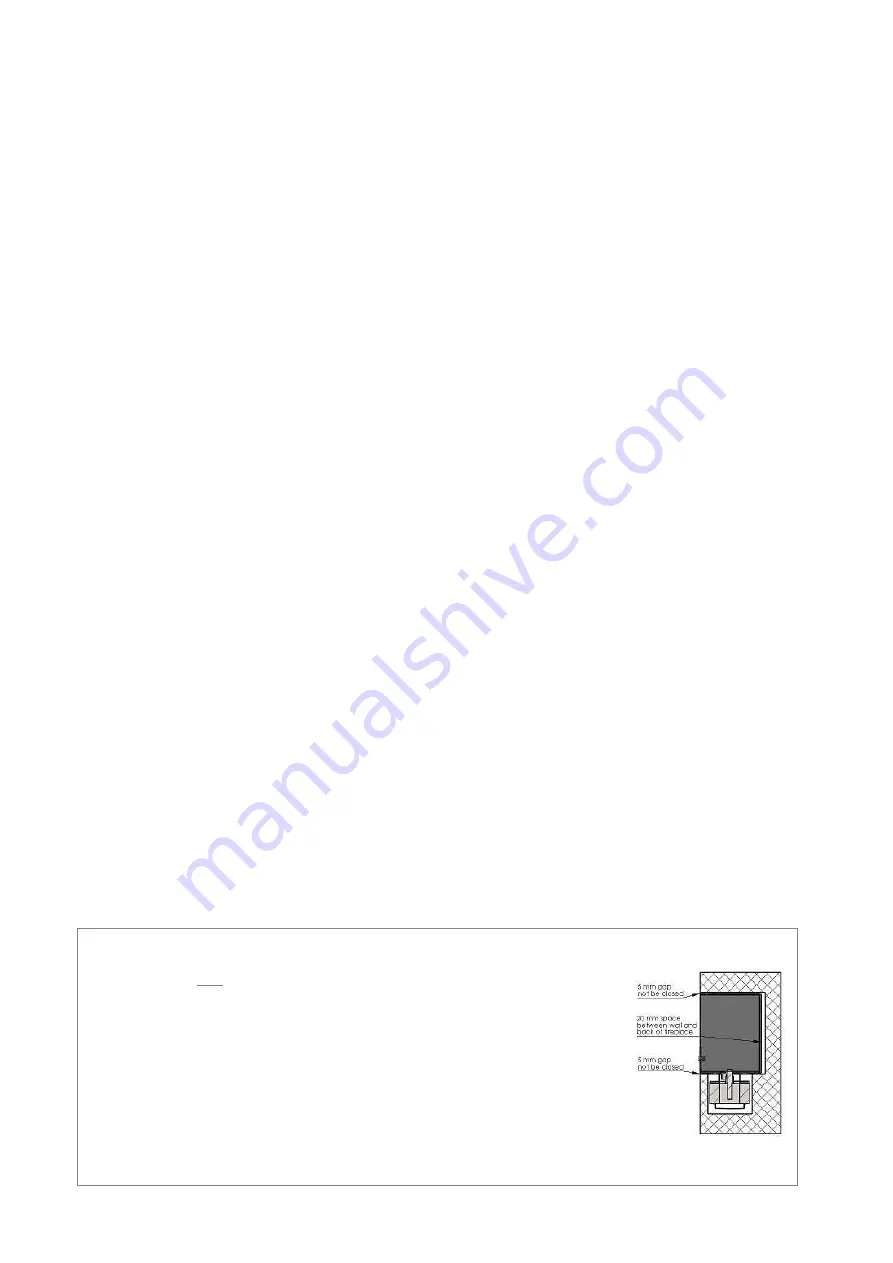
Layout open to one side: 
The wall cut-out is made at least 20mm deeper than the depth of  
the fireplace to ensure sufficient air flow and cooling of the fireplace. 


It is essential to maintain a 5mm gap all the way around the fireplace (Cut-out = 
dimensions of fir 10mm).This gap must not be sealed.  
 
As the edges of the cut-out remain visible it is important that they are done to 
the highest possible finish. All four corners of the cut out must have exactly a 90 
degree angle. 


Содержание Denver

Страница 1: ...nd Denver with decoflame e ribbon Fire featuring CEVB Technology English Decoflame Aps Stenholm 14 9400 Nørresundby Denmark tel 45 96 30 48 00 info decoflame dk www decoflame com It is imperative that you read this manual before using the fireplace Keep the manual in a safe place for future reference ...

Страница 2: ...NS TABLE OF CONTENT GENERAL SAFETY 2 POSITIONING 3 MAINTENANCE 3 INSTALLATION 4 OPERATING INSTRUCTIONS 6 MESSAGES ON LED DISPLAY AND TROUBLESHOOTING ADVICE 8 SAFETY ADVICE 9 DISPOSAL AND RECYCLING 9 RATING PLATE INFORMATION 9 GENERAL SAFETY Naturally safety is imperative dealing with open fire All decoflame fireplaces are designed manufactured and quality tested in Denmark with highest product saf...

Страница 3: ... your custom made fireplace are perfectly in level and all corners of the cut out are in a perfect 90 degree angle For all dimensions please refer to the detailed technical drawing for your decoflame fireplace If in doubt please contact Decoflame If your fireplace is installed in a room with a wooden ceiling you must ensure that the distance between the top of the fireplace and the ceiling is at l...

Страница 4: ... needs a connection to the mains in order to work Therefore a power socket needs to be present inside the cut out into which the fireplace will be fitted When installing your decoflame built in fireplace you will need Power drill Screwdriver Drill bit suitable for the type of material to which you wish to fix the top and bottom plates of your fireplace Spirit level Tape measure Screws at least Ø 5...

Страница 5: ...e to the highest possible finish All four corners of the cut out must have an exact 90 degree angle Denver drop down e Ribbon Fire The distance between the flame tray and any non flammable material above must not be less than 500mm The distance between the centre of the flame tray and any non flammable material to the back or front must not be less than 150mm DO NOT position the Denver in a draugh...

Страница 6: ...d Use of Remote Control The LED display will always show the following Line 1 Flame level or message e g READY FLAME 3 or FUEL LOW Line 2 Fuel level indicator bar During operation of the fire you could close the pop up lid of the LED display completely by pressing down onto it until you hear a soft click sound You can still use the remote control in order to change the flame level settings or to s...

Страница 7: ...ray is filled with flames depending on the dimensions of the flame tray it might take slightly longer Once the flame tray shows flames throughout its complete width the fire will be burning at a pre set level of 3 as long as the message WARMING UP is shown in the display this pre set level cannot be changed As soon as the warming up phase is finished the message FLAME 3 is shown in the display and...

Страница 8: ...emperature which is too high inside the housing of the e Ribbon Fire Make sure that the ventilation slots around the flame tray are not obstructed do not place ceramic logs or pebbles there Also check that the fireplace has been installed with the necessary 5mm gap all the way around and below the base plate models Montreal and Orlando If you find that all is at it should be call your point of sal...

Страница 9: ... at an adequate level by opening a window or door ever once in awhile during operation of your fire This can be achieved by opening a window for around 5 10 minutes or by leaving doors to adjacent rooms open Should the premises in which the fire is situated be equipped with an MVHR System Mechanical Ventilation with Heat Recovery the room air quality will automatically be kept at a high level and ...

Страница 10: ...10 Decoflame ApS Danmark info decoflame dk tel 45 96 3048 00 For more information please visit www decoflame com or contact Decoflame at info decoflame dk ...

Отзывы: