26
Operation
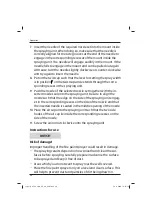
7. Insert the needle of the required nozzle set into the mount inside
the spraying unit. When doing so, make sure that the needle is
correctly aligned for the side grooves at the end of the needle to
engage in the corresponding recesses of the mount inside the
spraying unit. The needle will engage audibly in the mount. If the
needle fails to engage in the mount and can be pulled out again
with ease, turn the needle slightly clockwise or counter-clockwise
and try again to insert the needle.
8. Put on the twist cap such that the lever for setting the spray width
is in position on the twist cap and extends through the corre-
sponding recess in the spraying unit.
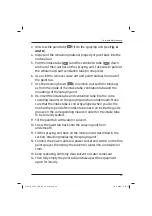
9. Push the nozzle of the selected nozzle set together with the in-
serted nozzle seal onto the spraying unit. Be sure to align the
nozzle such that the edge on the side of the spraying unit engag-
es in the corresponding recess on the side of the nozzle and that
the inserted needle is seated in the middle opening of the nozzle.
10. Place the air cap onto the spraying unit such that the two side
hooks of the air cap lie inside the corresponding recesses on the
side of the nozzle.
11. Screw the union nut clockwise onto the spraying unit.
Instructions for use
Risk of damage!
Improper handling of the fine paint sprayer could result in damage.
− The spraying results depend on how smooth and clean the sur-
face is before spraying. Carefully prepare in advance the surface
to be sprayed and keep it free of dust.
− Areas which you do not want to spray must be well covered.
− Place the fine paint sprayer only on a level and clean surface. This
will help to prevent dust and particles of dirt being drawn in.
Layout_DS_FSS_500_EX_UK_SPK7.indd 26
Layout_DS_FSS_500_EX_UK_SPK7.indd 26
19.11.2020 15:15:29
19.11.2020 15:15:29


