background image

19

4.4 How to fix and adjust the mechanical limit switches

•  Unlock the operator;

•  Rotate the wing to the position of complete opening, position the mechanical limit switch on the stop with the straight arm and fasten it 

with the provided screws (Pic. 10). If necessary, you can mount a second mechanical limit switch for the closing stop. In this case follow 

the above directions by moving the door in the desired closed position and fix it with the screws provided in detention;

•  Repeat the previous step for a possible second door;

•  Secure the protective cover on the straight arm with the screws provided (Pic. 10).

5  ELECTRICAL CONNECTIONS

Execute the wiring following the directions of table 1 and diagrams on page 20.

WARNING

 To ensure an appropriate level of electrical safety  always keep the 230V power supply cables apart (minimum  4mm in the 

open or 1 mm through insulation) from low voltage cables (motors power supply, controls, electric locks, aerial  and auxiliary circuits 

power supply), and fasten the latter with appropriate clamps near the terminal boards.

WARNING

 Connect to the power supply 230 V ~± 10% 50 Hz through a multi pole switch or a different device that can ensure multi pole 

disconnection from the power supply, with a contact opening of 3 mm.

WARNING 

To connect the encoder to the control panel, use only a dedicated cable 3x0,22mm

2

.

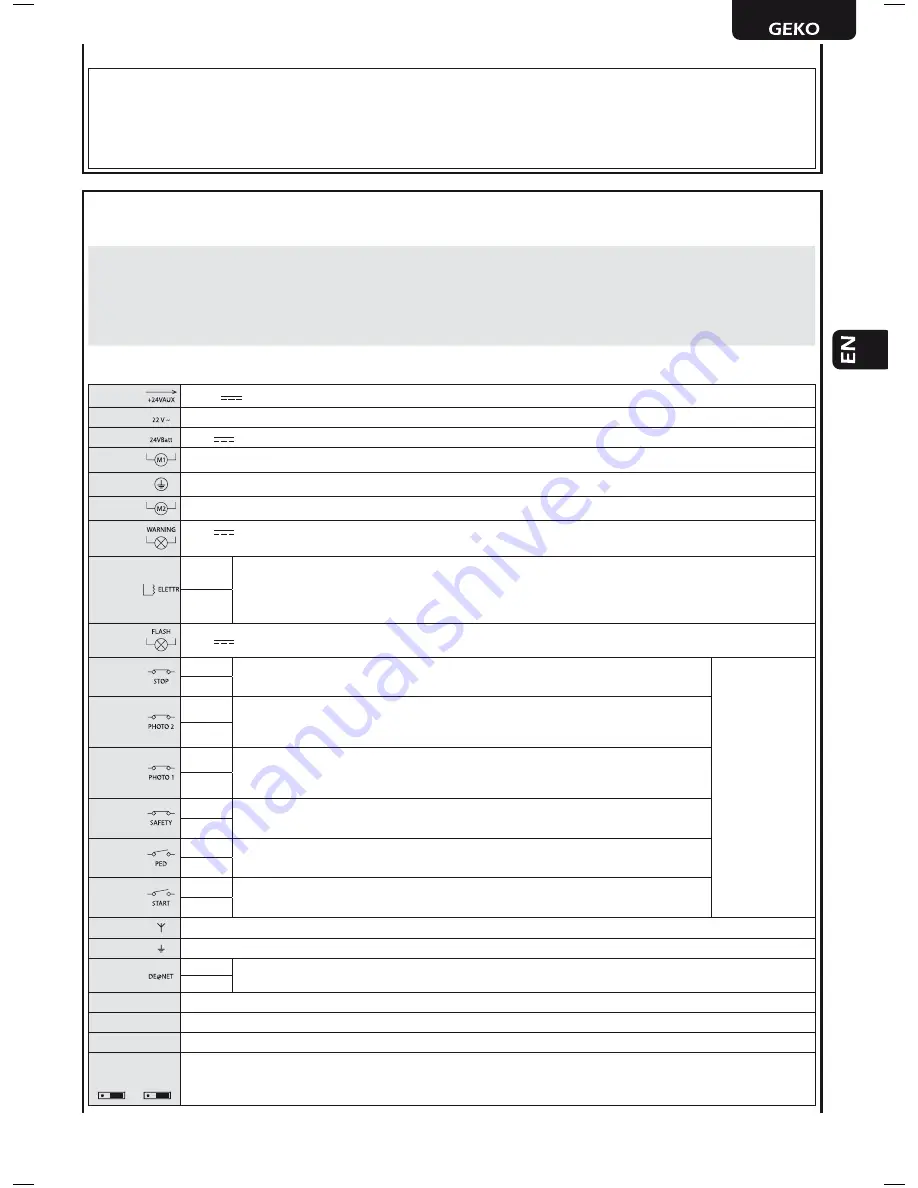
Table 1 “terminal board connections”

1-2

+24 V 

 power supply output for auxiliary devices  200mA

3-4

22 V ~ transformer power supply input

5-6

24 V 

 battery power supply or photovoltaic accumulator Green Energy input (follow carefully polarity indications).

7-8

Operator 1 output

9

Connection of motors metallic parts

10-11 

Operator 2 output (if present)

12-13

24 V 

 max 15 W output for open gate fix warning light (if P052=0), flashing (if P052=1) or courtesy light (if 

P052>1)

14-15

14  (-)

“Boost” output for electric-lock, max 1 x art. 110 (if P062=0), 24V pulse output, max 5W (if P062=1), step 

by step (if P062=2), electro-brake output for not self-locking operators (if P062=3), output for electric-lock 

power supply via external relay (if P062=4), output for electro-magnets power supply for barriers (if P062=5) 

or temporized output (if P062>5).

15  (+)

16-17

24 V 

 Flashing light output  max 15W art. Lumy/24A/S

18-19

18 - N.C.

Input 6 STOP. In case of intervention, it stops the movement of both motors during any 

operation. 

If unused, short circuit

.

If 

the 

installation 

req

uires 

dif

ferent 

commands 

and 

or 

additional 

to 

the 

standar

d, 

you 

can 

configure each in

put t

o the req

uired rat

e.

R

ef

er t

o Chap

ter

 “

Adv

anced Programming”.

19 - Com

20-21

20 - N.C.

Input 5 PHOTO 2. When enabled (see parameter P051 in the table), activation of PHOTO 

2 provokes: an inversion of direction (during closing), the arrest of the movement (during 

opening), prevent the start (gate closed). 

If unused, short circuit

.

21 - Com

22-23

22 - N.C.

Input 4 PHOTO 1. When enabled (see parameter P050 in the table), activation of PHOTO 

1 provokes: an inversion of direction (during closing), the arrest of the movement (during 

opening), prevent the start (gate closed). 

If unused, short circuit

.

23 - Com

24-25

24 - N.C.

Input 3 SAFETY. If activated, it causes the inversion. See P055 and P056 on the parame-

ters table. 

If unused, short circuit

.

25 - Com

26-27

26 - N.O.

Input 2 PED. If activated, it opens motor nr. 1 only.

27 - Com

28-29

28 - N.O.

Input 1 START. In case of intervention it provokes: the operator opening or closing. It may 

operate as “inversion” mode (P049=0) or “step by step” mode (P049=1).

29 - Com

30

Aerial signal input

31

Ground aerial input

32-33

32  (+)

DE@NET mains input (unused at the moment)

33  (-)

CON 1

230 V ~ ±10% (50/60 Hz) power supply input

CON 2

Connection of encoder to operator 2 (1-2-3)

CON 3

Connection of power supply to operator 2 + ground (4-5-6)

J5

J9

Encoder selection Jumper:

•A position = operators with encoder (remind to set P029=0)

•B position = operators without encoder (remind to set P029=1)

A

B

A

B

Содержание SWINGER

Страница 1: ...r portails battants Notice d emploi et avertissements Operador electromecánico para puertas con hoja batiente Instrucciones de uso y advertencias Operador electromecânico para portões de folha batente Instruções para utilização e advertências Siłownik elektromechaniczny do bram skrzydłowych Instrukcja montażu i użytkowania Электромеханический привод для распашных ворот Инструкция по эксплуатации и...

Страница 2: ...The Declaration of Incorporation may be consulted by entering http www deasystem com DEA SYSTEM S p A Via Della Tecnica 6 36013 PIOVENE ROCCHETTE VI ITALY LIEVORE TIZIANO Amministratore ...

Страница 3: ... K E E P T H E 230 V P O W E R S U P P LY C A B L E S A P A RT M I N I M U M 4 M M I N T H E O P E N O R 1 M M T H RO U G H I N S U L A T I O N FRO M LO W V O LTA G E C A B L E S M O TO RS P O W E R S U P P LY C O N T RO L S E L E C T RI C LO C K S A E RI A L A N D A U X I L I A RY C I RC U I T S P O W E R S U P P LY A N D FA S T E N T H E L A T T E R W I T H A P P RO P RI A T E C L A M P S N E A ...

Страница 4: ...ION AND ASSEMBLY 4 1 For a satisfactory installation of the product is important to Verify that the gate complies with the legal requirements and then define the complete project of the installation Verify that the gate is well balanced and that it has no points of friction in opening and closing Identify an area that allows a smooth and safe manual operation of the operator Verify that the operat...

Страница 5: ...4 15 14 Boost output for electric lock max 1 x art 110 if P062 0 24V pulse output max 5W if P062 1 step by step if P062 2 electro brake output for not self locking operators if P062 3 output for electric lock power supply via external relay if P062 4 output for electro magnets power supply for barriers if P062 5 or temporized output if P062 5 15 16 17 24 V Flashing light output max 15W art Lumy 24...

Страница 6: ...llation requires different commands and or additional to the standard you can configure each input to the required rate Refer to Chapter Advanced Programming ENC M1 ENC M2 F N 1 x 1 5 mm 2 1 2 3 4 5 6 1 2 3 4 5 6 FLASH LUMY 24A S max 15W N O N O N C SAFETY Only if needed START PED TX RX TX RX COM N C N O PHOTO 2 PHOTO 1 COM N O COM N O COM N C COM N C COM N C 2 x 0 5 mm 2 2 x 0 5 mm 2 2 x 0 5 mm 2...

Страница 7: ...aintenance intervention request ma noeuvres counter disabled 3 Hold down the key to display a cyclic 3 options or rele ase the button to exit the parameter 3 Selection type of operators IMPORTANT 1 Scroll down the parameters with and keys until you visua lise P028 2 Access the parameter by pressing the key 3 Verify that the value corresponds to d000 GEKO otherwise you must select it by pressing an...

Страница 8: ...ning you can manually intervene by giving an impulse to Start button or pressing the OK on the control panel simulating the stroke 6 Once the procedure is ended the display will show WARNING Once you have executed the learning stroke operate a complete cycle opening closing and then check the manual release to make sure it is working properly If it s to hard increase the value of P057 of 1 or more...

Страница 9: ...nly by pressing its hidden button Afterwards only transmitters personalized with the same encryption key can be memorized through the usual procedure unless a memory reset is carried out P004 8 Adjustment of operating parameters If you need to modify the operating parameters force speedness etc 1 Scroll down the parameters until you visualize the desire para meter i g P032 2 Access the parameter b...

Страница 10: ...key 3 When flashes press the key 4 Release the key as soon as stops flashing Default parameters for the configuration currently in use are restored 5 At the end of the operation display returns to P007 Warning After you restore the default parameters you must program the control panel again and adjust all ope rating parameters in particular remember to properly set the configuration of parameters ...

Страница 11: ... The display shows alternately the writing 4 Press the button the display shows the flashing writing 5 Press the button again and hold for 5 seconds releasing it be fore the procedure is terminated The display shows the fixed writing followed by before returning to the list of parameters 6 Access to programming is unlocked 4 Inputs configuration Where the installation requires different commands a...

Страница 12: ...ccessfully Operators mouvement not detected Make sure that operators and encoders connections are well done Check that jumpers J5 and J9 are well positioned as shown on the electric wiring If this error appears again replace the control panel 9 START UP The start up phase is very important to ensure maximum security and compliance to regulations including all the requirements of EN 12445 standard ...

Страница 13: ...Make sure that the electronic device for power adjustment is in good condition The operator jerks or is noisy during movement it stops mi dway or else it does not start If the leaf of the gate does not move freely release the operator and readjust the rotation points The power of the gearmotor may be insufficient for the characteristics of the gate s leaf check the choice of model whenever require...

Страница 14: ...TS CONFIGURATION PARAMETERS INPUT_3 selectioning input type 000 IN3 type free contact 001 IN3 type constant resistance 8K2 INPUT_1 operating selection 000 NONE unused parameter 001 START start 002 PED pedestrian 003 OPEN separated open 004 CLOSE separated close 005 OPEN_PM man present open 006 CLOSE_PM man present close 007 ELOCK IN electric lock activation See P062 008 PHOTO 1 photocell 1 009 PHO...

Страница 15: ... tot 100 tot Operators speed adjustment during slow down while closing 15 tot 100 tot Slow down duration adjustment while opening 0 tot 80 to Slow down duration adjustment while closing 0 tot 80 to Operator 1 force adjustment while opening if 100 obstacle detection deactivated 15 tot 100 tot Operator n 1 force adjustment while closing if 100 obstacle detection deactivated 15 tot 100 tot Operator n...

Страница 16: ... 0 indicates the duration in seconds of the run after inversion resulting from detection of an obstacle during the opening 000 complete reversal on obstacle 000 duration of reversal on obstacle 1sec 10sec Adjust the inversion on obstacle period detected by internal anti crushing sensor or by the safety input when activated If 0 it makes a complete inversion if 0 indicates the duration in seconds o...

Страница 17: ...0x500 25000 operations Warning Before you set a new value of the counter manoeuvres maintenance the same must be reset by setting P065 0 and only later P065 new value 000 Request Maintenance disabled 000 Number of operations x 500 for required maintenance 1 255 Selection of operating flashing light output If 0 intermittent flashing light output If 1 Fixed flashing light output for flashing lights ...

Страница 18: ...32 ...

Страница 19: ...Exclusive Australian Distributor Customer Service 03 9364 8288 See downee com au for your state office Tech Support 1800 241 733 techsupport downee com au downee com au deasystem com ...

Отзывы: