


,,,,,
yyyyy
,,,,,
yyyyy
22
4. When you have named the new program, press store again. the screen bumps to the next save screen,
asking you to select a program for the DDP to erase and write the new program over. Note that you
can only access programs 1-50 in this screen, as that is the only area where you can write new pro-
grams over old ones. Select the number where you want to write the new program and press store
once more. Momentarily the screen will say “Done!!” in the first line of text.
You have now saved a program consisting of two setups or one linked setup.
For example, if you chose to save Program #40, with setups “Slap Bass” and “Thick Kick”, the information you
have saved is the following:
Program #40
uses: setup “Slap Bass”
and: setup “Thick Kick”
Setups contain parameters. In order to save parameter settings you must save the setup.
Saving a setup
Saving a setup can be done by following these steps:
1. After you have edited your setups to your liking press the
Store
button. The screen will look like fig-
ure 22 below. Move the curser down to either CH 1 Setup, or CH 2 Setup, if you have been editing a
dual mono program. If you have been working with a linked program, your second choice will be
“Link Setup”. Make your selection by pressing the
Store
button again. Remember that there is room in
the DDP to store 100 linked setups and 100 mono setups, in addition to the factory setups.
2. Like above you are asked to name your setup. Again, there are instructions for you in the curve win-
dow. Press
Store
when you are done. Also, page 20 gives more detailed saving instrucions
3. You now must choose what you want to do with the setup you are going to save. You have two
choices: you may write over another setup, or you may make a new one. These two choices are
explained in more detail on the next page.
NOTE: YOU HAVE NOT SAVED ANY PARAMETERS AT THIS POINT.
Section 4: Editing/Saving/Recalling Programs
Figure 21: Store setup
Содержание DDP
Страница 1: ...y Operator Manual...
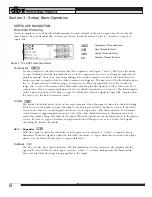
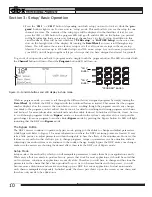
Страница 16: ...yyyyy yyyyy 13 Section 3 Setup Basic Operation Figure 13b Available Mono Chains...
Страница 42: ...FRAN AIS yyyyy yyyyy 39...
Страница 57: ...yyyyy yyyyy 54 Chapitre 3 Configuration Principes d utilisation Figure 13 Circuits mono disponibles...
Страница 82: ...yyyyy yyyyy 79 DEUTSCH...
Страница 97: ...yyyyy yyyyy 94 Kapitel 3 Anschluss und Grundfunktionen Abb 13 Verf gbare Mono Bearbeitungsketten...
Страница 122: ...yyyyy yyyyy 119 ESPA OL...