


If, on powerup, your 4030 displays the "LO bat" warning, you should
take the following steps to replace the battery (READ ALL OF THESE
DIRECTIONS COMPLETELY BEFORE YOU BEGIN):
1.
If possible, offload your 4030's present configuration data to disk
by means of the Upload Node Configuration routine in the
StartPAC 100 Software (you can use Download Node Configu-
ration to reload the configuration at a later time, if necessary).
2.
Turn off the 4030 and disconnect the power cord and any other
cables attached to the rear panel.
IMPORTANT: YOU SHOULD
TAKE PRECAUTIONS TO AVOID
ELECTROSTATIC DISCHARGE
THAT MIGHT HARM THE 4030'S
MICROPROCESSOR. IF POS-
SIBLE, WORK ON AN ANTI-
STATIC SURFACE AND WEAR A
GROUNDING STRAP AROUND
YOUR WRIST. THE STRAP
SHOULD BE CONNECTED TO
EARTH GROUND.
3.
Unscrew the two rear-panel
CLAMP SCREWS and slide
the CLAMP SLIDES rear-
wards out of their grooves
(see Fig. 3, Section 1.c).
4.
Now remove the four screws
in the corners of the rear
panel (see Fig. 2).
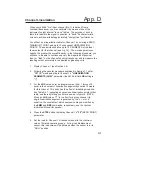
5.
Holding the 4030 with the rear panel upward, use a flat-tipped
screwdriver to gently pry up the rear panel from the instrument
case until you feel it loosen. The internal board connectors are
now disengaged from the front display assembly, and you can
easily pull the entire dual-board assembly out of the case.
E.1
App. E
Changing the Battery
Battery
(CR-1/3N)
Rear Panel
Board Connector
+
–
Fig. 15 Location of Battery