DAYLIFF Domestic Series Скачать руководство пользователя страница 15

13

Ÿ

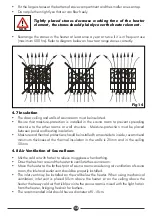
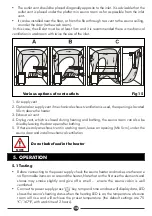
Put the larger stones at the bottom of stove compartment and the smaller ones on top.

Ÿ

Do not pile them tightly so that air can flow freely.

Tightly  placed  stones  decrease  working  time  of  the  heater 
element,  the stones should plainly cover the heater element .

NOTE

Ÿ

Rearrange the stones in the heater at least once a year or twice if it is in frequent use 
(maximum 500 hrs). Refer to diagram below on how to arrange stones correctly.

4.7 Insulation

Ÿ

The door, ceiling and walls of sauna room must be insulated. 

Ÿ

Ensure that moisture-protection is installed in the sauna room to prevent spreading 
moisture to the other rooms or wall structure . Moisture-protection must be placed 
between panel and heating insulation. 

Ÿ

Moisture and thermal protection should be installed from outside to inside, recommend 
minimum thickness of the thermal insulation in the walls is 25mm and in the ceiling 
50mm.

4.8 Air Ventilation of Sauna Room

Ÿ

Mix the cold air with hot air to relieve mugginess when bathing. 

Ÿ

Draw the fresh air around the heater to ventilate the sauna room. 

Ÿ

Move the heater to the farthest part of sauna room considering air ventilation of sauna 
room, the inlet and outlet vent should be properly installed. 

Ÿ

The inlet vent may be installed on the wall below the heater. When using mechanical 
ventilation, inlet vent is placed 50cm above the heater or on the ceiling above the 
heater the heavy cold air that is blown into the sauna room is mixed with the light hot air 
from the heater ,bringing fresh air for bathers. 

Ÿ

The recommended inlet should have a diameter of 5-10cm.

Fig 14

Содержание Domestic Series

Страница 1: ...Sauna Heater Domestic Commercial...

Страница 2: ...OUBLE SHOOTING 16 4 5 Heater Guard not supplied 12 4 6 Sauna Stones 12 4 7 Insulation 13 4 8 Air Ventilation of Sauna Room 13 8 TERMS OF WARRANTY 18 Davis Shirtliff Ltd 2022 Contents herein are not wa...

Страница 3: ...with a separate intelligent digital controller that provides various control and monitoring functions including temperature settings and a timer Commercial Suitable for larger institution saunas with...

Страница 4: ...hang clothes to dry in the heater WARNING Do not operate sauna heater without sauna stones WARNING Isolate the power supply before installation The sauna heater will be controlled via the control box...

Страница 5: ...ARNING The sauna heater becomes very hot when in operation and must be guarded to protect incase of accidental contact WARNING 3 Domestic 1 Inner Shell 2 Stone Bracket 3 Shell 4 Heat Element 5 Fix Bra...

Страница 6: ...ncrease Button Mode Button Time Display Temp Display Light LED Model LED Wait LED Push to operate heater Push to operate sauna room light Push to operate fan Preset time and temperature setting confir...

Страница 7: ...overheat cut out thermostat has tripped this means the sauna has reached very high temperature This can be reset with the button in the sensor 0 but test the control by setting a temperature of say 9...

Страница 8: ...o light wire 7 Fan terminal Connect to fan wire 8 Control panel terminal Connect to control cable 9 Cover Offer protection to the electronics Temp Sensor Frame Parts No Description Function 1 2 3 Circ...

Страница 9: ...7 Circuit Diagram Domestic Commercial Control Box Circuit Diagram for 9kW Domestic Unit Fig 4 Fig 5...

Страница 10: ...8 Control Box Circuit Diagram for 12 15kW Commercial Unit Fig 6...

Страница 11: ...ire control cable through the wire anchorage to the terminal as below figure 4 1 Important Prior to installing sauna heater please refer to installation handbook and check it as following points Is th...

Страница 12: ...nstalled at a height of approximately 1200mm for ease of use Installation method Drill a 40mm hole on wall for the wires The panel can be monitored by either drilling two holes 118mm apart for the scr...

Страница 13: ...all the temperature sensor on the height between 1500 1800mm in sauna room Open the cover with a screw driver Fix the bottom of the temperature sensor on to wall with screw Replace the cover Install t...

Страница 14: ...at the top rail of the guard is set at least 30 mm below the rim of the heater such that it does not receive heat radiation directly from the heater rocks NOTE 4 6 Sauna Stones Do not use the heater w...

Страница 15: ...el and heating insulation Moisture and thermal protection should be installed from outside to inside recommend minimum thickness of the thermal insulation in the walls is 25mm and in the ceiling 50mm...

Страница 16: ...ng and bathing the sauna room can also be dried by leaving the door open after bathing 5 If there is only an exhaust vent in washing room leave an opening Min 5cm under the sauna door and install mech...

Страница 17: ...ter to come on at a certain time use the B mode setting which can be set pressing the and the time window will display 4 00 then Press key the time display window will flash Then press or to adjust th...

Страница 18: ...aterial left over the sauna stove or in the sauna then the sauna cabin door must be closed before the timer setting can be made if the timer begins when the door is opened the controller will cancel t...

Страница 19: ...e sensor or the temperature is higher than 115 check the connection cable or change sensor 3 Change controller 1 Temp sensor isn t connected or cable is broken 2 The temperature is lower than 0 or hig...

Страница 20: ...rranty condition or liability implied by law the liability of Davis Shirtliff hereafter called the Company in respect of any defect or failure of equipment supplied is limited to making good by replac...

Страница 21: ...INS496A 03 22...

Отзывы: