background image

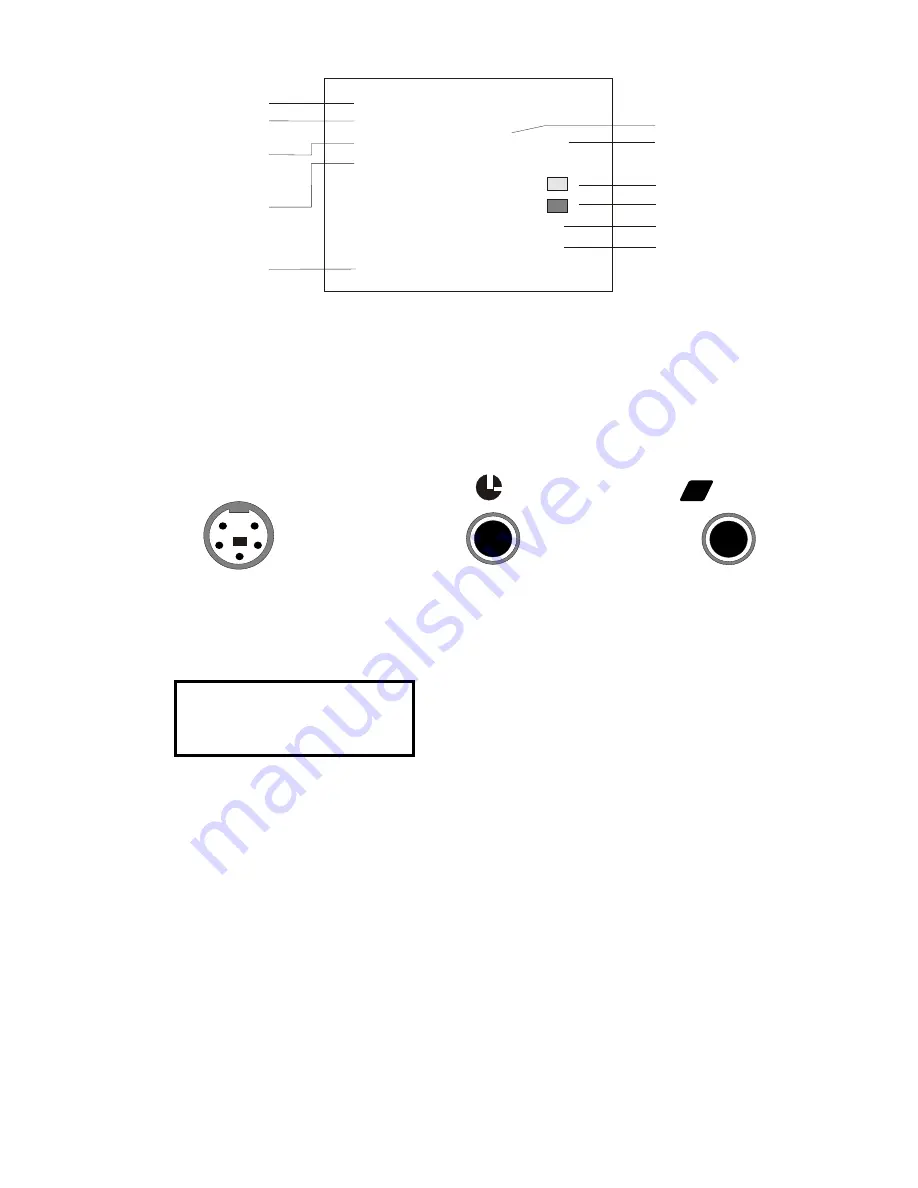
SOURCE A : PANASONIC
SOURCE B:  SONY
RECORD DELAY: 0S 00F
PAUSE DELAY:      0S 00F
LEADER: 00S COLOR: 
TRAILER: 00S COLOR:
GPI MODE: SINGLE TRIG
CALIBRATION CUT: NO
IR-CODE: SYSTEM CODE        

        VIDEO SOURCE  - A
        VIDEO SOURCE  - B

     RECORD TIME DELAY  
     OF RECORDING VCR

          PAUSE TIME DELAY 
          OF RECORDING VCR

  LEADER SEGMENT OF TAPE
  TRAILER SEGMENT OF TAPE

  GPI TRIGGER MODE

  FRAME CALIBRATION AT 
  "CUT IN" POINT

INFRARED CONTROL 
SYSTEM OF RECORDING
VCR

SECOND
FRAME

21

6.1.2  Select the type of edit control used by video source A.

     Move the cursor (using the Arrow keys) to "SOURCE A", then press the "IN" key to 

cycle through your three choices: "PANASONIC",  "SONY" or "JLIP". As illustrated 
below, choose "PANASONIC" if the source has a "Control-M" (5-pin) edit jack; 
choose "SONY" if the source has a "Control-L" edit jack; choose "JLIP" if the 
source has a "JLIP" edit jack.

The Source screen will appears as shown below:        

                   SOURCE-A = PANASONIC
                   PAUSE DELAY = 12 F
                   UNPAUSE DELAY = 12 F

The Player (camcorder/ VCR) will take time to react the "pause" and
 "unpause" command. Some camcorder/VCR will react faster some will react  
 slower. The pre-set delay setting of12 frames (12F) will work for most players.


Move the cursor to "SOURCE B", and press the "IN" key to make your 
selection.

Note: If you selected JVC (JLIP) as a source, the SE-200 will check the ID code


           of JVC camcorder before starting to edit. When you exit the Set-Up
           submode, you will see a screen as shown below. Ignore this momentary

screen display which will disappear after a few seconds.

                                                        CHECK JLIP-ID: 001


Control-M
5-pin) type
of edit jack

Choose "PANASONIC"                     Choose "SONY"                        Choose "JLIP"

Control-L
remote type 
of edit jack

JVC JLIP
remote type 
of edit jack

NEW EDIT

JLIP

JLIP

J

J

Содержание SE-200 Pro

Страница 1: ...CORRECTOR MUSIC VCR B VCR A COLOR GAIN AUDIO CUT ADJUST TIMING I O R G B CORRECTOR COLOR PROCESSOR B A SOURCE M I X B A B W VIDEO FADE AUDIO FADE MODE PLAY STYLE COLOR BORDER EHN SIZE CHAR FLASH CAPTI...

Страница 2: ...Different Style Characters 8 4 1 CREATE PATTERNS 8 4 2 CREATE TITLING EFFECTS 9 4 2 1 Go from Edit Sub Mode to Effects Sub Mode 9 4 2 2 Select Page to Work On 9 4 2 3 Select IN Effect 9 4 2 4 Select W...

Страница 3: ...e Single 21 or Double Trigger 6 1 7 Select Frame Calibration Yes or No 23 6 1 8 Select the Infrared Control System 23 6 2 CUT SUB MODE 26 6 2 1 Enter Cut Sub Mode 26 6 2 2 Delete All Edit Information...

Страница 4: ...6 5 4 Manual Record 41 TIME BASE CORRECTOR TBC 2000 43...

Страница 5: ...t Do not use liquid or aerosol cleansers Included with the unit 1 EDIT CONTROL CABLES You will use only one of these two cables depending on what camcorder you have a Control L cable Use this cable if...

Страница 6: ...one of the home videos you want to edit 1 Mode Indicator Displays the mode you have selected Titler S E G or Editor Please note Reading through this manual will require concentration Before you start...

Страница 7: ...only Source B only Both Sources A B Bypass no B W effect at all 12 Color Processor Key Enables R G B CORRECTOR Key and activates VIDEO GAIN and COLOR controls When LED is lit color processing is activ...

Страница 8: ...185 D x 50 H m m Weight 1 2 Kg approx 25 Mic Input Jack Left or Mono Accepts most microphones including the Narration Microphone provided Note mono input here will be outputed through both the Left a...

Страница 9: ...ideo audio source as well as with two video audio sources The SE 200 handles both synchronous and non synchronous video though it does not synchronize videos by itself Synchronous video is a professio...

Страница 10: ...e see S E G MODE section 5 0 for a further description of these effects 3 0 SYNCHRONOUS VIDEO 3 0 2 Typical installation of SE 200 with TBC 3000 Time Base Corrector and two non synchronous video sourc...

Страница 11: ...ey 1 to enter the Titler s Edit Sub Mode In Edit Sub Mode you will see the information on your TV screen as shown below Note that thember on the to on You may press the NEXT key blue color key to ente...

Страница 12: ...ers on them such as Type normally for the lower character press SHIFT the key for the upper character d For keys with yellow characters on them such as or press ALT the character for the lower yellow...

Страница 13: ...t text border Press the BORDER key The text on the screen will cycle through the three border styles available solid color color filled black outline and color filled white outline Note Memory capacit...

Страница 14: ...our TV screen Press number 2 to enter Effects Sub Mode In Effects Sub Mode you should see information on your TV screen as follows When you switch into Effects Sub Mode the page number will be the sam...

Страница 15: ...s the IN key until IN is flashing then press the right to left ARROW key just to the right of EDIT key The words LINE SHIFT SPEED 1 and SIZE 1 will appear on the screen Press the SPEED key to change s...

Страница 16: ...ing with page 01 and continue playing until you press the SUB MODE key 4 3 3 Play back titles manually 4 3 4 Playback titles with auto re cycle 4 4 CUSTOM ICONS 4 4 1 Go from ACTIVE SUB MODE to CUSTOM...

Страница 17: ...s the ALT key the SHIFT key and then the number 01 36 of the custom icon you want Note Custom Icons is not available for playing back with WIPE effect in Active Sub Mode ICON LIBRARY 01 02 03 04 05 06...

Страница 18: ...Wipe Fade or Animation Fade 14 5 0 2 Before entering Program Sub Mode The Program Sub Mode will allow you to program Fades Wipes 24 patterns Animation effects 24 patterns and User Programmable effect...

Страница 19: ...the ANIMATION key and enter 36 The characters A36 will appear in the EFFTS column without any mini icon EXAMPLE FOUR To program the F04 key with User Programmed Animation 95 move cursor to EFFTS colum...

Страница 20: ...u wish to program Press the D key cycle through 01 12 to select one of the effects numbered D01 to D12 Note these special A B DISSOLVE effects can be used only when a Title effect eg T01 and A B Roll...

Страница 21: ...ACH USER PROGRAMMED EFFECT CAN CONTAIN A SEQUENCE OF UP TO NINE CUSTOMIZED ICONS OR FRAMES USE ARROW KEYS TO MOVE CURSOR AND PLAY KEY TO DESIGN ICON PATTERN COMBINE USER PROGRAMMED EFFECT WITH EXISTIN...

Страница 22: ...ck a User Programmed Animation effect you must combine it with an existing Animation effect A25 A52 The pattern of the existing Animation effect will play back but the pattern will not consist of the...

Страница 23: ...5 A52 by pressing the ANIMATION key and then enter the number 26 52 of that existing effect Note every User Programmed effect MUST be combined with an existing Animation effect d Creating more User Pr...

Страница 24: ...you can play back the next Function key s effect by pressing the NEXT key EXAMPLE You just played back effect F29 by pressing SHIFT F9 and then PLAY To play back the effect programmed into the F30 key...

Страница 25: ...e source has a Control L edit jack choose JLIP if the source has a JLIP edit jack The Source screen will appears as shown below SOURCE A PANASONIC PAUSE DELAY 12 F UNPAUSE DELAY 12 F The Player camcor...

Страница 26: ...ay times in seconds and frames follow procedure in a above then press the OUT key 6 1 6 ONLY FOR USERS WITH GPI COMPATIBLE EXTERNAL DEVICES Select the GPI trigger mode single or double If you have a G...

Страница 27: ...device utilizes a SINGLE trigger When you press play does the effect appear on screen then remain on screen until you press play or some other key again If so the device utilizes a DOUBLE trigger 23 b...

Страница 28: ...STEM CODE the default setting lets you choose one of the Editor s many pre programmed system codes However if your VCR is not on the Editor s pre programmed system code list you will have to select I...

Страница 29: ...y so that the recording VCR begins to record Then press the pause key so that the recording VCR is paused in record mode i e both the record and pause indicators on the VCR are on Now determine which...

Страница 30: ...een to make that line flash aim the VCR s remote control at the Editor s SENSOR window then press the remote control key listed on the right side of the screen so that the word OK appears Note on the...

Страница 31: ...g up this screen SOURCE A DELETE ALL SCENES YES IN KEY NO OUT KEY 6 2 CUT SUB MODE 0 12 36 17 OUT SOURCE A SCENE NO 01 a If you wish to begin editing at the start of your source camcorder tape press t...

Страница 32: ...ame by pressing FWD same as the SHIFT key and or REV same as the ALT key After adjusting the IN point to your satisfaction press the IN key to mark the IN point If not you may press the PLAY key to by...

Страница 33: ...EDL data already stored in memory 6 2 6 Press the SUB MODE key to exit Cut Sub Mode and return to the Editor Mode menu EDITOR MODE 1 SET UP 2 CUT 3 EDL 4 PROJECT 5 RECORD b To assign a TAPE number 1...

Страница 34: ...oint of the scene is not accurate the EDL Sub Mode lets you adjust the counter number of that point Move cursor to the IN or OUT column on the screen and adjust the counter number as follows a To make...

Страница 35: ...assemble a new project please load an EDL by pressing the LOAD key The following screen will appear 31 Move cursor with the left and right arrow keys to the IN and OUT counter number positions and ent...

Страница 36: ...next tape Follow the instructions shown on the screen 32 PLEASE INSERT TAPE 2 TO SOURCE A REWIND PLAYER RESET COUNTER MANUALLY IF OK PRESS IN Move the cursor to the tape number you wish to edit and t...

Страница 37: ...sitions the sequence as you wish d Calibration during the recording process As with the scene marking process you have the option of making each scene pause at its IN point to make final frame by fram...

Страница 38: ...he scene where you want the title to appear iv Move cursor to the COUNTER column To adjust the counter number press the IN key to increase by seconds the FWD key to increase by frames the OUT key to d...

Страница 39: ...ter numbers to establish both the start and end of the effect s duration on screen Note Both of the effect s IN and OUT counter numbers must be higher than the scene s IN counter number but lower than...

Страница 40: ...en will change from A 1 to A 2 A 3 or A 4 b Inserting scenes form Source B Note before you can insert scenes from Source B you must have created an EDL for Source B If the EDL for Source A is Tape 1 t...

Страница 41: ...N OF SEQUENCE NO 3 TRANSITION EFFECTS OF SEQUENCE NO 3 IN POINT A01 TO A24 WIPE A25 TO A48 ANIMATION A95 TO A99 CUSTOM ANIMATION A00 FADE CUT CUT IN Note 1 The transition effect of the IN point will b...

Страница 42: ...above CUT transition effect can be also be a FADE WIPE or a ANIMATION effects as well The above Roll transition effects can also be an A B DISSOLVE or A B ANIMATION effects as well 3 The edited scene...

Страница 43: ...EDL 4 PROJECT 5 RECORD RECORD MODE 1 PREVIEW 2 AUTO RECORD 3 MANUAL EDIT 39 b This screen notes which source tape is playing which scene in the sequence will play next and which IN and OUT transition...

Страница 44: ...INSERT TAPE NO EDL tape 1 2 3 or 4 INTO SOURCE A or B PLAYER After inserting the new source tape press the IN key to continue the preview f If you are using two synchronous sources and have inserted S...

Страница 45: ...you press the EDIT key the source tape will play back automatically and the recording VCR will record the sequence of scenes you have edited Note The steps on Calibration Append Tape and synchronous s...

Страница 46: ...ect for the IN point of the first scene i For a fade wipe or animation effect press the ANIMATION key enter the effect s two digit code For example to select a fade in press ANIMATION 00 Notes The def...

Страница 47: ...be set up at Record Pause status by Editor If not then please manual control your recording VCR to enter Record Pause mode and then continuously press the IN and OUT key and cycle through the Record...

Страница 48: ...r the mixed audio signals either via the loudspeaker of the TV set connected to the unit or via a set of headphones The volume of the headphones is controlled by the EARPHONE VOLUME control on the rea...

Отзывы: