background image

27


5.3 Encoder 

Users can see the Encoder control page by pressing the Encoder option on the menu 
bar. There are five tags including tag1, tag 2, tag 3, tag4 and PGM which are shown in 
the “Encoder” control page. Each tag allows users to set parameters in two Encoders 
including Main Encoder and Sub Encoder. Users can set 8 parameters including 
Resolution, Frame Rate, Profile, Level, Entropy, GOP, Video Bitrate(bps) and Audio 
Bitrate(bps) for the Main Encoder and Sub Encoder separately. The Channel 1, 
Channel 2, Channel 3, Channel 4 and PGM output signals can apply different Main 
Encoder and Sub Encoder settings, which means that there are 10 parameters that 
can be set by users from the Encoder page. After the adjustment is finished, users 
can press the “Apply” button to apply and save those settings. If the input source is 
the SD signal, the aspect ratio option is added for the Encoder option. If the input 
source is not the SD signal, the aspect ratio option will not be shown.   

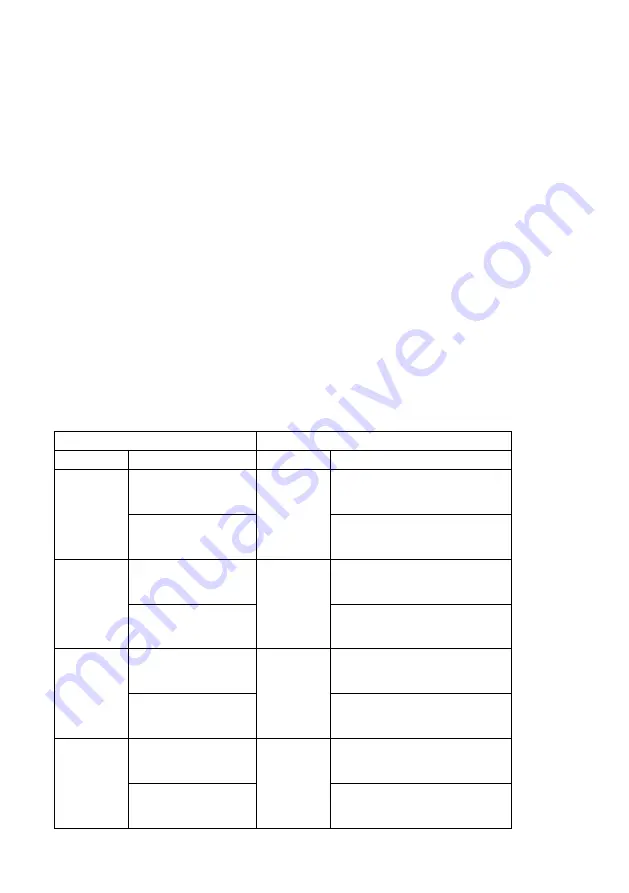
Note: Please pay attention that the total frame rate setting for the Stream 
must be within 300 FPS. The following table provides the example for the total frame 
rate setting.  

Record 

Streaming 

Channel 

Frame Rate 

Channel 

Frame Rate 

Main Encoder

60FPS 

Main Encoder


60FPS 

Sub Encoder

30FPS 

Sub Encoder


30FPS 

Main Encoder

Disable 

Main Encoder


Disable 

Sub Encoder

Disable 

Sub Encoder


Disable 

Main Encoder

Disable 

Main Encoder


Disable 

Sub Encoder

Disable 

Sub Encoder


Disable 

Main Encoder

Disable 

Main Encoder


Disable 

Sub Encoder

Disable 

Sub Encoder


Disable 

Содержание NVS-40D

Страница 1: ...NVS 40 4 channel streaming encoder recoder...

Страница 2: ...QUICK START GUIDE CONNECTION AND SETTING 17 4 1 QUICK START GUIDE 17 4 2 HOW TO INSTALL 2 5 SSD REMOVABLE HDD 20 CHAPTER 5 NVS 40 WEB CONTROL USER INTERFACE 21 5 1 MAIN CONTROL INTERFACE 21 5 2 SOURC...

Страница 3: ...TATUS AND BEHAVIORS 97 APPENDIX 2 NVS 40 FRONT PANEL BUTTONS BEHAVIORS 98 SERVICE AND SUPPORT 100 Disclaimer of Product Services The information offered in this instruction manual is intended as a gui...

Страница 4: ...should not be placed in a built in installation unless proper ventilation is provided 7 This product should only be operated from the type of power source indicated on the marking label of the AC ada...

Страница 5: ...iginal purchase invoice or other documentary evidence should be supplied at the time of any request for repair under warranty The product warranty period beings on the purchase date If the purchase da...

Страница 6: ...waste Instead it is your responsibility to dispose of your waste equipment by handing it over to a designated collection point for the recycling of waste electrical and electronic equipment The separ...

Страница 7: ...ecorder to record backup files for each input channel The NVS 40 can be a Video IP switcher to switch between different videos via internet connection which is suitable to control remotely Furthermore...

Страница 8: ...0p at 50 59 94 60 fps 576i at 50 fps 480i at 59 94 fps Web UI supported operating systems and web browsers Operating systems Microsoft Windows 8 1 64 bit Microsoft Windows 10 64 bit Web browsers Micro...

Страница 9: ...n Press this button to activate the RTMP RTMPS RTSP stream and press again to stop streaming Note Pressing the Stream button starts the stream for that device only and this stream button is used when...

Страница 10: ...Note If you want to start stop streaming and recording at the same time press and hold the Stream and Record buttons and then release them at the same time Please pay attention to the LED indicator s...

Страница 11: ...I or HDMI source If the input for the first channel is HDMI source this HDMI LED will be lit Red LED is Blinking Error Green LED is On Input sources are OK Record LED The Record LED indicates whether...

Страница 12: ...over of the SSD HDD enclosure 2 Please place your SSD or HDD into the enclosure Please pay attention that the side with the SATA connector should be placed toward the direction of the rear panel of th...

Страница 13: ...en the SATA interface is connected correctly and the Lock Unlock switch is pushed to the lock side the SSD HDD LED indicator will be lit Green LED is On The installation is finished The SSD HDD is rea...

Страница 14: ...o input source for the NVS 40 Channel 1 video input can be either SDIor HDMI source However the HDMI video input source is the only format that can be accepted by the video inputs of Channel 2 Channel...

Страница 15: ...ough a standard RJ 45 Ethernet cable DC IN 12V Power Connector Power the NVS 40 device by connecting the device to an AC outlet through a power cord and a power adapter To power off the NVS 40 simply...

Страница 16: ...16 Chapter 3 System Diagram...

Страница 17: ...nnected block cameras to the HDMI and SDI video input connectors on the rear panel of the NVS 40 Step 4 Please connect the public network to the WAN port of the router via an RJ 45 Ethernet cable Step...

Страница 18: ...18 Step 11 After the connected NVS 40 IP address is shown please enter the IP address into the address bar of the web browser...

Страница 19: ...ng in NVS 40 Web UI for the first time After the default Account and Password are entered please press the Sign in button for entering into the NVS 40 Web UI The default Account and Password are shown...

Страница 20: ...el of the NVS 40 to start recording 4 2 How to Install 2 5 SSD Removable HDD How to Assemble 2 5 SSD HDD in Removable Enclosure 1 Remove the top cover of the SSD HDD enclosure 2 Place the SSD HDD into...

Страница 21: ...e quick start guide in the previous chapter users can control the NVS 40 by the Web Control User Interface now Please refer to following chapters for details of the setting and control of the NVS 40 W...

Страница 22: ...g from the Source option on the toolbar menu to adjust the brightness contrast hue and saturation values by the sliders After the adjustment is finished users can press the Apply button to apply and s...

Страница 23: ...23 If the Input Source is HDMI If the Input Source is IP Stream The IP Stream function allows users to use the IP Stream to be the input source and the NVS 40 can acquire the streaming video remotely...

Страница 24: ...reaming address from the streaming source Step 2 Please click IP Stream from the web UI of the NVS 40 and then please paste the copied streaming address to the Source URL column in the IP Stream inter...

Страница 25: ...If the streaming video is decoded by the NVS 40 correctly the word IP Stream and resolution will be shown Step 3 At this time the NVS 40 can acquire the streaming video remotely The interfaces for vi...

Страница 26: ...However this interface also allow users to select the audio source to be SMPTE EBU or Manual After the setting is finished please press the Apply button to apply the setting All of the input sources...

Страница 27: ...rom the Encoder page After the adjustment is finished users can press the Apply button to apply and save those settings If the input source is the SD signal the aspect ratio option is added for the En...

Страница 28: ...er 15FPS Sub Encoder 15FPS Total FPS 60 30 30 15 60 30 30 15 270 300 For the introduction about each drop down menu in the Encoder page please see following table Resolution The Resolution drop down m...

Страница 29: ...the total frame rate setting for the Record Stream must be within 300 FPS Profile Users can select three Profile settings including High Main and Baseline Level Users can select different Encoding le...

Страница 30: ...tings including CAVLC and CABAC from the drop down menu 5 3 1 Setting Steps and Important Notices for Encoder Option Setting Take Youtube as an Example Please follow following steps and important noti...

Страница 31: ...twork speed and device demands for the audience of the live streaming Before the live streaming is started please make sure that the test is done The content of the test should include the content tha...

Страница 32: ...he Facebook Platform please follow following important Notices for streaming by the Facebook Platform The recommended upper limit for the Video Bitrate bps setting is 4000kbps 4mbps The recommended up...

Страница 33: ...e Facebook platform is 4000kbps so it is a must for users to set the video bitrate to less than 4mbps During the streaming the Key Frame must be sent for every two seconds which is the same as Youtube...

Страница 34: ...wo Record settings including Main Record and Sub Record So it means that users can record up to 10 video sources with different codings and video formats After the setting is completed users can press...

Страница 35: ...menu Duration min Users can determine the duration of each recorded file including 1 min 5 min 30 min 60 min 120 min and Unlimitation by this drop down menu 5 5 Streaming After pressing the Streaming...

Страница 36: ...on to start or stop the streaming 5 5 1 User Interface for Different Streaming Formats The streaming option of the NVS 40 Web UI provides different streaming formats for users including RTMP RTMPS RTS...

Страница 37: ...HLS For the introduction for each drop down menu of the Streaming page please see following table Encoder Source Users can select Main Encoder Sub Encoder and Disable from the Encoder Source drop down...

Страница 38: ...o obtain streaming server address and streaming token from their desired streaming platform such as Youtube or Facebook After that please enter the streaming server address and streaming token into th...

Страница 39: ...and password are shown as following Account root Password root RTSP Port and RTSP HTTP Port These two blanks will show RTSP port No and RTSP Http port No The range for default RTSP port No is from 554...

Страница 40: ...se use another RJ 45 Ethernet cable to connect one end to the LAN port of the PC Laptop and then connect another end to the LAN port of a router 4 Please open Datavideo IP Finder software and then ple...

Страница 41: ...d then the RTSP streaming address will be generated 10 Please download the VLC media player from https www videolan org and then install the software 11 Please open the VLC and then click Media drop d...

Страница 42: ...AN port of a router 2 Please use another RJ 45 Ethernet cable to connect one end to the LAN port on the rear panel of the NVS 40 and then connect another end to one of the LAN port of the router 3 Ple...

Страница 43: ...or Sub Encoder from the Encoder Source drop down menu 8 Please select TS from the Stream Type drop down menu of Main Stream or Sub Stream 9 Please enter the IP address of your PC which is shown by the...

Страница 44: ...44 11 Please download VLC media player from https www videolan org and then please install the software 12 Please open the VLC and then click Media drop down menu and then click Open Network Stream...

Страница 45: ...ocol Take Youtube as an Example 1 Please use an RJ 45 Ethernet cable to connect one end to the public network and then connect another end to the WAN port of a router 2 Please use another RJ 45 Ethern...

Страница 46: ...an button to find the IP address of the NVS 40 Please refer to Chapter 4 Quick Start Guide Connection and Setting 7 Please enter NVS 40 s IP address into the address bar of the web browser to open the...

Страница 47: ...by the Youtube platform 5 5 5 Streaming RTMP Use RTMP Protocol Take Facebook as an Example 1 Please use an RJ 45 Ethernet cable to connect one end to the public network and then connect another end t...

Страница 48: ...platform each streaming must be within 4 hours 5 The following screen will be shown please check Use a persistent stream key and then please copy Server URL and Persistent Stream Key Finally please pa...

Страница 49: ...be shown on the Facebook live stream page Please choose the section that you want to post your live broadcast and the audience who can see the live broadcast Finally please press the Go Live button to...

Страница 50: ...nu After that please press the Start Stream button 2 NVS 40 will generate a stream address with m3u8 file extension 3 Please play the m3u8 stream address by following ways For iPhone iPad and MacBook...

Страница 51: ...51 1 Please download VLC media player from https www videolan org and then please install the software 2 Please open the VLC and then click Media drop down menu and then click Open Network Stream...

Страница 52: ...52 3 Please enter the streaming address that is generated by the NVS 40 into the Please enter a network URL column and then please press the Play button for playing the streaming...

Страница 53: ...CG and Stop CG button to overlay desired characters or pictures to specific input source or PGM Moreover it allows users to remove the CG from specific input source or PGM Please see following diagra...

Страница 54: ...sers can enter different values to determine the Width and Height of the CG source Foreground Color Please enter different parameters in these blanks to determine different foreground color for the CG...

Страница 55: ...w the Location X Location Y values Affect CG Source 1 Text Users can adjust the Location X and Location Y values to change the position of the inserted text on the screen Location X For Location X the...

Страница 56: ...56 Example Location X 900 Location Y 500 You are my Friend...

Страница 57: ...the value the more the picture will be moved from the left side to the right side Location Y For the Location Y the more the value the more the picture will be moved from the up side to the down side...

Страница 58: ...58...

Страница 59: ...nu bar of the web UI users can see the control page 0f the PGM option The PGM option provides five modes for displaying the PGM screen including Quad View Full Screen POP PBP and PIP The main interfac...

Страница 60: ...n please press the Apply button for applying the setting 2 Full Screen Please press the Full Screen icon and then please select the channel that is desired to be shown in Full Screen mode After that p...

Страница 61: ...e desired to be shown in POP mode After that please press the Apply button for applying the setting 4 PBP Picture By Picture Please press the PBP icon and then please select the two channels that are...

Страница 62: ...5 PIP Picture in Picture Please press the PIP icon and then please select the two channels that are desired to be shown in the PIP mode After that please press the Apply button for applying the setti...

Страница 63: ...of the three modes including Stretch Fit and Full Stretch If the Stretch is selected the PGM screen will be stretched to up side and down side Fit If the Fit is selected the PGM screen will be shown i...

Страница 64: ...64 1 The PGM option is set to POP mode and the Scale drop down menu is set to Stretch 2 The PGM option is set to POP mode and the Scale drop down menu is set to Fit...

Страница 65: ...65 3 The PGM option is set to POP and the Scale drop down menu is set to Full 4 The PGM option is set to PBP mode and the Scale drop down menu is set to Stretch...

Страница 66: ...66 5 The PGM option is set to PBP and the Scale drop down menu is set to Fit 6 The PGM option is set to PBP and the Scale drop down menu is set to Full...

Страница 67: ...or HSB code to the right side of the pop up color picker Moreover users can select their desired background color from the color spectrum on the left side Step 2 After the desired color is selected p...

Страница 68: ...the Monitor option on the menu bar of the web UI users can see the control page is shown There are four HDMI frame rate including 60FPS 50FPS 30FPS and 25FPS for users to select Moreover it allow user...

Страница 69: ...b control interface users can see the system control page The system control page allows users to set five system related parameters including network setting Time Setting Firmware Update Disk Format...

Страница 70: ...twork mode of the NVS 40 is the DHCP mode once the DHCP mode is set to Enable all of the network related parameters will be set automatically If the DHCP mode is set to Disable users need to enter all...

Страница 71: ...system time Firmware Update Please download the latest firmware which the file name is nvs40_x_x_x gz from Datavideo official website www datavideo com After the latest firmware is downloaded please s...

Страница 72: ...utton for updating the FPGA Disk Format The Format Type drop down menu allows users to format the SSD HDD to FAT NTFS or exFAT format Users can select their desired disk file format and then press the...

Страница 73: ...r Option The Other Option allows users to set Timeout Period and Auto Streaming Restart functions When the desired settings are set by users please press the Apply button to apply the setting System C...

Страница 74: ...synchronize the system time to the NTP server automatically Please follow following steps for setting the system time automatically 1 Please select the Automatically from the Internet option from the...

Страница 75: ...ing Manually This option allows users to set the system time manually please follow following steps for setting the system time 1 Please select the Manually option from the Type drop down menu 2 Pleas...

Страница 76: ...ress the Apply button for applying the setting Note If the Automatically from the Internet option is selected users still need to select the Timezone manually by themselves If the system is restored t...

Страница 77: ...n Please press the MODE RECORD and STREAM buttons on the front panel of the NVS 40 simultaneously when the NVS 40 is powering on and then the IP address of the NVS 40 will be restored to factory defau...

Страница 78: ...78 4 INTEL 530 240GB 5 SANDISK Extreme 120GB 6 SANDISK Extreme 240GB 7 Samsung 850 PRO 256GB 8 Samsung 840PRO 512GB 9 Crucial M500 120GB...

Страница 79: ...he web UI users can see the Status control page The Status control interface provides details for following items Input Information for Channel 1 to Channel 4 Record Status information for Channel 1 t...

Страница 80: ...gs include Stream 1 Main Stream 1 Sub Stream 2 Main Stream 2 Sub Stream 3 Main Stream 3 Sub Stream 4 Main Stream 4 Sub Stream PGM Main and Stream PGM Sub Please follow following steps for streaming on...

Страница 81: ...Please select your desired input source from the Video Source drop down menu Step 3 Please check the checkbox of your desired Encoder Source Step 4 Please press the Start Stream button for starting s...

Страница 82: ...he of your web browser For the Microsoft IE browser please press the Refresh button to update the information of your web browser For the Google Chrome browser please press Reload this page button to...

Страница 83: ...83 Step 2 Please press the Delete button from the Browsing History Step 3 Please press the Delete button in Delete Browsing History...

Страница 84: ...Browser Step 1 Please open the Chrome web browser press the Customize and Control Google Chrome on the top right side and then please press Settings from the drop down menu Step 2 Please press Advanc...

Страница 85: ...menu and then please check the checkbox of Cached images and files Finally please press the Clear data button How to Clear the Cache for the FireFox Browser Step 1 Please open the FireFox browser and...

Страница 86: ...86 Step 2 Please press Privacy Security option Step 3 Please press Clear History button from the History option...

Страница 87: ...87 Step 4 Please select Everything from the Clear Recent History drop down menu and then please check Cache Finally please press the Clear Now button...

Страница 88: ...88 Forced Clear the Cache Manually to Reload the Web pages Please press the Ctrl F5 buttons simultaneously to force download the web pages...

Страница 89: ...o your PC Laptop Step 5 Please set your PC laptop in DHCP mode Step 6 Please download Datavideo IP Finder utility software NVS 2X_IPFinder on the Datavideo official website www datavideo com or by sca...

Страница 90: ...Please save the latest firmware into a USB thumb drive with the FAT 32 file format After that please insert the USB thumb drive into the front panel USB port of the NVS 40 After that please power off...

Страница 91: ...from the Datavideo official website www datavideo com for updating the FPGA Step 2 Please press the Browse button to select the latest bin file Step 3 Please press the Update button Step 4 The FPGA u...

Страница 92: ...92 Step 5 Please press the Reboot button and then the system will be rebooted After that the FPGA update procedure is finished successfully...

Страница 93: ...tact your distributor or the service center No Problems Solutions 1 How to use the SATA to USB 3 0 Adapter Cable After the SSD HDD enclosure is pulled out from the NVS 40 users can connect the SSD HDD...

Страница 94: ...94 Chapter 8 Dimensions All measurements in millimeters mm...

Страница 95: ...Format MP4 MOV TS General Setting Control Web UI for system configuration and control Firmware Update Firmware upgradable by Web UI network Standard Supported Input Resolutions 1080p60 59 94 50 1080p...

Страница 96: ...96 Akami Facebook Twitch Wowza Adobe Media Server Web UI Language English Simplified Chinese and Japanese Operating Temperature 0 C to 40 C 32 F to 122 F Chassis 1U rack mount Power DC 12V 2A...

Страница 97: ...N A Error Source Input OK HDMI N A Error Source Input OK REC N A Error 1 The hard disk is not inserted into the HD slot or the hard disk is inserted without locking 2 All of the Recording settings of...

Страница 98: ...l of the NVS 40 including MODE RECORD and STREAM please refer to following table for the NVS 40 front panel buttons behaviors Button Behavior Description LED Indicator Status MODE Stream ON Press Once...

Страница 99: ...99 Note...

Страница 100: ...https www datavideo com product NVS 40 Jul 20 2020 Ver E4 Datavideo Technologies Co Ltd All rights reserved 2020...

Отзывы: