background image


16 


The Preset row is the cued channel, this channel will appear in the PST or Preview window. 
The Preset row selection decides which input will be transitioned next when using any of the 
transition controls. 
 

Note: The keys on the Program and Preset rows will be inactive while the T-Bar is active or 
moving. Only when the T-Bar is fully up or fully down will the keys respond. 

Background 

The 

Background

 button assigns a background colour or SMPTE 75% bars for 

use on the Program and Preset row.  


2.2.2  Video Transitions 

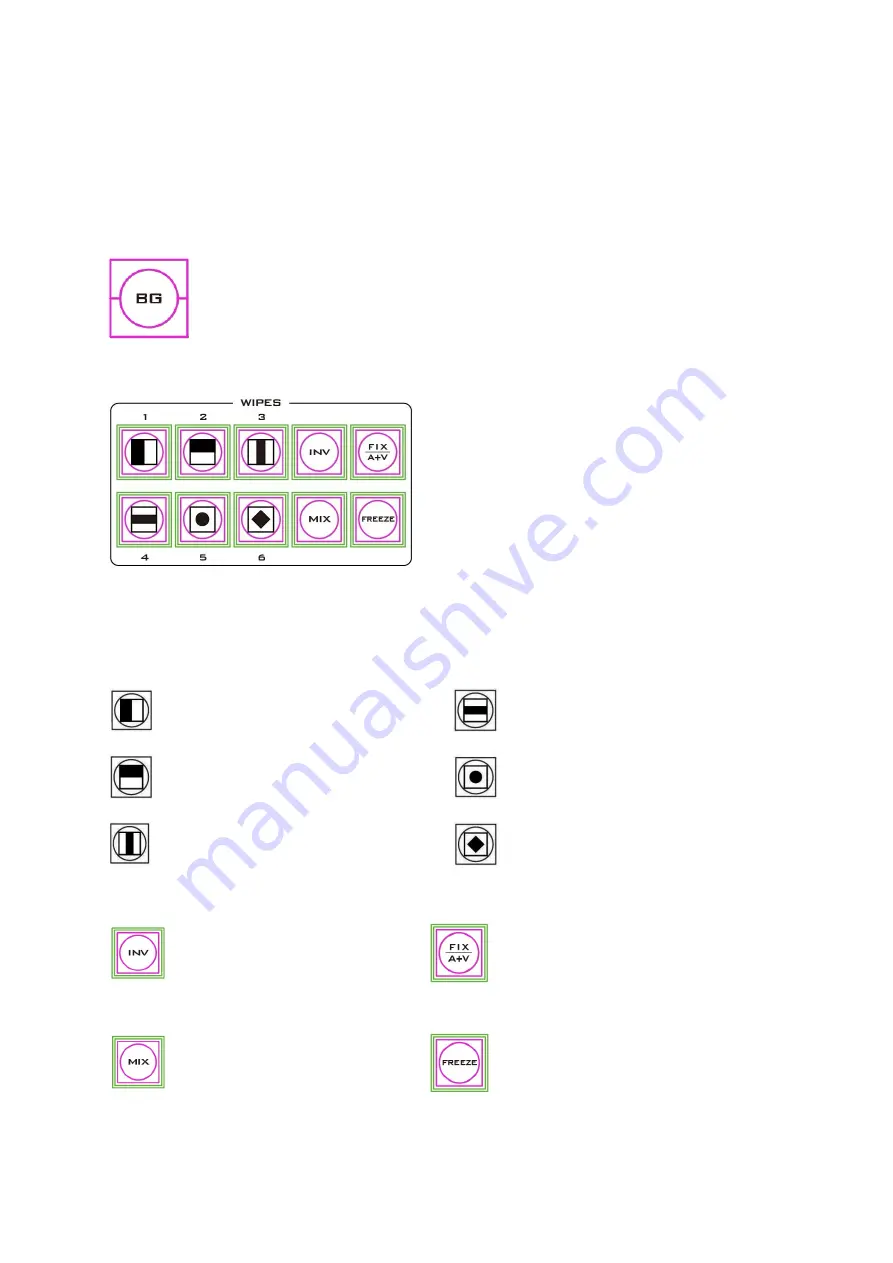
The  HS-2850  features  six  user  defined  wipe 
buttons,  an  A/B dissolve  or 

MIX

 button,  an 

INV


or Invert wipes button and a 

FREEZE

 button. 

 
All  wipes  can  have  an  optional  colour  border 
applied.  The  wipe  border  width  and  colour  are 
chosen within the menu system. 
 

Transitions can be performed manually using the T-Bar or automatically by using the 

SPEED


and 

AUTO TAKE

 buttons. 


Transition Selection 


1.  Vertical Wipe Left to Right. 


4. 

Horizontal Wipes from Centre to 
Top and Bottom. 


2. 

Horizontal Wipe Top to 
Bottom. 


5. 

Circle Wipe from Centre to 
outside edges. 


3. 

Vertical Wipes from Centre to 
Left and Right sides. 


6. 

Diamond Wipe from Centre to 
outside edges. 


INV 
Invert the selected wipe

 so it 

travels in the opposite 
direction. 


FIX / A+V 

Switch the audio mixing option 
between 

Audio Fixed

 and 

Audio-F-

Video

 (A+V). 


MIX 

Pressing this button selects a 
basic 

A/B Dissolve

 for the next 

transition. 


FREEZE 
Freeze the program source image

 or 

return to live video of the selected 
program source. 

Содержание HS-2850

Страница 1: ...HS 2850 HD SD 12 CHANNEL PORTABLE VIDEO STUDIO Instruction manual 8 12 CHANNEL...

Страница 2: ...Transition Selection 16 Triggering the Transition 17 2 2 3 Logo and Clock 18 2 2 4 Picture in Picture and Downstream Key 19 2 2 5 Frame Store and Audio Control 20 2 2 6 Crosspoint 20 2 2 7 OSD MENU Op...

Страница 3: ...I VIEW 55 4 2 VIDEO LAYERS 56 CHAPTER 5 AUDIO FUNCTION 58 5 1 OVERVIEW 58 5 2 AUDIO MENU OPTIONS DE EMBEDDING SDI OR HDMI AUDIO 58 5 3 AUDIO MENU OPTIONS MONITORING THE AUDIO LEVELS 60 5 4 AUDIO MENU...

Страница 4: ...hat some information in this manual from time to time may not be correct or may be incomplete This manual may contain typing errors omissions or incorrect information Datavideo Technologies always rec...

Страница 5: ...ailable consult your Datavideo dealer or your local power company 8 Do not allow anything to rest on the power cord Do not locate this unit where the power cord will be walked on rolled over or otherw...

Страница 6: ...ruses and malware infections on the computer systems are not covered under warranty Any errors that are caused by unauthorized third party software installations which are not required by our computer...

Страница 7: ...nserve natural resources and ensure that it is recycled in a manner that protects human health and the environment For more information about where you can drop off your waste equipment for recycling...

Страница 8: ...am The system is equipped with an eight way intercom system and is supplied with four belt packs for effective communication between the whole production crew The HS 2850 is ideal for TV and video pro...

Страница 9: ...Wipe with borders Logo and Clock on screen Cross Point Assignment XPT Audio delay for each de embedded audio source OSD SMPTE EBU Audio options Black burst PAL or Tri Level Sync Reference Countdown c...

Страница 10: ...10 1 2 System Diagram...

Страница 11: ...Inputs 11 Input11 SD HD SDI 24 3pin XLR Audio Outputs 12 Input12 SD HD SDI HDMI 25 Monitor HDMI IN External Video Input 13 External Sync Input 26 To Beltpack Please note inputs 9 to 12 are not presen...

Страница 12: ...connected to the HS 2850 switcher For example only input channels 4 8 and 12 have the HDMI input option NOTE This switcher cannot accept 1080P or 1280x720P or 1440x1080i inputs and has no computer in...

Страница 13: ...port 17 is used to connect the HS 2850 to a PC for remote control or to update the unit s firmware or to configure the switcher See Chapter 3 for more details AUDIO OUT 24 Supports two channels of th...

Страница 14: ...check with your local Datavideo office for advice on this connection or refer to Appendix 4 of this manual for RS 422 PIN definitions and cable wiring DC IN 21 Connect the supplied 12V 5A PSU to this...

Страница 15: ...Preset Row PST 7 DSK selection PST PGM 14 Program Row PGM 2 2 1 Video Switching Program and Preset rows The Program row of buttons is the active channel this is the live output The active channel will...

Страница 16: ...button All wipes can have an optional colour border applied The wipe border width and colour are chosen within the menu system Transitions can be performed manually using the T Bar or automatically b...

Страница 17: ...e chosen Speed button CUT This performs a simple immediate switch from the current main source to the selected sub source The selected transition wipe or dissolve is not used FTB Fade To Black this bu...

Страница 18: ...digits can be changed using the supplied SEConfig software See Chapter 3 for more details on using this software or see OSD MENU Options onwards for the Clock menu options TIMER In some mixing or swi...

Страница 19: ...iP1 or PiP2 label shown next to the selected input image The full PIP process is described in the section on Picture In Picture Function DSK Preset and DSK Program When looking at the top right corner...

Страница 20: ...r 3 AUX Source Selection The auxiliary output AUX allows you to fix the SDI output onto a particular input source The HS 2850 has four user defined SDI outputs see Section 2 1 1 item 14 One or all of...

Страница 21: ...an be applied to audio channel sources as well Follow the steps described below to cross assign audio input channels to program preset row buttons XPT Audio Assign audio source and channel settings ac...

Страница 22: ...ynamic Range 24 18 Audio Tract EXTERNAL ANALOG AUDIO Tick selection for ON or OFF AUDIO PASS THROUGH On Preview Video Adjustment Brightness 72 to 184 default 128 Select the input that you want to adju...

Страница 23: ...option enabled in Auto Audio Mixing Type By the End Tick selection clean cut or immediate audio switch PIP Set Up Position PIP 1 Horizontal Position Left to Right 000 097 Vertical Position Lower to Up...

Страница 24: ...Set Up DSK 1 2 Fill Key mode Alpha channel Luma Key mode Luma Key level 0 black to 255 white BG Color 1 8 and Color Bar 9 1 9 Background Color Settings 1 White 2 Yellow 3 Cyan 4 Green 5 Magenta 6 Red...

Страница 25: ...for Count Down ON or OFF Down Counter Value If Count Down is ON then the Down Counter value is set in minutes and seconds MM SS Max 1 Hour or 60 00 Default 15 Seconds or 00 15 Multi Screen Audio Sour...

Страница 26: ...are on the PC Locate SET function button which is located just above the T Bar When clicked a new window will open as shown left below This Settings window is used to match the software to the IP addr...

Страница 27: ...ou load a file the recorded actions will begin to play back until the end of the file Software based Macro Functions It is possible to record a Macro type playlist to the computer when using the SE Re...

Страница 28: ...annels will hear communication from the operator or from any other channel using the TALK button Channel Buttons 1 8 Opens communication with individual channels More than 1 channel can be active at a...

Страница 29: ...etween HDMI Multiview BLUE Press this button to eliminate the red and green component of input signals Only the blue component of an input is displayed on the screen PATTERN Press the PATTERN Key to a...

Страница 30: ...Down buttons Press Enter button to enter or exit the menu mode Main Options Sub Options Parameters Parameters MAIN ADJUST BRIGHTNESS 0 100 CONTRAST 0 100 SHARPNESS 0 100 SATURATION 0 100 TINT 0 100 B...

Страница 31: ...ttons to change the setting and then press Enter to store the new value and return to the main menu To select a different setting Brightness Contrast Saturation Sharpness TINT use the Up Down buttons...

Страница 32: ...navigate the available options You can choose OSD TIMEOUT 5 120 SEC FRAME RATIO 90 80 0FF 4 3 MARK LINE ON OFF CENTRAL MARK ON OFF CINEMA ZONE MARK ON OFF AUDIO CHANNEL L 1 2 3 4 AUDIO CHANNEL R 1 2 3...

Страница 33: ...the PC to the HS 2850 switcher using an Ethernet cable 2 Turn on the PC and the HS 2850 3 The HS 2850 then needs to be placed into PC Control mode To do this press the PC Control button on the HS 285...

Страница 34: ...t Status Window click the Properties button 8 On the Ethernet Properties window double click Internet Protocol Version 4 TCP IPv4 to open a window on which you will be allowed to manually enter an IP...

Страница 35: ...e first three octets numbers in the IP Address field must match the first three octets of the switcher IP address The fourth octet should be a different number for the PC and switcher In the example b...

Страница 36: ...he Switcher 1 Double click the SEConfig DV icon to launch the application 2 If you immediately get an error window do not worry this just means the PC Control button in the MENU area of the HS 2850 ke...

Страница 37: ...The Switcher Network Setup Utility allows the user to change the switcher IP address Locate on your desktop the icon as shown in the diagram below and then double click it to open the utility softwar...

Страница 38: ...method of connection between the computer and the switcher In this case the HS 2850 is connected using selected Ethernet IP addresses Note that the first three numbers in the IP addresses of the swit...

Страница 39: ...escribed in Section 2 2 7 Each menu option in the left hand pane can be expanded by clicking on the plus sign in the left hand pane The right hand pane shows any values which can be changed 3 4 1 Inpu...

Страница 40: ...ach input can be selected for Countdown ON or OFF If Countdown is ON then the Down Counter value is set in minutes and seconds MM SS MAX 1 Hour or 60 00 and Default 15 Seconds or 00 15 Timer Enable ON...

Страница 41: ...Mixing Type Type V User choice of X type A B cross fade V type Fade out A then Fade in B Type X Audio XPT Any of input audio sources can be associated with any of input button or buttons Different vi...

Страница 42: ...8 Audio source from Input 5 to Audio source from Input 5 to Button 1 Button 2 Button 3 Button 4 Button 5 Button 6 Button 7 Button 8 Audio source from Input 6 to Audio source from Input 6 to Button 1...

Страница 43: ...ill display a list of configurable video inputs as shown in the diagram below Video XPT Any of video sources can be associated with any of Console 1 8 buttons Video from Input 1 to Video from Input 1...

Страница 44: ...utton 6 Button 7 Button 8 Video from Input 5 to Video from Input 5 to Button 1 Button 2 Button 3 Button 4 Button 5 Button 6 Button 7 Button 8 Video from Input 6 to Video from Input 6 to Button 1 Butto...

Страница 45: ...e make sure your XPT setting is configured to one input to one button arrangement 3 4 4 Common Setup The Common Setup tab will allow you to set up various image effects such as the logo DSK and PiP as...

Страница 46: ...to BARS is OFF Speed Buttons Preset Run time of effects Min 4 Frames maximum speed Max 64 Frames minimum speed Run time of effects for Button 1 4 100 Run time of effects for Button 2 4 100 Run time o...

Страница 47: ...Cyan 4 Green 5 Magenta 6 Red 7 Blue 8 Black 9 SMPTE 75 Color Bars The color can be changed in the Palette setup PiP 1 PiP X Axis Position 0 97 PiP Y Axis Position 108 0 Picture Size 33 1 Border Width...

Страница 48: ...tings of outputs 1 to 4 can also be configured from the computer Clicking the Outputs tab will display a list of various input settings Output 1 Source to Output Program Program Logo Free Program Logo...

Страница 49: ...Output 4 Source to Output Program Program Logo Free Program Logo and Titles Free Preview AUX 1 AUX 2 Format HD SD SD 16 9 HD SD SD 16 9 HD 1080p 25 fps Re Embedded Audio Group 1 4 3 5 Images Upload ta...

Страница 50: ...can then be used to save the new picture into a selected frame store on the switcher 3 5 2 Logos The HS 2850 can store up to eight still logos in its memory Using the logos tab you can use the LOAD bu...

Страница 51: ...ton to browse for a logo sequence of images stored on the computer This logo sequence is then loaded into the application window The sequence is indicated by the number in the title two digits 01 02 a...

Страница 52: ...52 3 6 Multi screen window signs labels tab This tab allows the user to rename the input source labels on the HDMI multi view...

Страница 53: ...e new label text into the switcher s memory 3 7 Multiview Layout Tab The Multiview Layout Tab allows you to set the Multiview Layout displayed on the two HDMI outputs There are five variants listed as...

Страница 54: ...Multiview layout Simply clicking the LOAD button to browse for a Multiview files file extension mss stored on the computer This file is then loaded into the application window The WRITE button can be...

Страница 55: ...iguration C On HDMI screen 1 8 live inputs with additional Preview and Program windows On HDMI screen 2 Program window Configuration D On HDMI screen 1 12 live inputs with additional Preview and Progr...

Страница 56: ...plied with the HS 2850 see Chapter 3 for more details 4 2 Video Layers The HS 2850 is a Standard Definition or High Definition Digital Video Switcher and as well as mixing video and audio sources it h...

Страница 57: ...rectly this layer can stop the video layers behind it from being seen properly Re adjust your DSK 2 settings or switch off the DSK2 function on the HS 2850 to restore the video behind it The LOGO and...

Страница 58: ...ixer such as the Datavideo AM 100 Other audio sources such as microphones and background music can then be added at the AM 100 Once the audio has been mixed externally in the AM 100 with any microphon...

Страница 59: ...the video Group1 Stereo Pair 1 SDI Embedded Audio Group Stereo Pair Channel Embedded Channel No Group 1 Stereo pair 1 left 1 right 2 Stereo pair 2 left 3 right 4 Group 2 Stereo pair 3 left 5 right 6 S...

Страница 60: ...n the HDMI multi view See Section 3 7 Multiview Layout Tab It is also possible to hear the preview or program audio from the multi view HDMI outputs using the menu option below Multi Screen Audio Indi...

Страница 61: ...want to hear the audio from each camera as the video channels are switched audio follows video then we would set up in the following way Open the Switcher Configuration Utility click Settings Tab Aud...

Страница 62: ...tings is selected 5 Press the Right Arrow key to enter into the Input Audio Settings Menu 6 Press the Right Arrow key to enter the Audio Delay Setting Menu The default setting is 02 which is measured...

Страница 63: ...ng Picture In Picture images on the Multi view or Preview outputs Assigning a video source input to a PIP Using the lower PIP1 or PIP2 buttons you can assign a selected video input to the chosen PIP v...

Страница 64: ...cted video input to the chosen DSK video layer 1 First press and hold down the required DSK button on the lower row The Preset row of input sources will light 2 While still holding down the DSK button...

Страница 65: ...the HS 2850 s Channel 4 or 8 HDMI port using an HDMI cable 2 Open the HS 2850 OSD MENU to set Video Standard See Section 2 2 7 OSD Menu Options 3 Select Video Input Standard and Format Input 4 8 12 H...

Страница 66: ...66 7 On the CG 200 User Interface select Settings Preference to open the Preference window on which you can choose the appropriate Video Mode the video mode must be consistent with the HS 2850...

Страница 67: ...o toggle the CG overlay output On and Off 10 Click Play all icon to start playing and streaming your CG contents 11 Pressing DSK Program or Preset button on the control panel will take the DSK CG 200...

Страница 68: ...anel and screws Insert the VIDIN board module G0911D300413 Nyloc Machine Screw ISO Round Head 3 0 4m m Nickel Plated 2 G09220639022 VIDIN Block Panel SECC 1 0 VP 639 Painted Dark Blue Fine Weave 2 Pla...

Страница 69: ...69 Lock the VIDIN board module in place with screws G0911D300413 Nyloc Machine Screw ISO Round Head 3 0 4m m Nickel Plated 2...

Страница 70: ...r output Tally output of input video Program 8 9 Program 9 Open collector output Tally output of input video Program 9 10 Program 10 Open collector output Tally output of input video Program 10 11 Pro...

Страница 71: ...71...

Страница 72: ...user selected event Power is supplied by the HS 2850 and is less than 5V DC This GPI socket can also be used as a GPO socket to trigger record or playback events with other equipment such as the Data...

Страница 73: ...n also connect your PC to this port for controlling the HS 2850 with the SE Remote software PIN definitions of the RS 422 port of the HS 2850 are described below To connect the PC to the HS 2850 you h...

Страница 74: ...ive unit Successful firmware upgrade on HS 2850 requires The latest firmware update file for the HS 2850 This can be obtained from your local Datavideo office or dealer The HS 2850 power adapter The S...

Страница 75: ...e prompt window Do you really want to perform firmware update 10 The update process will begin and two progress bars will be shown The lower bar Total Progress will take around 15 minutes to complete...

Страница 76: ...5 Select Ethernet to display the Computer s IP Address Click the Find button to find and display the SE 2850 Switcher s IP Address in the drop down list The first three numbers in both IP addresses sh...

Страница 77: ...lding down the buttons in step 3 5 The switcher will start but the keyboard lights will remain dead except for the T Bar progress LEDs When these LEDs flash ON and OFF release the buttons from step 3...

Страница 78: ...supplied zipped archive or rar folder 2 Delete the contents of the USB 2 0 pen drive so it is empty 3 Transfer copy the unzipped extracted file to the USB 2 0 pen drive make sure the file name is rena...

Страница 79: ...d PGM channel the countdown timer will start on the PGM display as soon as the user switches to the selected PGM channel 3 Audio and video are not synced In this case the Video XPT feature might have...

Страница 80: ...80 Appendix 7 Dimensions Weight All measurements in millimeters mm Weight 18 7 Lbs 8 5 Kg...

Страница 81: ...Program without logo overlay and without subtitles One of the input signals AUX Audio Indicator on Multi view Each Video input embedded Audio 2 Ch Preview 2 Ch Program 4 Ch Tally Out D Sub 25 pin GPI...

Страница 82: ...phone 6 3mm Stereo Headphone Socket Headset Impedance 8 600 ohms 100mW min Microphone 3 Pin XLR 6 3mm Jack Microphone Socket Switchable Condenser Dynamic Input Microphone Sensitivity Level 67dB Speake...

Страница 83: ...83 Notes...

Страница 84: ...Feb 05 2021 Version E12 Datavideo Technologies Co Ltd All rights reserved 2020 www datavideo com product HS 2850...

Отзывы: