background image


7

Functions


The DVK-200 has two inputs (one camera input and one background input). Each of the inputs can be set to 
CV (Composite Video), S (S-Video (Y/C), YUV (Component) or DVI-I. All of the outputs, one Y/C (S-Video) 
and two Composite, are simultaneously live. We recommend that YUV or Y/C is used for the camera or 
source inputs wherever possible. 
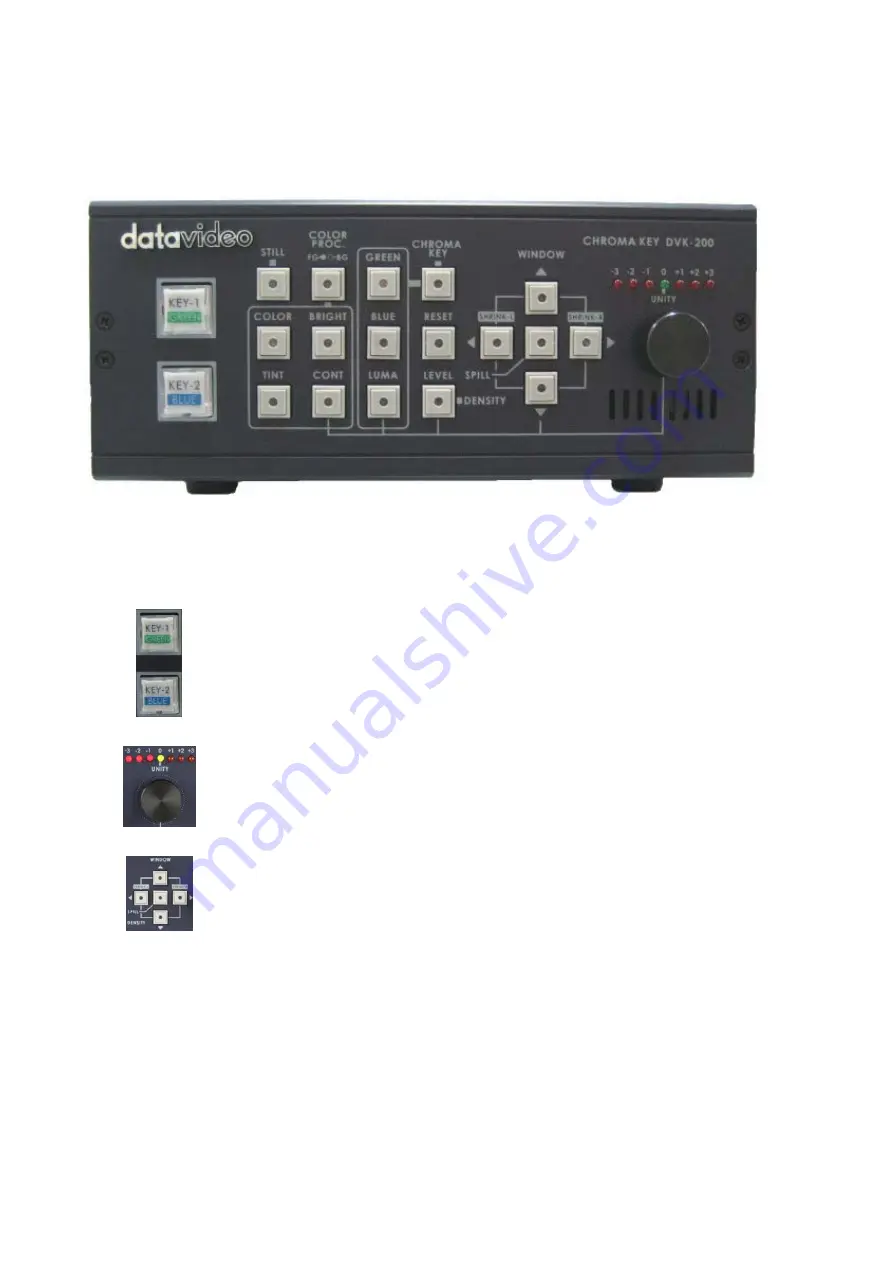


Front Panel 


Key-1 and Key-2 are used to save two setting modes, when you are setting up the 
DVK-200 front panel functions. 

The active settings key will be illuminated in red. The settings are non-volatile (they 
remain stored even when the DVK-200 is switched off). 


The Adjustment Knob is used to alter whichever function is active. The unity position, 
indicated in green, is the neutral setting. The adjustment scale is marked in nominal 
settings from -3 to +3. The adjustment can also be used to reset any value to the 
factory default; activate the function you want to reset by pressing the appropriate 
function button, and then push the adjustment knob in, you will see the LED meter 
return to unity. 


The Arrow Buttons adjust the window size (garbage matte) and the left and right 
edge. The spill button adjusts the colour balance of the keyed image; it enables you 
to correct any colour imbalance that remains on the foreground image once the 
backdrop has been keyed out.  

The window size can be set to remove any unwanted garbage from the foreground 
image. Often your backdrop does not fill the whole screen, particularly if you want 
your subject to appear small in the finished image. You can use the Up / Down / Left / 
Right arrows to make the keying window smaller so that only your backdrop is being 
keyed. 

To adjust left or right edge press and hold the Left or Right Arrow for two seconds, 
the button LED will then flash. While the button LED is flashing you can adjust the 
edge detail of the subject, you will see the value on the LED meter above the 
adjustment knob. 

Содержание DVK-200

Страница 1: ...Chroma Keyer DVK 200 Quick Start Guide www datavideo tek com...

Страница 2: ...he information offered in this instruction manual is intended as a guide only At all times Datavideo Technologies will try to give correct complete and suitable information However Datavideo Technolog...

Страница 3: ...at the total of the ampere ratings on the products plugged into the extension cord do not exceed the extension cord s rating 10 Make sure that the total amperes of all the units that are plugged into...

Страница 4: ...hin 30 days of purchase For information on how to register please visit www datavideo tek com or contact your local Datavideo office or authorized Distributors Certain parts with limited lifetime expe...

Страница 5: ...ure to give excellent keying results Cloth is quick to setup and roll away and is far more durable than paper Cloth is also less likely to fade than paper and generally gives far better performance It...

Страница 6: ...we recommend a minimum of 1m between subject and backdrop it is always easier to get even lighting if this distance is greater so please think of 1m as the absolute minimum The foreground lighting on...

Страница 7: ...he factory default activate the function you want to reset by pressing the appropriate function button and then push the adjustment knob in you will see the LED meter return to unity The Arrow Buttons...

Страница 8: ...ue and Luma are the three keying options available With the Chroma Key button switched on you can select the keying option to suit your needs The selected option will be illuminated red When the butto...

Страница 9: ...e Composite Video Loop Through if required The S Video Loop Through is only active if the S Video input is used The Main Video Output shows the final result of the keyer There are two composite output...

Страница 10: ...VGA The DVK 200 can be fully controlled via RS 232 please refer to the RS 232 protocols section at the rear of this manual for further details The DVK 200 can be switched via GPI trigger Using the GP...

Страница 11: ...und footage is being fed from a DVD Player and again it is connected using S Video You could alternatively use a VCR or even another camera The Output is being recorded to a DVD Recorder via an S Vide...

Страница 12: ...Power Supply has a 2 1mm in line plug with a screw threaded locking collar Push the plug into the DC In Socket of the DVK 200 and screw the locking collar into place Connect the power cord to the pow...

Страница 13: ...T to RCA Phono Adaptor as illustrated below SCART ADAPTOR with In Out Switch A SCART Adaptor simply plugs into the SCART Socket and breaks it out to RCA Phono Sockets Some adaptors have an Input Outpu...

Страница 14: ...onnect to As there are a number of different possibilities we will describe the item you intend to connect as your recording device Most DVD Recorders VTRs and DV Converters have inputs like these alt...

Страница 15: ...panel should light up for a couple of seconds and then the DVK 200 is ready Chroma Keying Switch on your cameras lighting background video player and monitors Before starting please ensure that the Wh...

Страница 16: ...nk Once Density has been adjusted we should be getting a pretty good Chroma Key Effect It is often worth going back to the Green Keying Level Adjustment to fine tune after the density has been adjuste...

Страница 17: ...t the procedure is the same for either side Press and hold the Shrink Left button in for two seconds the button should flash red if the red LED is on constantly i e not flashing press and hold the but...

Страница 18: ...ick up an unwanted colour cast the Spill Adjustment will remove it Press the Spill button it will illuminate red Turn the Adjustment Knob on the output monitor you will see the colour hue of the subje...

Страница 19: ...justment is being made you will notice the background image is in black white this is to help you see the edge of the window Now we will adjust the Left Press the Left Arrow button so that it is illum...

Страница 20: ...button will then be illuminated yellow instead of the usual red and the front panel will be locked To unlock press and hold the GREEN Key 1 or BLUE Key 2 button again for two seconds until the button...

Страница 21: ...that you are working with Although later in this manual we suggest setting up these buttons for keying out a white or black area For this set up you will need a computer fitted with a graphics card t...

Страница 22: ...lashing it is in Mode 2 which is for removing light colours As Key 1 button will be working with a white background that we want to remove we need Luma Mode 2 so press and hold the Luma button until i...

Страница 23: ...Key button and the Luma button both should be illuminated red Luma Key has two modes and you will see if you press and hold the Luma button for two seconds it flashes If the button is constantly red i...

Страница 24: ...ed none of the DVK 200 front panel controls will respond protecting the stored Luma Key settings To lock the DVK 200 front panel press and hold the GREEN Key 1 or BLUE Key 2 button for two seconds The...

Страница 25: ...BLUE whichever is active will become a freeze frame if the LED is not lit the Background Video channel will become a freeze frame To grab the freeze frame image press the Still button The Still butto...

Страница 26: ...None NTSC PAL b2 3 CV S IRE 30 0IRE 31 7 5IRE ColorBar 30 off 31 on DVKCMD_Get SetOutput 64 65 FG BG Comp 30 31 32 DVKCMD_Get SetCameraUnit 66 67 CAM1 CAM2 30 31 DVKCMD_Get SetColorProc 68 69 Cur CAM1...

Страница 27: ...Out 4 pin 75 ohm DIN Connector 2 Component Composite Out 75 ohm RCA Connector level 1 0Vp p Output modes FG or FG with BG Choose Chroma key ON or OFF Loop through out Composite Out from Y C or Composi...

Страница 28: ...Tel 31 30 261 96 56 Fax 31 30 261 96 57 E Mail service datavideo nl Datavideo UK Limited Tel 44 1457 851 000 Fax 44 1457 850 964 E Mail sales datavideo co uk Datavideo Technologies Co Ltd Tel 886 2 8...

Отзывы:

Похожие инструкции для DVK-200