background image

PREPARING FOR THE INSTALLATION

25

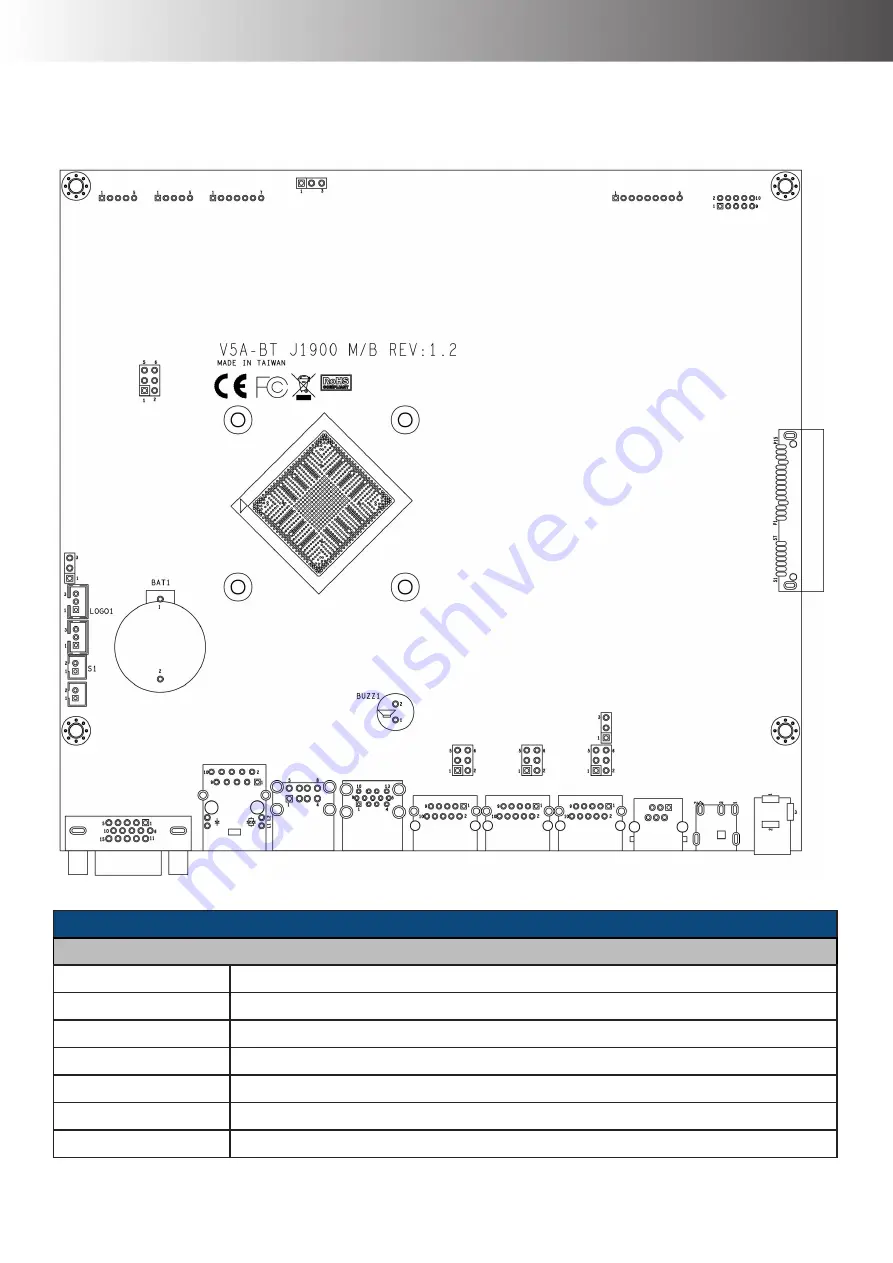
Jumpers Content List

S-615L

SoC

Battery

JP3

JP5

JP6

JP4
JP7

JP1

JP2


PIN Header / Jumper List

Item

Connector Definition

JP1

SPI BIOS Flash

JP2

LCD Panel Voltage Select

JP3

Clear CMOS

JP4

Cash Drawer Voltage Select

JP5

COM 1 Port Voltage Select

JP6

COM 2 Port Voltage Select

JP7

COM 3 Port Voltage Select

Содержание S-615L

Страница 1: ...Saturn Series S 615L S 715L Version 1 0 User Manual ...

Страница 2: ... to be shipped in the future Follow the product and warning label instructions Any changes or modifications that do not follow the instructions in this manual will void this product s warranty Power Supply Safety Notes To avoid electric shocks disconnect the power cord from the electrical outlet before relocating the system Make sure the voltage of the power outlet conforms within voltage range of...

Страница 3: ... a non special connector for the a c d c input has to have a marking stating the following Use only power supplies listed in the user instructions or For applicable power supplies see user instructions This statement shall also be in the user instructions If product with laser module the class of laser should be mentioned The warning as attachment Federal Communications FCC Statement This device c...

Страница 4: ...er or an experienced radio TV technician for help Warning CB LVD Statement A Class III equipment with an enclosure made of HB material and using a non special connector for the a c d c input has to have a marking stating the following Use only power supplies listed in the user instructions or For applicable power supplies see user instructions This statement shall also be in the user instructions ...

Страница 5: ...g of such hazardous waste Isolated collection and proper recovery of your electronic and electrical waste equipment at the time of disposal will allow us to help conserving natural resources Moreover proper recycling of the electronic and electrical waste equipment will ensure safety of human health and environment For more information about electronic and electrical waste equipment disposal recov...

Страница 6: ...ector Definition 21 Top Side 21 TOP and Bottom Side Layout Content List 21 Bottom Side 23 System Default Settings 29 Chapter 3 System Memory 30 Chapter 4 BIOS Setup 31 4 1 S 615L 31 4 2 S 715L 36 Chapter 5 Hardware Installation 41 Replacing the Rear Covers 41 Installing Replacing the HDD 42 Installing the Customer Display Optional 42 Installing the Secondary LCD Display Optional 44 Installing the ...

Страница 7: ... 7 Chapter 6 Frequently Asked Questions FAQ 48 How do I clear CMOS 48 ...

Страница 8: ...ge Contents Before setting up your Touch Terminal check that the package contains the following items If any of the items is missing or damaged contact your vendor immediately Quick Installation Guide Touch Terminal Power Cord Adapter Accessory Kit Optional Accessories Customer Display VFD LCM Secondary LCD Display 8 10 15 Magnetic Stripe Reader MSR MSR iButton Reader RFID Radio Frequency Identifi...

Страница 9: ... Overview of Saturn Series The figures in this section illustrate the components including input and output ports located at the front and rear of your Touch Terminal Front View Standard Type Rear View Standard Type ...

Страница 10: ...ial Ports COM1 RJ50 COM 1 Serial Ports USB2 USB 3 0 USB 2 0 USB1 Dual USB 2 0 LAN RJ45 Gigabit LAN VGA DB 15 VGA Connector S 715L DK JS1 JS2 USB1 LAN1 CN1 COM1 VNA1 COM2 COM3 Item Connector Definition DK RJ12 Cash Drawer JS1 DC 24V Input JS2 DC 12V Output VGA1 DB 15 VGA Connector USB1 Dual USB 2 0 LAN1 RJ45 Gigabit LAN CN1 Dual USB 3 0 COM1 RJ50 COM 1 Serial Port COM2 RJ50 COM 2 Serial Port COM3 R...

Страница 11: ...easons please be advised to hold the power button more than 4 seconds to force a shutdown of the system Status LED Indicator LED status indicator which is located at the bottom edge of the LCD panel is mainly responsible for notifying users of the current system status by emitting various LED signals In the chart provided below it describes all the possible LED status as a quick reference LED Stat...

Страница 12: ...12 INTRODUCTION Physical Dimensions Standard Display S 615L ...

Страница 13: ...INTRODUCTION 13 S 715L ...

Страница 14: ...14 INTRODUCTION LCM Liquid Crystal Module VFD Customer Display ...

Страница 15: ...INTRODUCTION 15 10 Secondary LCD Display ...

Страница 16: ...16 INTRODUCTION 15 Secondary LCD Display ...

Страница 17: ... x DDR3L SO DIMM up to 8GB 1 x DDR3L SO DIMM up to 16GB Storage 1 x 2 5 SATA HDD or 1 x 2 5 SSD 1 x 2 5 SATA HDD or 1 x 2 5 SSD I O Ports USB2 0 3 2 USB3 0 1 2 RJ50 COM 3 x RJ50 5V 12V selectable 3 x RJ50 5V 12V selectable Gigabit Ethernet 1 x Gigabit Ethernet 1 x Gigabit Ethernet VGA 1 x DB15 1 x DB15 HDMI N A N A Cash Drawer 1 x RJ12 1 x RJ12 Speaker N A 2 x 1W Speaker DC12V out DC 12V DC 12V DC...

Страница 18: ...5 615 715 L W P N ZKIPK 00123 Net Weight 4 61Kg 4 89 Kg Gross Weight 6 61Kg 6 89 Kg Safety Environment Product Certification CE FCC certificated Operation Temperature 0 C to 40 C Storage Temperature 25 C to 70 C O S Compatibility Windows 7 POSReady 7 Windows 10 Linux Kernel 3 0 Windows 10 Linux Kernel 4 0 ...

Страница 19: ...trix cursor Character type 95 Alphanumeric 32 International characters Dot size 0 55 W X 0 75 H mm Input power type 5V DC Interface RS232 Can be assembled on the same package with the system shipping 2 in 1 Identification Reader Interface RS232 Magnetic Stripe Reader MSR MSR iButton Reader MSR ISO Track 1 2 3 single dual triple tracks of magnetic card support ANSI ISO Standards7810 7811 1 5 7812 7...

Страница 20: ...el in disassembling the terminal The manufacturer will not be held responsible in the event of damage caused by an unauthorized person Before installation or disassembling of the terminal ensure that the power is turned off Otherwise electric shock may occur and may void the warranty For systems preloaded with POSReady Windows Embedded on the storage O S pre installed as an option the manufacturer...

Страница 21: ...onnector Definition Top Side S 615L SoC SATA1 Battery LED1 S2 VGA1 LAN1 USB1 USB2 COM1 COM2 COM3 Cash Drawer1 DC2 DC1 TOP and Bottom Side Layout Content List Top Side Connector Information Item Connector Definition LED1 Power LED S2 Power Trigger SATA1 7 15 SATA Port ...

Страница 22: ...22 PREPARING FOR THE INSTALLATION S 715L TOP and Bottom Side Layout Content List Top Side Connector Information Item Connector Definition S2 Power Trigger SATA1 7 15 SATA Port ...

Страница 23: ... COM4 LVDS1 CONVERTER1 SO DIMM1 JUSB1 JUSB2 Bottom Side Layout Content List Bottom Side Connector Information Item Connector Definition JUSB1 JUSB2 USB 2 0 JUSB3 USB 2 0 LVDS1 LVDS Single Dual Channel CONVERTER1 LCD Backlight Converter COM4 COM 4 Serial Ports ...

Страница 24: ...nt List Bottom Side Connector Information Item Connector Definition JUSB1 USB 2 0 JUSB2 JUSB3 JUSB4 JUSB5 JUSB6 USB 2 0 LVDS1 LVDS Single Dual Channel CONVERTER1 LCD Backlight Converter LED1 System Power LED FAN1 CPU FAN FAN2 System FAN SPK_R1 Speaker SPK_L1 Speaker ...

Страница 25: ...Battery JP3 JP5 JP6 JP4 JP7 JP1 JP2 PIN Header Jumper List Item Connector Definition JP1 SPI BIOS Flash JP2 LCD Panel Voltage Select JP3 Clear CMOS JP4 Cash Drawer Voltage Select JP5 COM 1 Port Voltage Select JP6 COM 2 Port Voltage Select JP7 COM 3 Port Voltage Select ...

Страница 26: ...OS 1 2 3 Pin Definition Definition 1 2 Normal 1 2 2 3 Clear CMOS JP4 Cash Drawer Voltage Select 1 2 3 Pin Definition Definition 1 2 24V 1 2 2 3 12V JP5 COM 1 Port Voltage Select 2 4 6 1 3 5 Pin Definition Definition 1 2 0V RI 1 2 3 4 5V 5 6 12V JP6 COM 2 Port Voltage Select 2 4 6 1 3 5 Pin Definition Definition 1 2 0V RI 1 2 3 4 5V 5 6 12V JP7 COM 3 Port Voltage Select 2 4 6 1 3 5 Pin Definition D...

Страница 27: ...715L PIN Header Jumper List Item Connector Definition J2 SPI BIOS Flash JRTC1 Clear CMOS JP2 LCD Panel Voltage Select JP3 Cash Drawer Voltage Select JP4 COM 1 Port Voltage Select JP5 COM 2 Port Voltage Select JP6 COM 3 Port Voltage Select ...

Страница 28: ...nel Voltage Select 1 2 3 Pin Definition Definition 1 2 3 3V 1 2 2 3 5V JP3 Cash Drawer Voltage Select 1 2 3 Pin Definition Definition 1 2 24V 1 2 2 3 12V JP4 COM 1 Port Voltage Select 2 4 6 1 3 5 Pin Definition Definition 1 2 0V RI 1 2 3 4 5V 5 6 12V JP5 COM 2 Port Voltage Select 2 4 6 1 3 5 Pin Definition Definition 1 2 0V RI 1 2 3 4 5V 5 6 12V JP6 COM 3 Port Voltage Select 2 4 6 1 3 5 Pin Defini...

Страница 29: ...elect by jumper Cash Drawer 24V 12V Select by jumper DC Output 12V USB 2 0 5VSB USB 3 0 5VSB COM Port Setting Definition S 615L Item COM1 COM2 COM3 COM4 COM5 I O Address 3F8 2F8 3E8 2E8 2F0 IRQ Setting IRQ4 IRQ3 IRQ5 IRQ10 IRQ11 S 715L Item COM1 COM2 COM3 COM4 COM5 I O Address 3F8 2F8 3E8 2E8 2F0 IRQ Setting IRQ4 IRQ3 IRQ5 IRQ10 IRQ7 Cash Drawer Setting Definition S 615L COM Port I O Address Baud ...

Страница 30: ...modules on this board 4GB maximum for each slot MX1900J does not support DDR DDR2 DDR3 SODIMM modules DO NOT install DDR DDR2 DDR3 SODIMM modules on this board Installing the DDR3L SODIMM 1 Locate the SODIMM socket onboard 2 Hold two edges of the SODIMM module carefully and keep away of touching its connectors 3 Align the notch key on the SODIMM module with the rib on the slot 4 Firmly press the S...

Страница 31: ...s use the arrow keys To select a submenu use the Enter key To exit from a submenu use the Esc key To change field values use the F5 and F6 keys To view help information on the possible selections for the highlighted item select the F1 key To load optimal default select the Exit Menu and do any of the following 1 Select Load Optimal Default and then press Enter 2 Or press F9 and then press Enter To...

Страница 32: ...32 BIOS SETUP Main Tab Under Main select System Time or System Date to change the system date and time Advanced Tab for setting the LCD Brightness 1 Select Advanced and then select Video Configuration ...

Страница 33: ...BIOS SETUP 33 2 Select Brightness Control Level Default setting is Level 3 Security Tab for setting Supervisor Password 1 Select Security and then Set Supervisor Password ...

Страница 34: ...34 BIOS SETUP 2 Enter New Password and then Enter New Password Again and then select YES Power Tab ...

Страница 35: ...ot Type 1 Select Boot and then Set Boot Type 2 Select Legacy Boot Type or UEFI Boot Type Default setting is Legacy Boot Type Save Exit Tab 1 Select Load Optimal Default and then press Enter 2 Select Exit Saving Changes and then press Enter ...

Страница 36: ... key To exit from a submenu use the Esc key To change field values use the F5 and F6 keys To view help information on the possible selections for the highlighted item select the F1 key To load optimal default select the Exit Menu and do any of the following 1 Select Load Optimal Default and then press Enter 2 Or press F9 and then press Enter To save the changes select the Exit Menu and do any of t...

Страница 37: ...BIOS SETUP 37 Advanced Tab for setting the LCD Brightness 1 Select Advanced and then select Video Configuration 2 Select Brightness Control Level Default setting is Level 3 ...

Страница 38: ...38 BIOS SETUP Security Tab for setting Supervisor Password 1 Select Security and then Set Supervisor Password 2 Enter New Password and then Enter New Password Again and then select YES ...

Страница 39: ...BIOS SETUP 39 Power Tab Boot Tab for setting Boot Type 1 Select Boot and then Set Boot Type 2 Select Legacy Boot Type or UEFI Boot Type Default setting is Legacy Boot Type ...

Страница 40: ...40 BIOS SETUP Save Exit Tab 1 Select Load Optimal Default and then press Enter 2 Select Exit Saving Changes and then press Enter ...

Страница 41: ...e Touch Terminal on a soft and flat surface with the LCD panel facing down 2 Slide the top rear cover off the Touch Terminal 3 Replace the top rear cover on the Touch Terminal 4 Repeat steps 1 and 2 to replace the connectors cover Connectors cover Top rear cover For S 615 Model For S 715 Model ...

Страница 42: ...and secure with the screw a b a c Installing the Customer Display Optional WARNING Be sure to turn off the power of the Touch Terminal before making any connection or disconnection 1 Place the Touch Terminal on a soft and flat surface with the LCD panel facing down 2 Remove the connectors cover a 3 Rotate the panel stand to access the screws securing the panel stand to the Touch Terminal b 4 Remov...

Страница 43: ...11 Align and install the customer display into its slot on the panel stand h 12 Secure the customer display to the Touch Terminal using the two screws i 13 Replace the customer display compartment cover f 14 Connect the customer display s interface cable to the corresponding port on the Touch Terminal j 15 Replace the connectors cover a f g h i c d b a e j ...

Страница 44: ...6 Detach the VESA compartment cover e 7 Detach the secondary LCD display compartment cover f 8 Route the secondary LCD display cable through the cable compartment on the panel stand g 9 Align and install the panel stand to the Touch Terminal d 10 Secure the panel stand to the Touch Terminal with the four screws c 11 Align and install the secondary LCD display into its slot on the panel stand h 12 ...

Страница 45: ...fication reader connector through the opening on the support bracket c 4 Align and install the support bracket to the Touch Terminal d 5 Secure the support bracket to the Touch Terminal with the screw e 6 Detach the identification reader compartment cover f 7 Connect the identification reader connector with the optional identification reader connector g 8 Align by the screw holes and then install ...

Страница 46: ...46 HARDWARE INSTALLATION Identification Reader Item Name Magnetic Stripe Reader MSR MSR iButton Reader RFID Radio Frequency Identification Reader RFID Fingerprint Reader iButton Reader ...

Страница 47: ...nal a 3 Remove the four screws securing the panel stand to the Touch Terminal b 4 Remove the panel stand c 5 Align and install the mount bracket on the back of the Touch Terminal d 6 Secure the mount bracket to the Touch Terminal with the four screws e 7 Drill four small holes on the mounting location and insert the plastic washers into the holes f 8 Align by the screw holes and then install the w...

Страница 48: ...o the following 1 Turn off power and pull out the power cord 2 Insert the JP3 jumper cap to clear CMOS PIN and remove the jumper cap from clear CMOS PIN 3 Switch on the power again 4 Press F2 to enter CMOS setting and load optimized defaults JP3 Clear CMOS 1 2 3 Pin Definition Definition 1 2 Normal 1 2 2 3 Clear CMOS ...

Страница 49: ... and pull out the power cord 2 Insert the JRTC1 jumper cap to clear CMOS PIN and remove the jumper cap from clear CMOS PIN 3 Switch on the power again 4 Press F2 to enter CMOS setting and load optimized defaults JRTC1 Clear CMOS 1 2 3 Pin Definition Definition 1 2 Normal 1 2 2 3 Clear CMOS ...

Отзывы: