background image


2

Table


of


Contents


GENERAL


INFORMATION ............................................................................................................... 3


COPYRIGHT.................................................................................................................................................... 3


NOTICES


AND


CLASSIFICATIONS......................................................................................................... 3


CONTACT


US.................................................................................................................................................. 3


PRECAUTIONS


FOR


THE


ENCLOSURE ........................................................................................ 4


GENERAL


PRECAUTIONS......................................................................................................................... 4


ENCRYPTED


HDD


ENCLOSURE


PRECAUTIONS.............................................................................. 4


INTRODUCTION................................................................................................................................. 5


F

EATURES

.......................................................................................................................................................... 5


SYSTEM


REQUIREMENT ................................................................................................................. 6


PC ........................................................................................................................................................................... 6


MAC....................................................................................................................................................................... 6


P

ACKAGE 

C

ONTENTS

....................................................................................................................................... 6


SYSTEM


UNIT


VIEW.......................................................................................................................... 7


F

RONT 

V

IEW

..................................................................................................................................................... 7


ASSEMBLING


THE


HDD


ENCLOSURE .......................................................................................... 8


CONNECTING


THE


ENCLOSURE


TO


A


COMPUTER ...............................................................11


SAFE


REMOVAL


OF


THE


UNIT.....................................................................................................13


LED


STATUS......................................................................................................................................13


Q&AS ...................................................................................................................................................13


HDD


S

TATUS

................................................................................................................................................. 13


S

ECURE 

K

EY 

F

EATURE

................................................................................................................................. 13


F

ILE 

S

YSTEM 

F

ORMAT

.................................................................................................................................. 14


D

ISCREPANCY IN 

R

EPORTED 

&


A

CTUAL 

S

IZE 

C

APACITY

........................................................................ 14


APPENDIX:


SPECIFICATIONS ......................................................................................................15


Содержание Guardian

Страница 1: ...1 User s Manual Copyright 2010 ONNTO Corporation All rights reserved www onnto com tw USB 2 0 AES 256 bit 2 5 inch Encrypted HDD Enclosure dataTale ...

Страница 2: ...RECAUTIONS 4 INTRODUCTION 5 FEATURES 5 SYSTEM REQUIREMENT 6 PC 6 MAC 6 PACKAGE CONTENTS 6 SYSTEM UNIT VIEW 7 FRONT VIEW 7 ASSEMBLING THE HDD ENCLOSURE 8 CONNECTING THE ENCLOSURE TO A COMPUTER 11 SAFE REMOVAL OF THE UNIT 13 LED STATUS 13 Q AS 13 HDD STATUS 13 SECURE KEY FEATURE 13 FILE SYSTEM FORMAT 14 DISCREPANCY IN REPORTED ACTUAL SIZE CAPACITY 14 APPENDIX SPECIFICATIONS 15 ...

Страница 3: ... device must accept any interference received including interference that may cause undesired operation This equipment has been tested and found to comply with the limits for a Class B digital device pursuant to Part 15 of the FCC rules These limits are designed to provide reasonable protection against harmful interference when the equipment is operated in a commercial environment This equipment g...

Страница 4: ...able provided with the Enclosure Use only a 9 5mm high 2 5 HDD inside the Enclosure The Enclosure may not function properly if a HDD with a different thickness is used In addition the Enclosure and HDD may be damaged ENCRYPTED HDD ENCLOSURE PRECAUTIONS Required to partition and format the hard drive after installing it inside the Enclosure Always perform partition and format of a new disk drive wi...

Страница 5: ...ow the instructions provided in this manual Failure to do so may result in damage to the Enclosure Kit and any or all of the connected devices Features Supports current SATA II compliant HDDs fully backward compatible with SATA 1 0 and SATA 1 0a compliant HDDs Provides real time cryptographic strength with encryption length up to 256 bit Supports Hi Speed USB USB2 0 connection Connects to host by ...

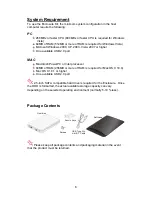
Страница 6: ... Macintosh PowerPC or Intel processor 64MB of RAM 256MB or more of RAM is required for Mac OS X 10 4 Mac OS X 10 1 or higher One available USB 2 0 port 2 5 inch SATA compatible hard drive is required for the Enclosure Once the HDD is formatted the actual available storage capacity can vary depending on the selected operating environment normally 5 10 less Package Contents USB Type A to mini B Y Ca...

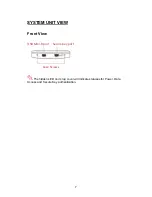
Страница 7: ...7 SYSTEM UNIT VIEW Front View USB Mini B port Secure Key port Case Screws The hidden LED on its top cover will indicate statuses for Power Data Access and Secure Key authentication ...

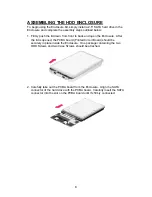
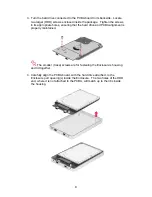
Страница 8: ...n the Enclosure After the lid is opened the PCBA board Printed Circuit Board should be securely in place inside the Enclosure One package containing the two HDD Screws and two Case Screws should be attached 2 Carefully take out the PCBA board from the Enclosure Align the SATA connector of the hard drive with the PCBA board Carefully insert the SATA connector into the slot on the PCBA board until i...

Страница 9: ...ring that the hard drive and PCBA alignment is properly maintained The smaller Case screws are for fastening the Enclosure s housing and lid together 4 Carefully align the PCBA board with the hard drive attached to the Enclosure port opening s inside the Enclosure The two holes of the HDD end where it is not attached to the PCBA will match up to the ribs inside the housing ...

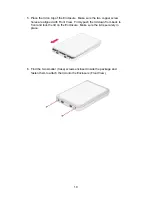
Страница 10: ...oles are aligned with Front View Firmly push the lid down from back to front and lock the lid on the Enclosure Make sure the lid is securely in place 6 Find the two smaller Case screws enclosed inside the package and fasten them to attach the lid onto the Enclosure Front View ...

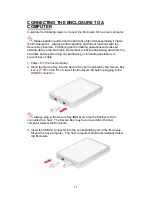
Страница 11: ...m the hard disk before performing any partitioning or formatting operations to prevent loss of data 1 Power on the host computer 2 Insert the Secure Key into the Secure Key port indicated by the Secure Key icon on the Front view of the Enclosure Kit before plugging in the USB2 0 connector Always plug in the Secure Key first every time the Enclosure Kit is connected to a host The Secure Key may be ...

Страница 12: ...rovides 2 USB type A connectors and 1 USB mini B connector The 2 USB type A connectors are inserted into two available USB ports on the computer The USB Y cable serves as both power supply and data transfer cable When the host computer doesn t supply enough power to start up the HDD under only one USB connector plug in the second type A connector into the host computer 4 When successfully connecte...

Страница 13: ...ed the hidden LED will become red Q Can I use my old HDD for this new Enclosure Kit A Yes as long as it is a SATA interface HDD Because installation involves reformatting partitioning of the HDD all previous data stored on your HDD will be lost First make sure that you ve kept a good copy of the data from your HDD prior to installation Then copy this data onto the Enclosure Kit once installation h...

Страница 14: ...orted Actual Size Capacity Q If I have a 320GB HDD why does the Enclosure only recognizes the HDD available space as to be less than 320GB A Many customers are confused by their host systems when it reports a discrepancy between reported capacity and actual capacity Several factors can come into play when your host system views and reports the capacity of a hard drive There are actually two differ...

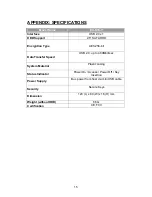
Страница 15: ...on Type AES 256 bit Data Transfer Speed USB 2 0 up to 480Mbit sec System Material Plastic casing Status Indicator Power On Access Power Off Key Insertion Power Supply Bus power from host via mini USB cable Security Secure Keys Dimension 123 L x 80 W x 16 H mm Weight without HDD 86 G Certification CE FCC ...

Отзывы: