


14
Chapter 3 – Printer Operation
3
3
3
.
.
.
3
3
3
M
M
M
u
u
u
l
l
l
t
t
t
i
i
i
-
-
-
F
F
F
u
u
u
n
n
n
c
c
c
t
t
t
i
i
i
o
o
o
n
n
n
B
B
B
u
u
u
t
t
t
t
t
t
o
o
o
n
n
n
s
s
s
Three buttons (
F1
,
F2
, and
F3
)
perform different functions depending upon the mode of the printer:
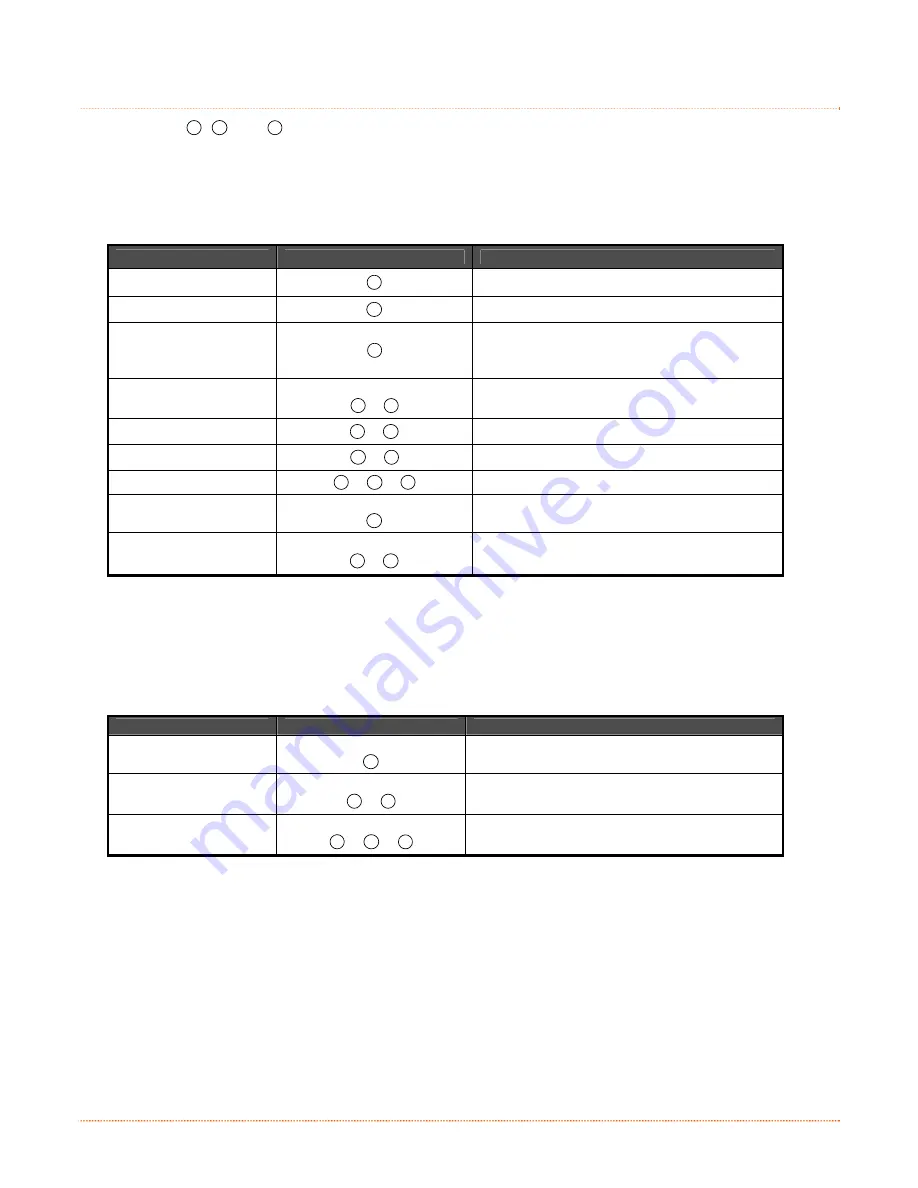
Ready Mode Functions
Control, calibration, and test functions can be performed when the printer is idle. Initiate the desired function
by pressing the respective button (or button combination) as detailed below.
Function
Button(s)
Description
Pause
F1
Pauses and un-pauses the printer
Feed Media / Clear Fault
F2
Feeds one label or clears fault condition
Cancel
F3
Cancels the current batch of labels. Press the
PAUSE Button to print the next batch of labels in
the print buffer.
Soft Reset
Press and Hold
F1
+
F3
Resets the printer
Print Test Label
F1
+
F2
Prints the Test Label
Print Configuration Label
F2
+
F3
Produces Database Configuration and Test Label
Print Ethernet Label
F1
+
F2
+
F3
Prints the printers Ethernet configuration
Quick Calibration
Press and Hold
F2
Performs Quick Calibration; see Section 3.7.1.
Empty Calibration
Press and Hold
F1
+
F2
Performs Empty Calibration; see Section 3.7.2.
Delayed Power-Up Functions
Some system functions can be initiated during power-up, as detailed below. Initiate the desired function by
turning ON the printer and, while all 3 lights are ON, pressing and holding the respective button combination
until all lights turn OFF.
Function
Button(s)
Description
Hex Dump
Press and Hold
F2
Enters Hex Dump Mode; see Section 3.8.3.
Level 1 Reset
Press and Hold
F1
+
F3
Resets the printer to a saved configuration file.
Level 2 Reset
Press and Hold
F1
+
F2
+
F3
Resets the printer to the factory default settings.
Содержание Mark II
Страница 1: ...Operator s Manual ...
Страница 2: ......
Страница 8: ......
Страница 10: ...2 Chapter 1 Getting Started ...
Страница 20: ...12 Chapter 2 Printer Setup ...
Страница 40: ...32 Chapter 4 Maintenance Adjustments ...
Страница 46: ...38 Appendix A Specifications ...


