background image

4-14

POWERSCAN D8590 User’s Manual

Other Communications Settings in ESP

Other Communications Settings in ESP

Some 

ESP

 Communications options are unique to the software, and do not have corresponding 

programming symbols. These options are explained below. 

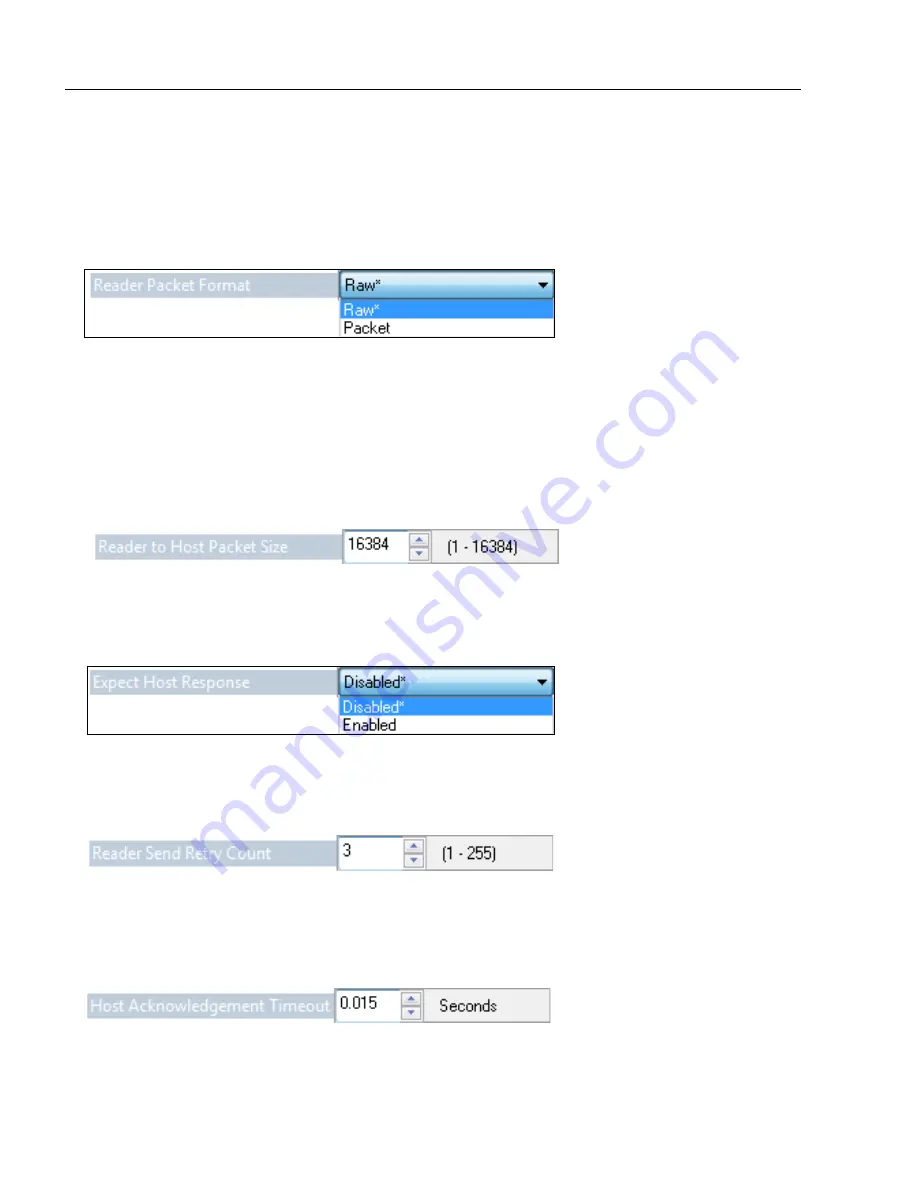
Reader Packet Format

Data that is sent from the imager to the host in 

Raw

 format is sent without packet framing 

or check characters. 

One-Way

 communication is in a raw format, no response is expected 

from the host, and data is not resent.

Packetized

 data is sent with framing (a preamble communicating the amount of data to be 

transmitted, and a postamble containing error detection) and check characters, and a 

response is expected from the host. 

Two-Way

 communication is in packet format.

Reader to Host Packet Size

The 

Reader to Host Packet Size

 is the amount of data (in bytes) that is sent to the host in 

packet format. This feature allows you to set the maximum allowable packet size.

Expect Host Response

When 

Expect Host Response

 is enabled, the imager will re-transmit data if it doesn’t 

receive acknowledgement from the host.

Reader Send Retry Count

Reader Send Retry Count

 sets the number of times the imager will re-transmit data 

before abandoning further send attempts. The minimum retry count is 

1

, which represents 

the initial transmission.

Host Acknowledgement Timeout

The 

Host Acknowledgement Timeout

 is the amount of time (in seconds) that the imager 

will wait for an acknowledgement from the host before re-sending data.

Содержание PowerScan PD8590-DPM

Страница 1: ...PowerScan PD8590 DPM Imager Industrial Corded Handheld Bar Code Reader User s Manual...

Страница 2: ...of the documentation Should future revisions of this manual be published you can acquire printed versions by contacting your Datalogic representative Electronic versions may either be downloadable fro...

Страница 3: ...g Guidelines 3 3 Decode Zones and Lighting Zones 3 4 Illumination System 3 7 Illumination Sequence 3 9 Chapter 4 Communications Communications by ESP 4 2 Communications Overview 4 3 USB Interface 4 4...

Страница 4: ...lidation 7 6 Chapter 8 Advanced Operations Dot Peen Enhanced Illumination Settings 8 2 Illumination Settings by ESP 8 3 Lock Settings 8 6 Chapter 9 Terminal Terminal View 9 2 Find 9 3 Send 9 4 Macros...

Страница 5: ...ged design Sustains 50 drops from six feet to concrete About This Manual This manual provides complete information on setting up installing and configuring the POWERSCAN D8590 The chapters are present...

Страница 6: ...pproved by the party responsible for compliance could void the user s authority to operate the equipment The POWERSCAN D8590 has been tested for compliance to CE Conformit Europ enne standards and gui...

Страница 7: ...pecific application can be obtained in the subsequent sections Your interface type will determine how data is received by your host When sending data by USB you must open a text editor in your host co...

Страница 8: ...List for USB POWERSCAN D8590 One POWERSCAN D8590 imager One 12 ft USB cable pre attached to imager Parts List for RS 232 POWERSCAN D8590 One POWERSCAN D8590 imager Cable clip attachment Spacer Two th...

Страница 9: ...cable to the host 2 Open any program in your host computer that can receive keyboard text such as Notepad 3 Read the Reset to USB Factory Defaults symbol below Reset to USB Factory Defaults 4 Read the...

Страница 10: ...ly 5 Plug in the power supply and power on the host 6 Start up a terminal program such as ESP s Terminal view or HyperTerminal and set to 57 6K baud 8 data bits none parity and 2 stop bits 7 Read the...

Страница 11: ...m ESP System Requirements 166 MHz Pentium processor Pentium II processor recommended Windows Vista XP or 2000 operating system Internet Explorer 5 0 or higher 64 MB minimum RAM 128 MB RAM recommended...

Страница 12: ...k Switch Model at the top of the screen 1 Click the POWERSCAN D8590 button and then click OK If you do not want to make this selection every time you start ESP uncheck Show this dialog at startup 2 Se...

Страница 13: ...u are in the correct communications mode Keep the printed symbol in a convenient place for future use Click Next when you are finished The USB Select Device dialog will then reappear Reader ID number...

Страница 14: ...enient place for future use Click Next to return to the RS 232 dialog Configure RS 232 settings and COM port and click Connect When you are connected successfully the CONNECTED message will appear in...

Страница 15: ...in the following ways Tree Controls Each configuration menu contains a list of all option settings that pertain to that specific element of imager operation For example the Communications menu shows...

Страница 16: ...ur cursor over the symbol you will see the illumination gain and resolution settings that were used in capturing the image Symbol data is displayed in the area under the Save Image button The purpose...

Страница 17: ...Mode view Refer to the Basic Operations section for more information about the imager s illumination capabilities Note If you have difficulty viewing TIFF images it is recommended that you use Paint o...

Страница 18: ...Click on this icon to return to this view from Utilities or Terminal Click these tabs to access configuration tree controls Click here to open Terminal Click here to return to EZ Mode Click here for...

Страница 19: ...election box scroll down to the setting you want to change and click once on the setting 4 Left click again on the open screen to complete the selection 5 Right click on the open screen and select Sav...

Страница 20: ...able whenever the same file is selected under Open When you save menu changes to your hard drive these changes are not saved to your imager The diagram below shows how settings can be saved and receiv...

Страница 21: ...urrent connection with your present model will be terminated New Model To connect to another model select New Model choose the model you want and click OK All models you have selected and enabled will...

Страница 22: ...splays it in the Connecting dialog whenever you attempt to connect Show Connect Prompt At startup displays the Would you like to connect prompt Receive After Connect At startup loads the imager s sett...

Страница 23: ...entered data Change Keyboard Macros Clicking the Change Keyboard Macros button brings up the Function Keys dialog In this dialog you can select the desired function key and then enter your macro keys...

Страница 24: ...2 10 POWERSCAN D8590 User s Manual Menu Toolbar Bar Code Options Tab Sizing Information Sets Bar Width in mils of symbols that can be created in ESP...

Страница 25: ...ngs from the Reader will automatically send the imager s settings to ESP when Auto Sync is enabled Send ESP Settings to the Reader will automatically send all imager configuration settings chosen in E...

Страница 26: ...nabled prompts the user to save a esp file when ending a session The esp file will be saved in the location specified by the user Connect to Readers via TCP IP When enabled shows the TCP IP Connection...

Страница 27: ...ou type in the Model Memo field will appear in a context sensitive text box whenever your cursor hovers over the Model Memo item on the Options menu Memos created in Model Memo are specific to the mod...

Страница 28: ...to the imager via the Connection Wizard you will first need to select the correct protocol see Select Protocol and Connect to Imager When you have successfully connected to the imager you will see one...

Страница 29: ...s Each option allows you to configure the imager or to perform various other functions in the chosen view The View menu also allows you to access the Bar Code Dialog Bar Code Dialog In the Bar Code Di...

Страница 30: ...to change choosing Receive Reader Settings will allow you to load those settings to ESP and save them as an ESP file Receiving the imager s settings also assures that you will not subsequently save a...

Страница 31: ...ting settings in ESP The imager is not affected unless you download new settings Advanced Options Send Current View This is the same as Save to Reader Send No Save except that only the commands in the...

Страница 32: ...2 18 POWERSCAN D8590 User s Manual Send Receive NOTES...

Страница 33: ...s Contents This section explains how to practice targeting and triggering and how to begin configuring the imager Targeting and Decoding 3 2 Scanning Guidelines 3 3 Decode Zones and Lighting Zones 3 4...

Страница 34: ...lue targeting pattern as shown below 2 Move the front of the imager steadily downward toward the mark and parallel to the mark surface 3 The imager will decode the mark at the optimal read distance ty...

Страница 35: ...e part type the POWERSCAN D8590 always uses the most recent good read settings as a starting point so subsequent reads will be faster Hold the POWERSCAN D8590 still do not swipe or move the imager Pul...

Страница 36: ...nd Lighting Zones The following chart provides a guideline for overall read performance based on mark size Actual range for direct part marks will vary based on mark parameters and the illumination zo...

Страница 37: ...ing Zones The following charts indicate the POWERSCAN D8590 s illumination zones Dome Lighting Zone Dome illumination de emphasizes surface texture and elevation curved surface Dome Illumination Textu...

Страница 38: ...Manual Decode Zones and Lighting Zones Low Angle Lighting Zone Low Angle illumination emphasizes surfaces texture and elevation curved surface Low Angle Illumination Texture and Elevation are Emphasi...

Страница 39: ...e is useful on both specular and non specular surfaces and emphasizes surface texture The optimum lighting angle for most marks is 30 degrees which occurs when the imager is approximately 0 25 away fr...

Страница 40: ...distances will provide the best performance In addition to illuminating marks on curved surfaces dome illumination also provides diffuse even bright field illumination which will provide thorough cove...

Страница 41: ...Angle Illumination with Low Resolution Image Low Angle Illumination 2 Low Angle Illumination with Full Resolution Image Low Angle Illumination 3 Blue Dome Illumination Blue Dome Illumination 4 Red Do...

Страница 42: ...3 10 POWERSCAN D8590 User s Manual Illumination Sequence NOTES...

Страница 43: ...ptions for communicating with the POWERSCAN D8590 in various interfaces Communications by ESP 4 2 Communications Overview 4 3 USB Interface 4 4 RS 232 Interface 4 5 Preamble 4 7 Postamble 4 9 Preamble...

Страница 44: ...arameter and click once in the selection box to view options 3 Place your cursor in the selection box scroll down to the setting you want to change and click once on the setting 1 Left click on the to...

Страница 45: ...Connect Mode or RS 232 Connect Mode to connect to ESP Once the imager is connected to ESP you can select your communications mode and set other communication parameters USB With USB communications the...

Страница 46: ...USB Downloader Mode This mode is the standard way of transferring unformatted unpacketized data to the imager through the USB port USB Native Two Way Mode This mode is used when the user needs error c...

Страница 47: ...ps on setting up the RS 232 Interface RS 232 Default Settings This mode is the standard way of transferring unformatted unpacketized data through the RS 232 port You will need to read this symbol when...

Страница 48: ...changed if necessary to match the host setting None Default Odd Even Stop Bits RS 232 Stop Bits are added to indicate the end of each character This setting should only be changed if necessary to matc...

Страница 49: ...g the data ABC your output will look like this ABC The only limit to the number of preambles enabled is the total memory size available Important Be sure to save all settings before reading any of the...

Страница 50: ...SCAN D8590 User s Manual Preamble USB or PS 2 Keyboard Preamble Comma Space Tab Erase All Preamble Data Erase Preamble and Postamble Data Note To erase all preamble and postamble data read the symbol...

Страница 51: ...ur output will look like this ABC The only limit to the number of postambles enabled is the total memory size available Important Be sure to save all settings before reading any of the following posta...

Страница 52: ...D8590 User s Manual Postamble USB or PS 2 Keyboard Postamble Comma Space Enter Tab Erase All Postamble Data Erase Preamble and Postamble Data Note To erase all postamble and preamble data read the sy...

Страница 53: ...erface on the right Scroll through a list of all preamble and postamble options and then click Insert In addition to typing directly in the text fields and selecting from the dropdown menu you can als...

Страница 54: ...d mapping is that it allows any language and keyboard layout to be mapped Important Keyboard Mapping is not to be confused with USB Keyboard Mode which has an entirely different function namely to ena...

Страница 55: ...agic sequence entered will Enable Text Commands and Suppress Echo and Responses Enter the magic sequence in this text field and click Send Once the magic sequence has been sent you can send text comma...

Страница 56: ...eck characters and a response is expected from the host Two Way communication is in packet format Reader to Host Packet Size The Reader to Host Packet Size is the amount of data in bytes that is sent...

Страница 57: ...te Requests that the host polls the USB POWERSCAN D8590 at the rate specified 1 to 255 ms Keyboard Inter Message Delay Places a delay between each character that is output by the imager when in Keyboa...

Страница 58: ...4 16 POWERSCAN D8590 User s Manual Other Communications Settings in ESP NOTES...

Страница 59: ...e Contents This section contains information on how to set your imager to the most efficient and effective parameters for your application Read Cycle by ESP 5 2 Button Stay Down Time 5 3 Ignore Duplic...

Страница 60: ...the tree 4 Left click again on the open screen to complete the selection 5 Right click on the open screen and select Save to Reader to implement the command in the imager 2 Double click on the parame...

Страница 61: ...Button Stay Down Time Button Stay Down Time sets the amount of time in seconds that the imager will continue to process the current decode symbol event The imager will behave as if the trigger is bein...

Страница 62: ...8590 User s Manual Ignore Duplicate Symbol Timeout Ignore Duplicate Symbol Timeout Ignore Duplicate Symbol Timeout sets the imager not to output the same symbol data multiple times within the time per...

Страница 63: ...nterest allows the user to determine the size of the image window to be captured and decoded Note Using a smaller Region of Interest if possible may enhance read cycle performance Full Image 1280 x 10...

Страница 64: ...5 6 POWERSCAN D8590 User s Manual Region of Interest NOTES...

Страница 65: ...Disabling unused symbologies may substantially improve the POWERSCAN D8590 s decode speed Symbologies by ESP 6 2 Aztec 6 3 BC412 6 4 Codabar 6 5 Code 39 6 6 Code 93 6 7 Code 128 6 8 Composite 6 9 Dat...

Страница 66: ...en screen to complete the selection 5 Right click on the open screen and select Save to Reader to implement the command in the imager 1 Left click on the to expand the tree 2 Double click on the param...

Страница 67: ...POWERSCAN D8590 User s Manual 6 3 Symbologies Aztec Read the following symbols to enable disable Aztec settings Aztec On Save Settings Aztec Off Default Aztec by ESP Sample Aztec Symbol...

Страница 68: ...4 POWERSCAN D8590 User s Manual BC412 BC412 Read the following symbols to configure BC412 settings BC412 Off Default BC412 On BC412 On Remove Check Digit Save Settings BC412 by ESP Sample BC412 Symbo...

Страница 69: ...odabar Read the following symbols to enable disable Codabar settings Codabar On Default Codabar Off Save Settings Codabar by ESP Sample Codabar Symbol ESP allows you to enable a checksum or to enable...

Страница 70: ...symbols to configure Code 39 settings Code 39 On Default Code 39 Off Enable Checksum Disable Checksum Default Enable Checksum and Strip from Result Code 39 Extended Code 39 Extended Full ASCII On Full...

Страница 71: ...POWERSCAN D8590 User s Manual 6 7 Symbologies Code 93 Read the following symbols to enable disable Code 93 settings Code 93 On Default Code 93 Off Save Settings Code 93 by ESP Sample Code 93 Symbol...

Страница 72: ...6 8 POWERSCAN D8590 User s Manual Code 128 Code 128 Read the following symbols to enable disable Code 128 settings Code 128 On Default Code 128 Off Save Settings Code 128 by ESP Sample Code 128 Symbol...

Страница 73: ...e 1D and 2D components before the POWERSCAN D8590 outputs a result When Composite is enabled the unit decodes the 1D component first Important EAN 8 EAN 13 UPC A and UPC E cannot be decoded individual...

Страница 74: ...User s Manual Data Matrix Data Matrix Read the following symbols to enable disable Data Matrix settings Data Matrix ECC 0 140 On Default Data Matrix ECC 0 140 Off Save Settings Data Matrix by ESP Samp...

Страница 75: ...ure GS1 DataBar settings All DataBar On Default All DataBar Off DataBar Limited On DataBar 14 and DataBar 14 Stacked On DataBar Expanded On Save Settings GS1 DataBar by ESP Sample DataBar 14 Limited S...

Страница 76: ...On Default Interleaved 2 of 5 Off Interleaved 2 of 5 Two Digits On Interleaved 2 of 5 Two Digits Off Interleaved 2 of 5 Four Digits On Interleaved 2 of 5 Four Digits Off Interleaved 2 of 5 Checksum O...

Страница 77: ...POWERSCAN D8590 User s Manual 6 13 Symbologies MicroPDF417 Read the following symbols to enable disable MicroPDF417 settings MicroPDF417 On MicroPDF417 Off Default Save Settings MicroPDF417 by ESP...

Страница 78: ...6 14 POWERSCAN D8590 User s Manual PDF417 PDF417 Read the following symbols to enable disable PDF417 settings PDF417 On Default PDF417 Off Save Settings PDF417 by ESP Sample PDF417 Symbol...

Страница 79: ...the imager to recognize and decode the Pharmacode symbol Minimum Bars Sets the minimum number of bars that a Pharmacode symbol must have to be considered valid Bar Width Status If set to Mixed the ima...

Страница 80: ...tion Specifies the direction in which a symbol can be read Fixed Threshold Value Used when Bar Width Status is set to Fixed Threshold Defines the minimum difference in pixels that will distinguish a n...

Страница 81: ...logies QR Code Read the following symbols to configure QR Code settings QR Code On QR Code and Micro QR Code Off Micro QR On QR Code and Micro QR Code On Default Save Settings QR Code by ESP Sample QR...

Страница 82: ...l UPC EAN UPC EAN Read the following symbols to configure UPC EAN settings UPC On Default UPC Off UPC Expansion On Default UPC Expansion Off EAN On Default EAN Off Save Settings UPC EAN by ESP Sample...

Страница 83: ...e the AIM Symbology Identifiers list This preamble identifies what kind of symbology has been decoded Symbology Identifier On Symbology Identifier Off Default Save Settings Symbology Identifier by ESP...

Страница 84: ...6 20 POWERSCAN D8590 User s Manual Symbology Identifier NOTES...

Страница 85: ...meters Contents This section contains information on how to set your imager to the most efficient and effective parameters for your application I O Parameters by ESP 7 2 Operational Feedback 7 3 Gain...

Страница 86: ...he open screen to complete the selection 5 Right click on the open screen and select Save to Reader to implement the command in the imager 2 Double click on the parameter and click once in the selecti...

Страница 87: ...th Host via USB 1 Beep Vibration None Successful Decode and Data Transfer to Host 1 Beep Vibration Flash GREEN Configuration Symbol Successfully Decoded and Processed 2 Beeps Vibrations separated by s...

Страница 88: ...be The higher the gain the brighter the image When the POWERSCAN D8590 is set to Adaptive mode it will automatically maintain the proper setting for gain based on the captured image in order to produc...

Страница 89: ...s Manual 7 5 I O Parameters Exposure The larger the Exposure value the longer the pixels in the candidate image are exposed allowing the imager to collect more light Note A larger exposure value may...

Страница 90: ...DI and ISO IEC 21849 ATA TEI semantics to construct the UII CPN and LBN Unique Identification Features The following data output options are applicable to Data Matrix ECC 200 symbols only and have no...

Страница 91: ...8 CPN 87654321 UII 12345678 LBN 87654321 DATA Datalogic UII Enabled with Error Messages UII UN123456789ABCDEFG Construct_1 25SUN123456789ABCDEFG CPN 87654321 PNR PNR 87654321 LBN 87654321 30T 30T87654...

Страница 92: ...Enabled with Error Messages Allows the imager to read only ISO IEC 15434 compliant messages in Data Matrix ECC 200 symbols and output detailed information such as prefix format indicator data componen...

Страница 93: ...ion functions Data Validation Disabled Default Save Settings UII Enabled with Error Messages ISO IEC 15434 Enabled ISO IEC 15434 Enabled with Error Messages UII Enabled UII Enabled with Pass Through D...

Страница 94: ...ier is in use UII Enabled Content of Decoded Data Matrix Symbol UII CPN LBN Valid UII UII UII_data Example UII 12345678 Valid CPN Valid LBN CPN CPN_data Example CPN 87654321 LBN LBN_data Example LBN 8...

Страница 95: ...onstruct_1 30T Valid UII and Invalid CPN Valid UII and Invalid LBN UII UII_data 30P ERROR xxxx UII UII_data PNR ERROR xxxx UII UII_data 240 ERROR xxxx UII UII_data 30T ERROR xxxx Constructed UII type...

Страница 96: ...OR DATA ELEMENT TOO LONG UII ERROR DATA ELEMENT TOO SHORT UII ERROR LOWER CASE CHARACTER UII ERROR NEED UII ELEMENT FIRST UII ERROR SPACE AFTER TEI DATA QUALIFIER UII ERROR TEI DATA QUALIFIER UII ERRO...

Страница 97: ...perations Contents This section introduces several settings that can be applied to speed up processing or improve readability in various circumstances Dot Peen Enhanced Illumination Settings 8 2 Illum...

Страница 98: ...controlled using the configuration symbols shown here They can also be controlled in ESP s EZ Mode Note The illumination default mode will reset the imager s illumination settings to factory default...

Страница 99: ...ps 1 8 the imager will cycle through during its sequence Click Create Bar Code to encode illumination settings in a programming symbol Click this button to default settings for the imager s illuminati...

Страница 100: ...ne which cells will be enhanced grown Click Grow Dark or Grow Light on the Illumination tab in I O Parameters to improve decode performance on under marked or over marked direct part marks Red Dome Il...

Страница 101: ...e or a 1D symbol with large bar widths This feature improves processing speed because the image sizes are smaller Note Low Resolution with Low Angle is the first step in the POWERSCAN D8590 s illumina...

Страница 102: ...ck Settings Read the symbols below to lock or unlock imager settings Note This feature does not lock preamble and postamble programming symbols Clear XML Rules or postamble erase none commands Unlock...

Страница 103: ...User s Manual 9 1 9 Terminal Contents This section describes the Terminal interface and macro functions in ESP Terminal View 9 2 Find 9 3 Send 9 4 Macros 9 5 Terminal Right Click Menu 9 6 Terminal Dr...

Страница 104: ...cros listed on this bar Terminal screen Type text here to find matching text in the terminal window Clear screen copy paste save The Terminal interface allows you to send commands to the imager by usi...

Страница 105: ...se a series of symbols have been scanned into the terminal view and you want to determine if a particular symbol whose data begins with ABC has been read 1 Type ABC into the Find box 2 Press Enter The...

Страница 106: ...and that disables vibrate in the text field and click Send Type text commands in the text field and then click the Send button to initiate Clicking Send repeatedly will initiate the command repeatedly...

Страница 107: ...k on all subsequent arrows to Edit the associated macros When you click Move to Start the names of all the macros appear as shown at left Choose which macro button you want to appear in the first posi...

Страница 108: ...t Default Settings to return all of the above to original settings Keyboard Macros brings up the Function Keys dialog which allows you to create customized macro functions Function Keys The Function K...

Страница 109: ...be opened You can select Pause to interrupt the capture flow or Stop to end the flow and open the file Save Current Text saves all text in the terminal window to a text file of your choice Find Next...

Страница 110: ...9 8 POWERSCAN D8590 User s Manual Terminal Dropdown Menu NOTES...

Страница 111: ...perations with one click Differences from Default which shows all currently enabled POWERSCAN D8590 settings that are not default settings Firmware where you can update your imager s firmware and Adva...

Страница 112: ...ta removes decoded symbol data and commands in the imager s memory Default Reader returns the imager to its default state without any optimization or configuration Deactivate XML Rules turns off but d...

Страница 113: ...guration dialog Then create symbols containing the configuration commands of your choice Click Save As to save the report as plain text or a tab delimited text file Send configuration settings to the...

Страница 114: ...rmware in the imager Use this dropdown menu to locate batch files in the host computer s file directory Download the needed files directly to the imager by clicking the Start button The Firmware Verif...

Страница 115: ...he following symbol Imager ID U J X ap i42440138none00100911810200016040002422700170001 35 617001 10 006 The host s text program will output a data string containing the imager s identifying informati...

Страница 116: ...ls or to collect only the files that you use frequently to configure the imager for your application The Download Collection and Save Collection As buttons allow you to acquire the entire contents of...

Страница 117: ...D8590 User s Manual A 1 Appendices Appendix A General Specifications A 2 Appendix B Electrical Specifications A 4 Appendix C Default Reset Procedure A 7 Appendix D Maintenance A 8 Appendix E Troublesh...

Страница 118: ...C EAN Image Collection Options Sensor CMOS Sensor Array 1280 x 1024 Communication Protocols Standard Interface USB RS 232 Read Parameters Rotational Tolerance 180 Focal Range 0 to 2 0 to 50 8 mm Focal...

Страница 119: ...fications are given for typical performance at 25 C 77 F using grade A labels Performance characteristics may vary at high temperatures or other environmental extremes Read Ranges Options Accessories...

Страница 120: ...C PIN 2 RS 232_TX RS 232 level serial transmit signal PIN 3 RS 232_RX RS 232 level serial receive signal PIN 4 PS 2_DATA_UART_RX_USB_DP PS 2 clk to host UART transmit signal USB Data plus signal PIN 5...

Страница 121: ...POWERSCAN D8590 User s Manual A 5 Appendices USB Cable Pinouts 1 828 80 mm...

Страница 122: ...A 6 POWERSCAN D8590 User s Manual Electrical Specifications RS 232 Cable Pinouts 177 80 mm 1 066 80 mm 165 10 mm...

Страница 123: ...n and XML programming including Preamble and Postamble 1 Unplug the POWERSCAN D8590 from the PC 2 While holding down the trigger plug the reader into the USB port on the PC You will hear five rapid be...

Страница 124: ...be taken not to apply too much pressure as a trapped particle may scratch the window If cleaning of the window becomes necessary follow this procedure Use a minimal amount of Isopropyl Alcohol to damp...

Страница 125: ...r Devices self powered hubs some laptops etc Right click on My Computer in the Windows Start menu select Properties click the Device Manager button on the Hardware tab expand the Universal Serial Bus...

Страница 126: ...le from customer support go to the Utilities section of ESP browse for the file in the Batch File Update field and click Start once you have located the file Problem No Illumination No Process Sequenc...

Страница 127: ......

Страница 128: ...Datalogic ADC Inc 959 Terry Street Eugene OR 97402 USA Telephone 541 683 5700 820057190 Rev A May 2013 www datalogic com...

Отзывы: