


Datalogic Applications
User’s Manual
133
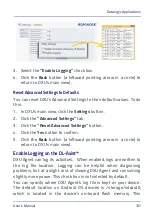
10. (Optional) Select the barcode symbology in the
“Barcode Type”
menu.
11. Click the
Save
button to save your barcode label set as a graphic
image file.
12. To print, click the
“Print Preview”
button, then click the
button in the button bar, and then finish printing using your
printer’s Print dialog.
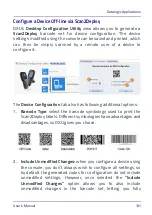
To apply the configuration by scanning the
Scan2Deploy
barcodes:
13. Resume your device and unlock its screen.
14. Launch the
DXU Agent
application.
15. Tap the
Menu
button, and then select the
Scan2Pair
command.
16. Scan any label in your Scan2Deploy label set.
17. Continue to scan all barcodes until all of them on the list on the
screen indicate they have been scanned. Once the last label is
scanned, the configuration will be put into effect, and an
on-screen notification will confirm that your configuration is
complete.
18. Clean up by tapping the
Home
button.
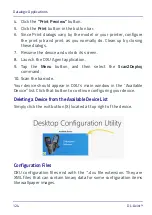
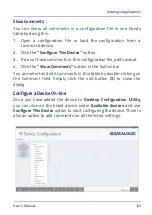
Configure DXU
There are many ways to configure DXU, such as changing its
language, changing the TCP/IP ports used to communicate with
DXU Agent on remote devices, enabling automatic discovery of
devices, enabling logging, and resetting DXU’s settings back to their
default values.
NOTE
Some configurations are small enough to fit on only one
barcode label, and others may have many barcodes to
scan.
Содержание DL-Axist
Страница 1: ...Personal Digital Assistant PDA User s Manual ...
Страница 8: ...vi DL Axist NOTES ...
Страница 21: ...Battery User s Manual 13 NOTE Use only a Datalogic approved power supply ...
Страница 34: ...SD Card SIM Card 26 DL Axist NOTES ...
Страница 41: ...Getting Started User s Manual 33 Tap IP to set the IP address and the port number ...
Страница 42: ...Getting Started 34 DL Axist Tap WiFi to set the Wi Fi info For further information see Tap2Deploy on page 158 ...
Страница 54: ...Getting Started 46 DL Axist NOTES ...
Страница 70: ...Settings 62 DL Axist ...
Страница 77: ...Settings User s Manual 69 4 Tap Save ...
Страница 79: ...Settings User s Manual 71 ...
Страница 82: ...Settings 74 DL Axist ...
Страница 84: ...Settings 76 DL Axist ...
Страница 86: ...Settings 78 DL Axist ...
Страница 100: ...Settings 92 DL Axist Unicode Tap Unicode to remap a key to display Unicode characters such as symbol ...
Страница 106: ...Settings 98 DL Axist NOTES ...
Страница 112: ...Datalogic Applications 104 DL Axist ...
Страница 168: ...Datalogic Applications 160 DL Axist The menu allows to access more features and options ...
Страница 172: ...Datalogic Applications 164 DL Axist ...
Страница 175: ...Datalogic Applications User s Manual 167 ...
Страница 178: ...Datalogic Applications 170 DL Axist NOTES ...
Страница 181: ...Tools User s Manual 173 2 Select the tab SDK Update Sites and click the plus icon on the right side toolbar ...
Страница 204: ...Connections 196 DL Axist NOTES ...
Страница 211: ...User s Manual 203 Test Codes High Density Codes 0 25 mm 10 mils Code 39 17162 Interleaved 2 5 0123456784 Code 128 test ...
Страница 212: ...Test Codes 204 DL Axist High Density Codes continued 0 25 mm 10 mils 80 EAN 13 80 EAN 8 ...
Страница 214: ...Test Codes 206 DL Axist Medium Density Codes continued 0 38 mm 15 mils 100 EAN 13 100 EAN 8 ...
Страница 215: ...Test Codes User s Manual 207 Low Density Codes 0 50 mm 20 mils Code 39 17162 Interleaved 2 5 0123456784 Code 128 test ...
Страница 216: ...Test Codes 208 DL Axist Low Density Codes continued 0 50 mm 20 mils 120 EAN 13 120 EAN 8 ...
Страница 217: ...Test Codes User s Manual 209 2D Codes Datamatrix ECC200 Example Inverse Datamatrix ECC200 Example ...
Страница 218: ...Test Codes 210 DL Axist NOTES ...
Страница 247: ...User s Manual 239 Reference Documentation For further information regarding DL Axist refer to the SDK Help on line ...
Страница 248: ...Reference Documentation 240 DL Axist NOTES ...
Страница 260: ...Glossary 252 DL Axist NOTES ...
Страница 264: ...NOTES ...