


C-BOX 300/310
14
2
C-BOX 3X0 Configuration for Profibus DP Slave Node
In order to setup the C-BOX 3X0, you need to install the function blocks in your PLC
programming software and configure it.
The procedure below can be generally applied for this purpose:
1. Start the PROFIBUS configurator on the DP Master.
2. Insert the diskette with the device databas files (.GSD) into the drive of the
programming device (usually a PC).
3. Load the .GSD file HMS_1810.GSD in the configurator.
4. Configure the C-BOX 3X0 (through WinHost) setting the parameters according
to the PROFIBUS network application as described in the configurator's Help
On-Line or User's Manual.
NOTE
Further information on PROFIBUS protocol and Flow control is
provided in the C-BOX 300/310 PROFIBUS document and Help On-
Line installed from the configuration diskette provided in the C-BOX
package.
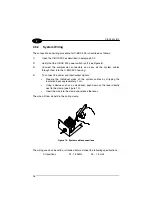
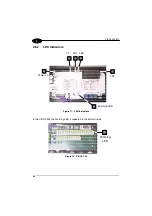
2.5.6
OM4000 Jumper Settings
J1
J2
Figure 14 - OM4000 jumpers
The jumpers allow connection to the EXT TRIG signals on separate spring clamp
terminals for applications which use the OM4000 Oscillating Mirror in Trigger Mode.
They are used together and they have the following significance:
when a jumper is in the J1 position (see Figure above) pin 40 is connected to pin 27
(EXT TRIG+); a jumper in J2 position connects pin 20 to pin 28 (EXT TRIG-).
If the jumpers are removed pin 20 and pin 40 are disconnected.
Содержание C-BOX 300
Страница 1: ...C BOX 300 310 Installation Manual...
Страница 2: ...C BOX 300 310 Installation Manual...
Страница 3: ...C BOX 300 310 INSTALLATION MANUAL...
Страница 8: ...vi C BOX 310 1 2 Figure B LCD display Keypad 1 2...
Страница 11: ...ix C BOX 310 Figure D Bottom inside...
Страница 14: ...xii...


