22
7. Instruction for installation
7.1 Step 1 – DIP Switch Setting
Set the Mirror option to H+V mode.
7.2 Step 2 – One End of Mounting Wire
Attach the mounting wire to the junction box mounted on the ceiling by screwing one end of the
mounting wire into a screw hole in the junction box with a screw (not supplied) as shown in the
diagram below.
7.3 Step 3 – Ceiling Bracket (B)
•
Again, as illustrated in the diagram below, screw a ceiling bracket (B) into the
junction box mounted on the ceiling.
•
Make sure the screw holes of the ceiling bracket (B) are aligned with the holes on
the junction box.
Содержание PTC-150T
Страница 1: ...1 ...
Страница 9: ...9 5 System Diagram ...
Страница 24: ...24 ...
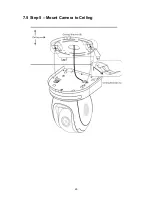
Страница 25: ...25 7 5 Step 5 Mount Camera to Ceiling ...
Страница 53: ...53 12 Dimensions Unit mm ...
Страница 54: ...54 ...
Страница 57: ...57 14 Service and Support ...


