background image

Data Aire’s dap4 Modbus TCP/IP 


Document:


600

000

961


version


4.0


5


11.


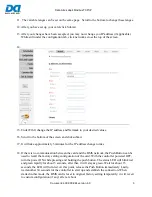
 The variable ranges can be set on the same page.  Scroll to the bottom to change these ranges.  


12.


After you have set up your card, click Submit. 


13.


After your changes have been accepted, you may now change you IP address (if applicable.)  
While still under the configuration tab, click network across the top of the screen. 


14.


15.


Under Eth0, change the IP address and Netmask to your desired values. 

 
16.


Scroll to the bottom of the screen and click submit. 


17.


It will take approximately 5 minutes for the IP address change to take 


18.


If there is no communication between the card and the BMS network, the Push Button can be 
used to recall the factory setting configuration of the card: With the controller powered OFF, 
turn the power ON while pressing and holding the push button. The status LED will blink red 
and green rapidly for about 3 seconds, after that, it will stay as green. Wait for about 15 
seconds, the LED will turn red. At this point, release the Push Button immediately. Lastly, 
wait another 30 seconds for the controller to start up and establish the connection. When 
started in this mode, the BMS card is reset to original factory setting temporarily; it will revert 
to custom configuration (if any) after a reboot. 

Содержание dap4 touch

Страница 1: ...Data Aire dap4 Controller MODBUS TCP IP Protocol Integration Instructions Data Aire Inc 230 West BlueRidge Ave Orange CA 92865 Document number 600 000 961 November 2012 Revision 4 0...

Страница 2: ...Data Aire s dap4 Modbus TCP IP Document 600 000 961 version 4 0 2 Table of Content I Modbus TCP IP Setup Procedures for dap4 Ethernet Card page 3 II Modbus TCP IP BMS Points page 6...

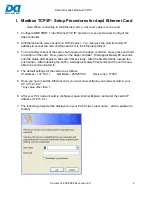
Страница 3: ...hold the button on the card Now power on the dap4 controller Wait approximately 20 seconds until the status LED begins to blink red 3 times slowly After the first Red blink release the push button Aft...

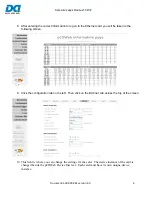
Страница 4: ...d you will be taken to the following screen 9 Click the configuration tab on the left Then click on the BACnet tab across the top of the screen 10 This field is where you can change the settings for t...

Страница 5: ...ately 5 minutes for the IP address change to take 18 If there is no communication between the card and the BMS network the Push Button can be used to recall the factory setting configuration of the ca...

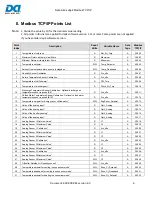
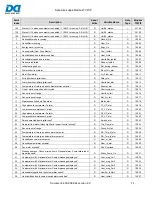
Страница 6: ...Sensor Calibration Optional chilled water temperature sensor required B10 R Ain_offs A 30012 12 Temperature setpoint for Energy saver chilled water R W EngSaver_Setpoint A 40013 13 Value of the analog...

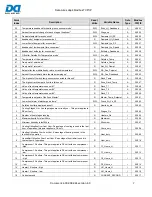
Страница 7: ...re sensor 2 R Rack_T2 A 30049 49 Value of rack temperature sensor 3 R Rack_T3 A 30050 50 Temperature setpoint of the Zone Master R Master_Temp_Setpoint A 30051 1 Lower limit alarm of discharge air tem...

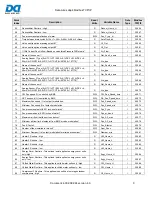
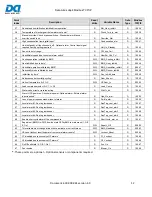
Страница 8: ...on optional alarm screen some also add function R Alarm4_txt I 35037 37 Comps 0 none 1 one 2 one UL 3 two 4 two UL 5 Four two circuit R Comp_sel I 35038 38 0 none 1 comp limited 2 twocomp limited 3 co...

Страница 9: ...7 NTC HT 8 50T90 9 10T170 R Ain_type I 35070 70 CW Fan speed controlled by BMS R W CW_Fan_Speed_bms I 45071 71 DX Fan speed controlled by BMS R W DX_Fan_Speed_bms I 45072 72 Maximum Fan speed of outpu...

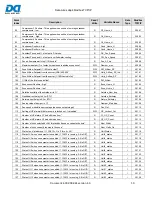
Страница 10: ...an speed modulation percentage bases on output singal R Fan_Out I 35110 110 Setting of HP alarms hr before comp is locked out 1 disabled R W HP_Lockout_Cnt I 45111 111 Number of HP alarms C1 had withi...

Страница 11: ...Humidity_fail D 10016 16 Sensor is out of range R Ret_Air_fail D 10017 17 Maintenance Schedule Due alarm R Maint_alm D 10018 18 High pressure compressor 1 alarm R C1_HP_alm D 10019 19 Low pressure com...

Страница 12: ...l humidity cycling R Hum_Expect D 10050 51 Units of temperature 0 F 1 C R W USAshr_f_c D 00052 52 Lead compressor select 0 C1 1 C2 R Lead_Comp D 10053 53 Water valve direct or reverse acting R WtrVlv_...

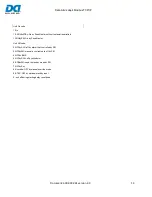
Страница 13: ...fied 13 ONbyZM On by Zone Master Unit Off code 2 OFFbyALR off by alarm that controlled by ZM 3 OFFbyZM manually configured to off by ZM 4 OFFby BMS 5 OFFbySCH off by scheduler 6 STBbyZM send to standb...

Отзывы: