background image


Description of the device 


Features 

The DSM-26 is a 2 in- and 6 output speaker manager that can be used for a wide range of applications. 
At the front it has an USB connection port which enables you to program the DSM-26 with the included 
software. The RS485 interface gives you the possibility to connect and program multiple units at once. It 
has a powerful chipset that makes it possible to use all filter slopes up to 48 dB per octave and all 
equalizer, delay sections without running out of memory. The DSM-26 is suitable for professional PA 
systems, line arrays and audio installations, as well as sound distribution networks.


• DAP speaker presets available at 

www.dap-audio.info


• 96 Khz Sample rate, 115 dB dynamic range 
• Noise floor better than -95 dBu  
• USB at front with included user-friendly remote software 
• Connect multiple units with RS485 (use optional interface D2071) 


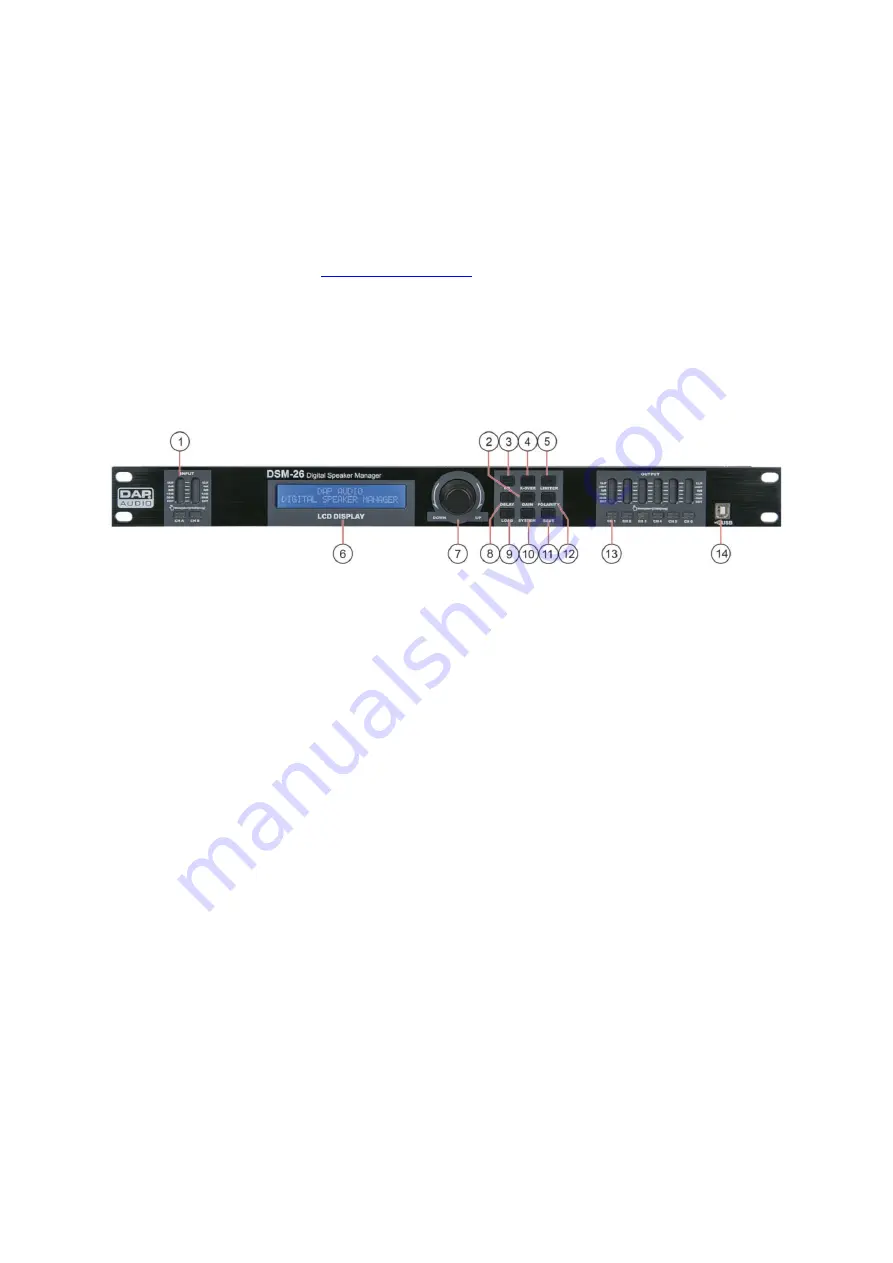
Overview  


  1) 

Input LED ind mute switches 

       Indicates the input level. Make sure the Clip led only lights up occasionally.  
       Pressing the mute/ edit button shortly will mute the corresponding input.  
       Pressing and holding the mute/ edit button lets you enter the edit mode for the corresponding  
       channel. In edit mode you can adjust the polarity, delay and EQ for each input separately by  
       pressing the 

Polarity(12)

Delay(8)

 or 

EQ(3)

 button. 


 2)


Gain button


       Pressing the Gain button allows you to enter the Gain menu directly. The gain can be setup for each  
       output separately. You can’t adjust the gain for the input channels. 

  3)


EQ button


       Pressing the EQ button allows you to enter the EQ menu directly. You can setup 6 different EQ’s for  
       each input and each output. 

  4)


X-over button


       Pressing the X-over button allows you to enter the X-over menu directly. Pressing the X-over button  
       let’s you select and adjust a high- and low- pass filter for each output. 

  5)


Limiter button


       Pressing the Limiter button allows you to enter the Limiter menu directly. You can set up a limiter for  
       each output. 

  6)


LCD display


       To display functions and operating status. 

  7)


Jog-wheel 

       Turning the Jog Wheel allows you to change parameters. 
       Pressing the Jog Wheel allows you to enter or confirm. 

  8)


Delay button


       Pressing the Delay button allows you to enter the Delay menu directly. The delay for each input  
       and output can be adjusted separately. 


Содержание DSM-26

Страница 1: ...DSM 26 ORDERCODE D2070...

Страница 2: ...Audio for more excellent audio products We design and manufacture professional audio equipment for the entertainment industry New products are being launched regularly We work hard to keep you our cu...

Страница 3: ...nu 9 Save menu 11 Digital Speaker Manager software Installation 12 Software installation 12 Installing the CP1203 USB driver 12 Installing the Digital Speaker Manager software 14 Connecting a single D...

Страница 4: ...there be any consult your dealer and do not use the system To maintain perfect condition and to ensure a safe operation it is absolutely necessary for the user to follow the safety instructions and wa...

Страница 5: ...or by the front panel rack mount screws Before changing your grounds around always turn your amplifiers down Keep this user s manual for future consultation Also remember that the device will get a b...

Страница 6: ...erly pack fixture any shipping damage resulting from inadequate packaging is the customer s responsibility Highlite reserves the right to use its own discretion to repair or replace product s As a sug...

Страница 7: ...will mute the corresponding input Pressing and holding the mute edit button lets you enter the edit mode for the corresponding channel In edit mode you can adjust the polarity delay and EQ for each i...

Страница 8: ...ort allows you to edit and manage your presets using the supplied software Backside 15 IEC Connector Fuse This connector is meant for the connection of the supplied main cord Connect one end of the po...

Страница 9: ...ns in order to mute all outputs Activate the HF outputs first In case of wrong cabling High Frequency HF signals will come out of bass speakers that cannot be harmed this way Vice versa the Low Freque...

Страница 10: ...y for each output channel Pressing and holding the EQ 3 button while in edit mode allows you to setup up to six EQ s per output Use the EQ 3 button to select EQ1 EQ6 You can setup each equalizer as a...

Страница 11: ...s shown below Confirm by pressing the Jog Wheel 7 Now you are able to copy any input to any other input or any output to any other output by turning and pressing the Jog Wheel 7 System menu Pressing a...

Страница 12: ...puts and outputs the way they are programmed All mute will mute all inputs and outputs when changing a program This to prevent your speakers and audience from annoying or even dangerous sudden signal...

Страница 13: ...g the Jog Wheel 7 allows you to choose between 1 Store 2 Default Select by pressing the Jog Wheel 7 1 Store Stores the program currently in the DSM 26 s working memory to the preset you select by turn...

Страница 14: ...as shown in the figure below will pop up Installing the CP2103 USB driver Make sure the DSM 26 is not connected to your computer while installing the USB driver Click USB Driver Installation The windo...

Страница 15: ...ow the InstallShield wizard will guide you through the driver installation Click the next button Click the Finish button Now you re driver is installed Click the back button to return to the setup win...

Страница 16: ...ing the Digital Speaker Manager software Click Application Installation The Digital Speaker Management setup window will pop up Click next If you agree with the default destination folder click the ne...

Страница 17: ...15 Click next to proceed Click the Finish button Now you re ready with the installation of the Digital Speaker Management software Exit the setup window...

Страница 18: ...ggest connecting them to a RS485 bus This way you can convenient create edit and manage your patches by means of a PC You can connect up to 250 units in parallel with standard network cables by means...

Страница 19: ...nect your DSM 26 to your PC using the included USB cable or via the optional USB RS485 converter in combination with a network cable Start up the Digital Speaker Management software Click the connecti...

Страница 20: ...ws the name of the program in the upper row and the number of the preset in the bottom row The first time you run the Digital Speaker Management software the Name row will be blank and the NO row will...

Страница 21: ...s memory into the DSM 26 s memory Recall all programs from device Allows you to recall all the program currently in the DSM 26 s memory and put the settings in the Digital Speaker Management software...

Страница 22: ...ace Clicking the button opens a window which allows you change the message on the display of the DSM 26 while the unit is standby Interface 1 Allows you to edit the first line of the display Interface...

Страница 23: ...you to edit EQ1 EQ6 delay and polarity Each output channel gives you access to Gain delay polarity X over limiter and EQ1 EQ6 Editing labels The Digital Speaker Management software allows you to ad l...

Страница 24: ...ing or high shelving Adjust the gain by typing the value in the box by clicking the increase decrease buttons in the value box or by clicking and dragging the fader The other parameters can be adjuste...

Страница 25: ...ttack time and release time by clicking the increase decrease buttons in the value box or by typing the new value in the box Source The source window indicates which source s is are connected to the s...

Страница 26: ...s and twists when coiling them This gives the advantage of increasing their life and reliability Periodically check your cables A great number of problems faulty contacts ground hum discharges etc are...

Страница 27: ...ver into a slot in the fuse cover Gently pry up the fuse cover The fuse will come out 3 Remove the broken fuse If brown or unclear it is burned out 4 Insert the replacement fuse into the holder where...

Страница 28: ...Hz in 1 24 octave steps Crossovers Types Linkwitz Riley Bessel and Butterworth Slopes 12 18 24 48 dB octave frequencies 19 7 to 20 000 Hz in 1 24 octave steps Limiter Threshold points 20 to 20 dBu in...

Страница 29: ...2011 Dap Audio...

Отзывы: