background image

8

Installation Instructions - Intergrated Application 

Preparing the
Enclosure

Tools You Will Need


The appliance must be     
connected to an individual


properly grounded electrical 
outlet, protected by a 15 or 
20


ampere circuit breaker or 

time delay fuse. 

‡

It is recommended that you do

not install the beverage cooler
into a corner (i.e. directly beside
a wall). This is to allow the
door(s) to have a greater then
90° opening swing.  A limited
door swing will prevent the
shelves from sliding out as
intended, and may lead to dam-
aging the door gasket(s).   

‡

The electrical outlet may be

positioned from within either
side of the adjacent cabinetry, or
the rear of the shaded area (as
shown in Fig F).

‡

If the electrical outlet is located

inside the adjacent cabinetry, cut
a 1-1/2”(3.81cm) diameter hole to 
admit the power cord.  If the cabi-
net wall is metal, the hole edge
must be covered with a bushing
or grommet.

Electrical Requirements:


Important

: If the electrical outlet

is surface mounted (not flush)
within the enclosure, the depth
requirement for the installation
may be affected.

*The listed depth requirement for the 
installation is assuming that the electrical 
outlet is located in the adjacent cabinetry 
or is flush mounted in the rear wall, not 
surface mounted in the enclosure. 

‡

The rough cabinet opening

must be on a level floor area
and at least 23 1/16”  deep
(63.2cm) by 15


1/16”(38.6cm)

wide.  The opening should also
have a height of at least 
34 9/16  ”(86.8 cm).


NOTE:

 This unit is front breathing. 

Do not block the front air vent.  
Blockage of the vent will result 

in high operating temperatures 
and system failure.   (Fig.E)

15 

1

/

16

1


1

/

2

 dia hole

*If electrical outlet 
is in adjacent cabinetry

3

/

16

34


9

/

16

From underside 
of countertop 
to floor

6”

23

1

/16” 

min

Cabinet is 

square 

and plumb

Electrical Access

Fig E

Fig F

Tape measure 

Carpenter square

Electric drill with hole bit 

Gloves

Level

Safety goggles

Flashlight


be

While performing
installations 

described in this


section,


gloves,

safety glasses


or


goggles should  

worn.

FOR YOUR
SAFETY

Содержание Silhouette DBC031D4BSSPR

Страница 1: ...ting instructions before first use of this product PRÉCAUTION Veuillez lire attentivement les consignes de sécurité et les instructions d utilisation avant l utilisation initiale de ce produit Danby Products Limited Guelph Ontario Canada N1H 6Z9 Danby Products Inc Findlay Ohio USA 45840 V1 05 14 1 844 455 6097 ...

Страница 2: ... the Temperature 6 7 Beverage storage 7 s n o i t c u r t s n I f l e h S Installation Instructions Tools You Will Need 8 Preparing the Enclosure 8 Care and Cleaning Helpfull Hints 10 How to Clean the Inside 10 How to Clean the Outside 10 Trouble Shooting Before Your Call For Service 11 3 5 10 11 1 8 Door Swing Reversal 9 Warranty 11 1 12 TABLE OF CONTENTS Function Instruction 6 ...

Страница 3: ...you use and maintain your appliance properly If you received a damaged appliance immediately contact the dealer or builder that sold you the beverage center Save time and money Check the Trouble Shooting section before calling This section helps you solve common problems that may occur If you do need service you can relax knowing help is only a phone call away Toll Free 1 844 455 6097 Write down t...

Страница 4: ...e perishable food items such as but not limited to meats and dairy products in your Beverage Center Store beverages in sealed containers only See door surface cleaning instructions in the Care and Cleaning section s of this manual Do not cover or block any openings on the appliance This appliance is intended for household use only Do not attempt to operate or store this appliance outdoors This app...

Страница 5: ...remove the third ground prong from the power cord Do not use an adapter plug with this appliance Do not use an extension cord with this appliance If the power cord is too short have a qualified electrician or serv ice technician install an outlet near the appliance GROUNDING INSTRUCTIONS IMPORTANT SAFETY INFORMATION Improper use of the grounding plug can result in a risk of electric shock Extreme ...

Страница 6: ...the temperature of the beverage center 3 Magnetic Door Gaskets Tight fitting seals retain all the cooling power and humid ity levels 5 Vertical Towel Bar Handle 6 Front Mounted Exhaust Allows for integrated built in applications 7 Leveling Legs 8 Interior Light not shown Cool White 5 1 3 2 LED lighting illuminates the interior without the heat of an incandescent bulb 6 4 4 Glass shelves ...

Страница 7: ...will automatically be set to 54 F 12 C and will be displayed in the Fahrenheit scale F Function instruction Temperature Memory Function Door Ajar Alarm Function Temperature Alarm Function NOTE In the event of a power interruption the Beverager Center can reme mber the previous temperature settings and when the power is restored the cabinet temperature will go back to the same setting temperature a...

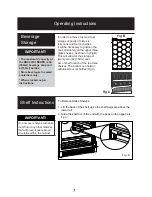
Страница 8: ...s shelves as shown in Fig B This will allow for the storage of twenty two 22 350 ml cans per of shelf in each of the top three shelves The bottom can hold an additional four 4 bottles Fig C s n o i t c u r t s n I f l e h S LJ Fig D J L F To Remove Glass Shelves 1 Lift the back of the shelf up so the shelf pegs are above the lower rail 2 Slide the shelf out of the unit with the pegs on the upper r...

Страница 9: ...equirements Important If the electrical outlet is surface mounted not flush within the enclosure the depth requirement for the installation may be affected The listed depth requirement for the installation is assuming that the electrical outlet is located in the adjacent cabinetry or is flush mounted in the rear wall not surface mounted in the enclosure The rough cabinet opening must be on a level...

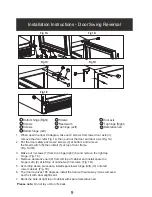
Страница 10: ... Reed switch 5 then install 5 at top of door frame Fig 1A 1B 3 Make out 3 screws 7 from top hinge right 6 and remove the right top hinge Fig 1C 4 Remove decorative nail 9 from left top of cabinet and install spare top hinge Left 8 at left top of cabinet with 3 screws Fig 1D 5 According above procedure install spare lower hinge left 10 onto left lower cabinet Fig 1E 6 The door revolves 180 degrees ...

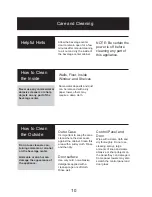
Страница 11: ...clean where the door seals against the cabinet Clean this area with a sudsy cloth Rinse and then dry Door surface Use only mild non abrasive detergents applied with a clean sponge or soft cloth Rinse well Control Panel and Door Wipe with a damp cloth and dry thoroughly Do not use cleaning sprays large amounts of soap and water abrasive or sharp objects on the panel they can damage it Some paper to...

Страница 12: ...y be blown or the circuit breaker tripped Replace fuse or reset circuit breaker Power surge Unplug the beverage center wait a few seconds and then plug it back in Plug not fully inserted into wall outlet Make sure the 3 prong plug is fully inserted into outlet Verify the temperature control setting Ensure that the door is fully closed and that the gasket is sealing against Verify there is nothing ...

Страница 13: ...ly that Danby will be responsible or liable for any spoilage or damage to food or other contents of this appliance whether due to any defect of the appliance or its use whether proper or improper EXCLUSIONS Save as herein provided Danby there are no other warranties conditions representations or guarantees express or implied made or intended by Danby or its authorized distributors and all other wa...

Страница 14: ...e la température 18 Instruction de fonction 18 Entreposage des breuvages 19 Instruction des tabletts 19 Instructions d installation Outils néccesaires 20 Préparation de l enceinte 20 Soin et nettoyage Conseils utiles 22 Comment nettoyer l intérieur 22 Comment nettoyer l extérieur 22 En cas de panne Avant de placer un appel de service 23 Garantie 24 15 17 22 23 13 TABLE DES MATIÈRES 20 Inverse ouve...

Страница 15: ...d des instructions pour vous assister à l utilisa tion et l entretien adéquats de votre centre de breuvages Si votre appareil neuf est avarié Communiquez immédiatement avec le revendeur ou le man ufacturier Épargnez temps et argents Avant de faire un appel de service révisez le chapitre intitulé Dépannage Ce chapitre vous aidera à solu tionner des problèmes com muns qui pourraient survenir Si une ...

Страница 16: ...peurs corrosives dans près de cet appareil N utilisez cet appareil que pour les fins auxquelles il est conçu comme indiqué dans ce guide Ne placez pas les articles périss ables de nourriture dans votre centre de breuvages Pour exam plem les viandes et les produits laitiers Entreposez le vin dans des bouteilles scellées seullement Référez vous aux instructions de nettoyage du fini de la porte se tr...

Страница 17: ...ectrique N utilisez pas d adaptateur de fiche avec cet appareil N utilisez pas de cordon de rallonge avec cet appareil Si le cordon électrique de l ap pareil ne rejoint pas la prise murale faites installer une prise plus rapprochée par un électricien ou un technicien qualifié INSTRUCTIONS DE MISE À LA TERRE INFORMATIONS DE SÉCURITÉ IMPORTANTES AVERTISSEMENT Une mauvaise utilisation de la mise à la...

Страница 18: ...ité à l intérieur du cabinet 4 5 Poignée 6 Échappement sur le Devant Pour des applications intégrées cabinet 7 Pieds de nivellement 8 Lumière Intérieures non illustré S aIllume lorsqu on ouvre la porte du cabinet 1 Portes en Verre Trempé 2 Controls Électroniques Contrôle de la Verre à faible émissivité U r et à bsorber la chaleur 7 5 1 3 2 6 4 Étagères en verre Centre de Breuvages ...

Страница 19: ... autre Si cela se pro duit fréquemment ou dure longtemps vous pouvez éteindre l appareil puis le rallumer pour corriger la situation Si le problème se reproduit après le redémarrage de l ap pareil veuillez communiquer avec le serv ice après vente pour obtenir de l aide Fonction de mémorisation de la température Fonction d alarme de rappel de porte ouverte Si vous oubliez de fermer la porte ou cell...

Страница 20: ...rep osage maximum de trente quatre 66 canettes et quatre 4 bouteilles de vin il sera nécessaire de positionner les canettes en alternance sur les trois clayettes du haut Cela permettra d entreposer dix sept 22 canettes de 355ml Fig B par clayette surcha cune des trois clayettes supérieures La tablette inférieure peut contenir quatre 4 boutrilles supplémentaires Fig C D g i F Pour retirer les étagè...

Страница 21: ...tagères de glisser dehors comme supposé et peut endommager la garniture de porte empêchera les étagères de glisser dehors comme supposé et peut endommager la garniture de porte L ouverture brute de l armoire doit être sur une surface niveau avec le plancher et d au moins D SULVH PXUDOH SHXW rWUH SODFp de l un ou l autre côté si la prise murale n est pas dans l ouverture d installation ou de l arri...

Страница 22: ...sus du cadre de la porte 3 Enlevez 3 vis 8 de la charnière supérieure droite 6 et enlevez la charnière supérieure droite fig 1C 4 Enlevez le clou décoratif 10 du coin supérieur gauche du cabinet et installez la charnière supérieure gauche supplémentaire 9 dans le coin supérieur gauche de l armoire au moyen de 3 vis fig 1D 5 En suivant la procédure décrite ci dessus installez la charnière inférieur...

Страница 23: ...r et puis séchez Surface du Porte N utilisez que des détergents doux non abrasifs appliqués avec une éponge propre ou un chiffon doux Rincez abondam ment Panneau de com mande et Porte Essuyez avec un chiffon humide Asséchez bien avec un chiffon sec N utilisez pas de nettoyants en aérosol de grandes quantités d eau et de savon d abrasifs ou d objets acérés sur le panneau ceci pourrait l endommager ...

Страница 24: ...tableau d affichage La porte n est pas fermée hermétiquement Assurez vous que la porte soit hermétiquement fermée Fuite dans le système panne du ventilateur de l évaporate ur panne du ventilateur du compresseur Communiquez avec le centre de services Pour interrompre le signal sonore de l alarme débranchez l appareil L alarme émet un bip et on peut lire LO sur le panneau d affichage Panne du capteu...

Страница 25: ...e garantie condition ou représentation qu elle soit exprimée ou tacite de façon manifeste ou intentionnelle par Danby ou ses distributeurs agréés De même sont exclues toutes les autres garanties conditions ou représentations y compris les garanties conditions ou représentations en vertu de toute loi régissant la vente de produits ou de toute autre législation ou règlement semblables En vertu de la...

Страница 26: ...the TOLL FREE NUMBER When requesting service or ordering parts always provide the following information Product Type Model Number Part Description Centre de Breuvages Le numéro de modèle se trouve sur la plaque signalétique au dos de l unité Vous pouvez vous procurer commander toute pièce de rechange chez votre dépositaire le plus rapproché Pour toute demande de service ou pour localiser le déposi...

Отзывы: