INSTALLATION INSTRUCTIONS
10
WALL MOUNTED INSTALLATION
Find a safe location to install the fi replace. To prevent fi re there must be
a minimum clearance of 50 cm (20 inches) on the sides and bottom and
100 cm (40 inches) on the top of the unit.
Choose a location near an outlet so an extension cord is not required.
Do not position the fi replace directly below a power outlet.
WARNING: Prior to wall mounting, check the wall to ensure that there
are no wires, pipes or similar in the area where holes will be drilled.
WARNING: Ensure the fi replace is unplugged prior to installation,
moving and assembling.
WARNING: This fi replace cannot be recessed into a hollow wall cavity.
Mountings must be secured to a solid wall surface such as plaster board
or drywall that is supported by studs spaced no more than 24 inches (60
cm) apart.
Note: Ensure the feet are not installed before attempting a wall
installation.
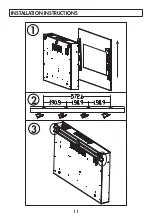
1. The glass should be removed before installation. Remove the two
screws on the left and right side of the glass and then lift the glass
panel upward to remove it.
2. Attach the wall hanging bracket to the wall using four 4x45 mm
screws and four screw expansion brackets. The screw holes should be
190.9 mm (7.5 inches) apart. Ensure that at least one screw enters a
wall stud.
3. Lift the fi replace into position using two people. Ensure that the tabs
on the back of the fi replace securely engage with the slots provided.
Use two 4 x 12 mm screws to attach the fi replace to the wall hanging
bracket. There is one screw on each side of the panel.
4. Replace the glass on the front of the fi replace, ensuring the locating
tabs engage securely in their corresponding slots and that the screws
are tightened.
5. Plug the fi replace into a 120V outlet.
Содержание DDEF03813BD13
Страница 12: ...11 INSTALLATION INSTRUCTIONS 1 2 3 ...
Страница 26: ...25 INSTRUCTIONS D INSTALLATION 1 2 3 ...
Страница 40: ...INSTRUCCIONES DE INSTALACIÓN 39 1 2 3 ...


