Replacing Parts
23
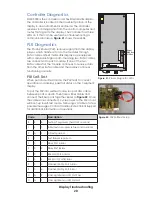
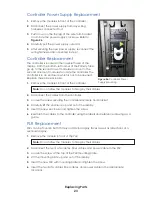
Controller Power Supply Replacement
1�
Remove the modules in front of the controller.
2�
Disconnect the power supply from any wiring
harnesses connected to it.
3�
Push down on the top leg of the wire form bracket
and rotate the power supply clockwise. Refer to
.
4�
Carefully pull the power supply outward.
5�
After securing the new power supply, reconnect the
wiring harnesses disconnected in step 1.
Controller Replacement
The controller is located in the lower-left area of the
display. From the bottom-left corner of the Primary face,
go up to the second row of modules and over to the
second column of modules to locate the controller. The
controller is in an enclosure which is not to be opened.
Replace the entire enclosure.
1�
Remove the modules in front of the controller.
Note:
Do not allow the modules to hang by their cables.
2�
Disconnect the cables from the controller.
3�
Loosen the screw securing the controller enclosure and bracket.
4�
Carefully lift the enclosure up and out of the display.
5�
Insert the new enclosure and tighten the screw.
6�
Reattach the cables to the controller using the labels and reference drawings as a
guide.
PLR Replacement
PLRs can be found in both Primary and Mirror display faces as well as all sections of a
sectional display.
1�
Remove the module in front of the PLR.
Note:
Do not allow the modules to hang by their cables.
2�
Disconnect the two SATA cables, fiber cables, and power cable to the PLR.
3�
Loosen the screw at the top of the PLR mounting plate.
4�
Lift the mounting plate up and out of the display.
5�
Insert the new PLR with mounting plate and tighten the screw.
6�
Insert the two SATA cables, fiber cables, and power cable in the appropriate
locations.
Figure 26:
Controller Power
Supply Mounting
Содержание Large Matrix Galaxy GT6X Series
Страница 4: ...This page intentionally left blank...
Страница 30: ...This page intentionally left blank...
Страница 32: ...Daktronics Warranty and Limitation of Liability 28...


