


- 8 -
11. Key Lock Switch
–
Turn the key to the 12
o’clock position and remove key to lock out
power from the control panel.
12. Emergency Stop Switch
–
Press to stop the machine. Turn knob 90° to reset
.
MANUAL CUTTING, TABLE
STATIONARY
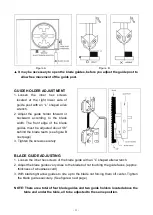
1. Adjust table all the way forward
2. Make sure
“Auto-stop” is off.
3. Depress the motor start button
4. Adjust your blade speed.
5. Begin free hand cutting.
AUTOMATIC CUTTING
Please make sure that the
“Auto Stop” switch is in the
“OFF”
position before making
this adjustment.
1. Turn
“pressure selector knob” all the way to the maximum. (3 o’clock setting)
2. Depress manual forward and reverse buttons to make table travel. Adjust limits as
follows.
3. Adjust the forward limit switch to the position (B) where you want the cut to stop. Adjust
knob to just trip the limit switch.
4. Adjust the reverse limit switch to the position (A) where you want the cut to start. Adjust
knob to just trip limit switch.
5. Adjust table to the start position, load material, set
“pressure selector knob” to the
minimum
(9 o’clock) position that forces the table travel to start at a slow rate
6.
Depress “machine start switch”. (Adjust blade speed if needed) Using the manual
reverse switch run the blade up to the material.
7.
Depress “automatic” button, to make the table travel and slowly start cutting the work
piece. Adjust to proper cutting pressure. Adjust
“pressure selecting knob” to the
position where the work is being cut safely and efficiently.
8. At the end of the cut the blade will keep running and back itself out of the cut. Shut the
blade off with main motor off button.
9.
To stop the blade at the end of cut switch “Auto Stop switch on when the cut starts.
Remove piece and turn off Auto Stop. Blade and table movement will shut off at the
end of the cut.
CONTINUOUS CUTTING
Set up stops as mentioned above. Depress
“continuous cutting switch”, this will provide a