


EDUS041016
Installation Manual
Room Air Conditioners J-Series
33
9
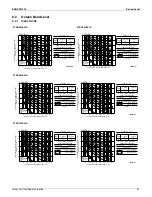
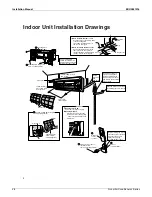
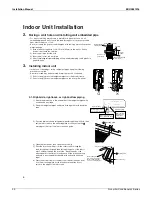
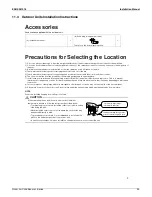
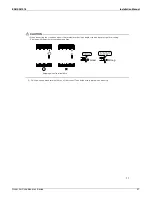
5-5. Prepare the accessory (separate product) [Figure 2].
1) Remove the cover from the accessory (separate product).
2) Insert the connection cord into connector “S21” (white) in the accessory (separate product).
3) Route each of the connection cords through the cut-outs in the accessory, then reinstall the accessory cover in its
original position.
4) Insert the accessory (separate product) connector into connector “S403” in the indoor unit electrical component box.
Then route the connection cord through the cut-out in the indoor unit electrical component box.
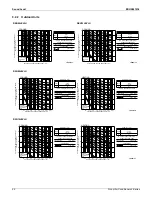
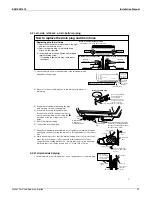
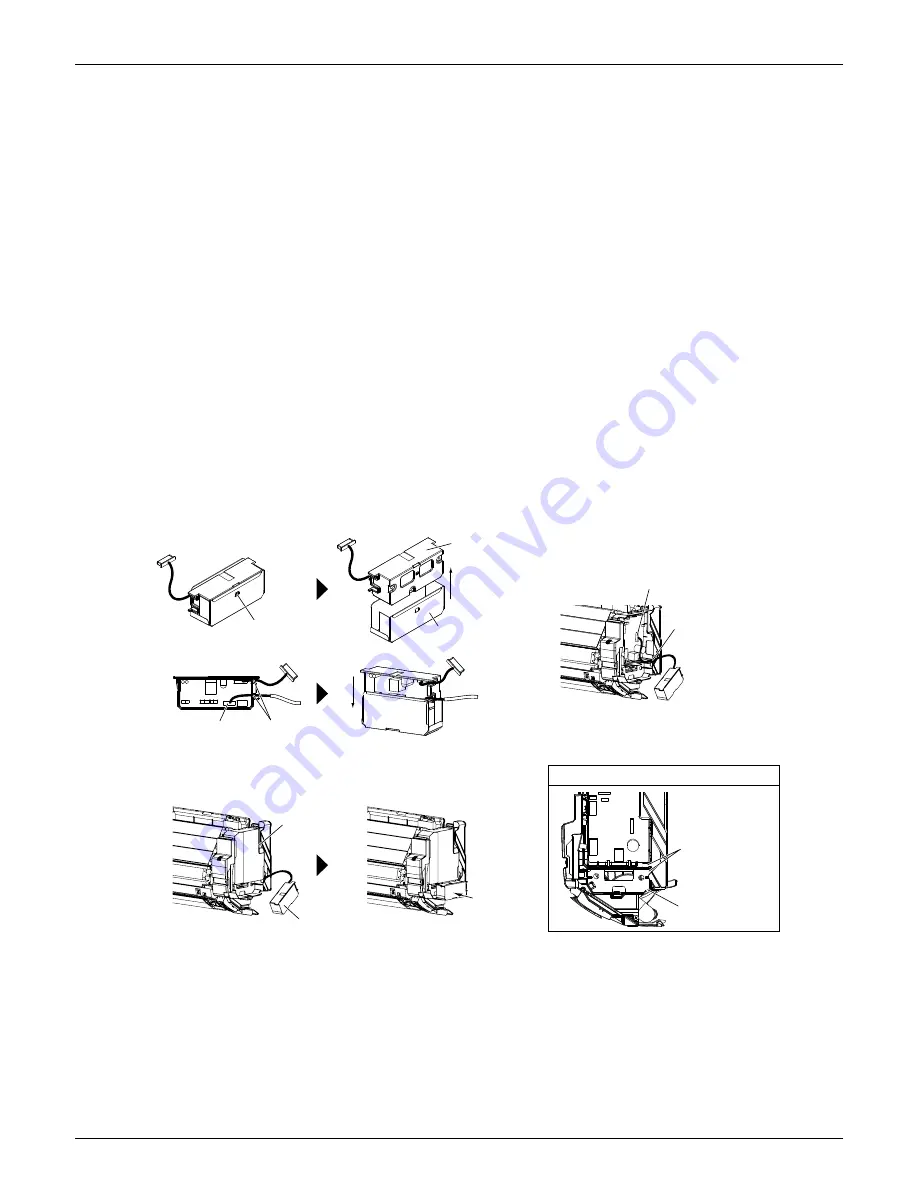
5-6. Install the cover of the electrical component box in its original position [Figure 3].
5-7. Install the accessory (separate product) [Figure 3].
1) Install the accessory (separate product) into the indoor unit electrical component box.
2) Route the connection cord as shown in [Figure 3].
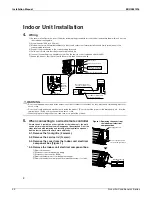
* 5-8. Install the indoor unit electrical component box in its original position.
1) Install the louver.
2) Install the electrical component box (1 screw).
3) Install the thermistor in its original position on the heat exchanger.
4) Install the connector (S200) in its original position.
5) Connect the communication wiring in its original position.
5-9. Install the front grille in its original position (2 screws).
5-10. Install the service lid (1 screw).
Disengage the tab.
Remove the accessory cover.
Route each of the
connection cords.
Insert “S403”.
Route the connection
cords through the cut-outs.
“S21”
Accessory
Accessory
Accessory cover
Accessory
cover
Install the accessory.
Install the accessory cover
in its original position.
Cut-out for the “S403”
connection
Cut-out for the
connection cord
Figure 2: Preparing the accessory
Figure 3: Installing the accessory
Cut-outs for the connection cords
Содержание J Series
Страница 1: ...EDUS041016 J Series Cooling Only Heat Pump SEER 13 Models ...
Страница 53: ...Operation Manual EDUS041016 52 Room Air Conditioners J Series 12 2 Operation Instructions ...
Страница 54: ...EDUS041016 Operation Manual Room Air Conditioners J Series 53 ...
Страница 55: ...Operation Manual EDUS041016 54 Room Air Conditioners J Series ...
Страница 56: ...EDUS041016 Operation Manual Room Air Conditioners J Series 55 ...
Страница 57: ...Operation Manual EDUS041016 56 Room Air Conditioners J Series ...
Страница 58: ...EDUS041016 Operation Manual Room Air Conditioners J Series 57 ...
Страница 59: ...Operation Manual EDUS041016 58 Room Air Conditioners J Series ...
Страница 60: ...EDUS041016 Operation Manual Room Air Conditioners J Series 59 ...
Страница 61: ...Operation Manual EDUS041016 60 Room Air Conditioners J Series ...
Страница 62: ...EDUS041016 Operation Manual Room Air Conditioners J Series 61 ...
Страница 63: ...Operation Manual EDUS041016 62 Room Air Conditioners J Series ...
Страница 64: ...EDUS041016 Operation Manual Room Air Conditioners J Series 63 ...
Страница 65: ...Operation Manual EDUS041016 64 Room Air Conditioners J Series ...
Страница 66: ...EDUS041016 Operation Manual Room Air Conditioners J Series 65 ...
Страница 67: ...Operation Manual EDUS041016 66 Room Air Conditioners J Series ...
Страница 68: ...EDUS041016 Operation Manual Room Air Conditioners J Series 67 ...
Страница 69: ...Operation Manual EDUS041016 68 Room Air Conditioners J Series ...
Страница 70: ...EDUS041016 Operation Manual Room Air Conditioners J Series 69 ...
Страница 71: ...Operation Manual EDUS041016 70 Room Air Conditioners J Series ...
Страница 72: ...EDUS041016 Operation Manual Room Air Conditioners J Series 71 ...
Страница 73: ...Operation Manual EDUS041016 72 Room Air Conditioners J Series ...
Страница 74: ...EDUS041016 Operation Manual Room Air Conditioners J Series 73 ...
Страница 75: ...Operation Manual EDUS041016 74 Room Air Conditioners J Series ...
Страница 76: ...EDUS041016 Operation Manual Room Air Conditioners J Series 75 ...
Страница 77: ...Operation Manual EDUS041016 76 Room Air Conditioners J Series 3P253185 2 ...


