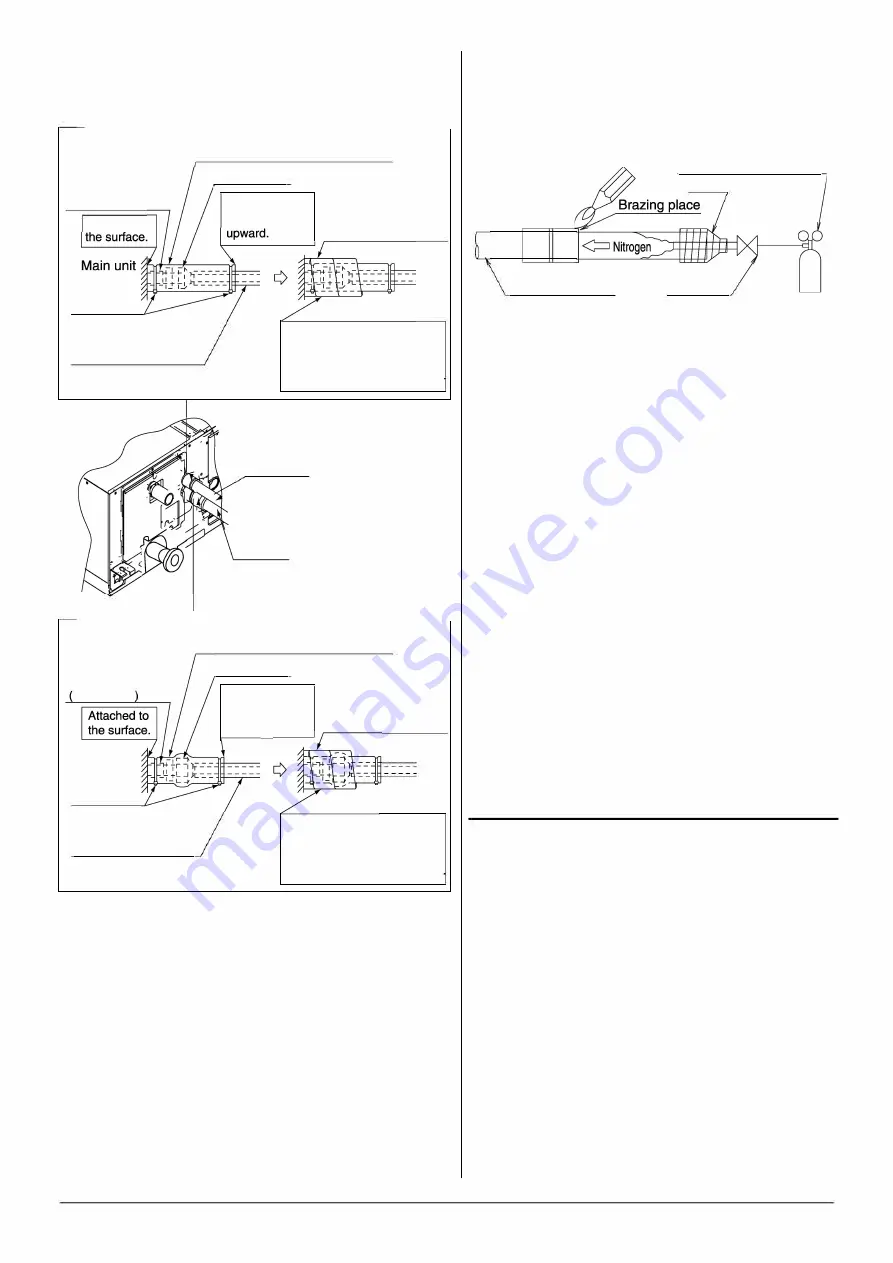
On completion of installation work, check that there is no gas
leakage. Refer to the illustrations on the right hand side and be sure
to perform heat insulation work on the piping joints after gas leakage.
(Refer Fig.8)
Heat insulation procedure for liquid piping------�
Insulation material
for piping
(on unit side)
Attached to
Clamp (7)
(accessory)
Insulating material
for piping (field supply)
Insulation for fitting (3) (accessory)
Flare nut joint
Make sure that
the seam faces
Middle sealing pad (6)
(accessory)
Wrap the insulation material
around the portion from the
surface of the main unit to the
upper part of the flare nut joint
Liquid pipe
Gas pipe
Heat insulation procedure for gas piping
------�
Insulation for fitting (4) (accessory)
Insulation material
for piping
on unit side
Clamp (7)
(accessory)
Insulating material
for piping (field supply)
Flare nut joint
Make sure that
the seam faces
Middle sealing pad (6)
upward.
(accessory)
Fig. 8
Wrap the insulation material
around the portion from the
surface of the main unit to the
upper part of the flare nut joint
• Use the insulation for fitting (3) and (4) provided to
the liquid piping and gas piping,
respectively and conduct heat insulation work.
(Tighten both edges of the insulation for fitting(3)
and (4) for each joint with clamp(?)).
• Make sure that the joint of the insulation for
fitting(4) and (5) for the joint on the liquid piping
and gas piping side faces upwards.
• Wrap the middle sealing material(6) around the insulation for
fitting (3) and (4) for the joint (flare nut part).
8
• Before brazing refrigerant piping, have nitrogen flow
through the refrigerant piping and substitute air with nitro
gen (NOTE 1)
(Refer to Fig. 9).
Then, carry out brazing
(NOTE 2).
After all the brazing works are finished carry out flare
connection with the indoor unit.
(Refer to Fig. 8)
Pressure reducing valve
Refrigerant piping
Fig.9
NOTE
_;DI
Taping
Stop valve
Nitrogen
1. The proper pressure for having nitrogen flow through the
piping is approximately 0.02 MPa, a pressure that makes
one feel like slight breeze and can be obtained through a
pressure reducing valve.
2. Do not use flux when brazing refrigerant piping.
Use phosphor copper brazing filler metal (BCuP-2: JIS Z
3264/B-Cu93P-710/795: ISO 3677) that does not require
flux.
(If chlorinated flux is used, the piping will be corroded and,
in addition if fluorine is contained, the refrigerant oil will
be deteriorated and the refrigerant circuit will be affected
badly.)
3. When carrying out leakage test of refrigerant piping and
the indoor unit after the installation of indoor unit is fin
ished, confirm the connecting outdoor unit installation
manual for test pressure.
Refer to also the outdoor unit installation manual or techni
cal document for refrigerant piping.
4. In case of refrigerant shortage due to forgetting additional
refrigerant charge etc., it will result in malfunction such as
does not cool .
Refer to the outdoor unit installation manual or technical
document for refrigerant piping.
-&
CAUTION----------
Do not use antioxidant when brazing piping.
It may result in malfunction of components and clogging of
piping due to residue.
7. DRAIN PIPING WORK
(1) Carry out drain piping.
Carry out drain piping so that drainage is ensured.
• Select the piping diameter equal to or larger than
(except for riser) that of the connection piping (polyvinyl
chloride piping, nominal diameter 25 mm, outside
diameter 32 mm).
• Install the drain piping as short as possible with down
ward inclination of 1/100 or more and such that
air may not stagnate.
(Refer to Fig. 10)
Содержание FDMA125AV16
Страница 22: ...4 15 3 30 RZA125AV16 RZA140AV16 RZA125AV16 RZA140AV16...
Страница 50: ...49...
Страница 51: ...50...
Страница 52: ...51...
Страница 53: ...52...
Страница 54: ...53...
Страница 55: ...54 49 48 49 50 50...
Страница 56: ...55...
Страница 58: ...MEMO...
Страница 59: ...MEMO...
Страница 60: ...MEMO 3P727715 6 B...


