background image

7 Configuration

Installation manual

13

EKHWET90~120BAV3
R32 Split series – Domestic hot water tank
4P680074-1 – 2021.11

D

D

X8M

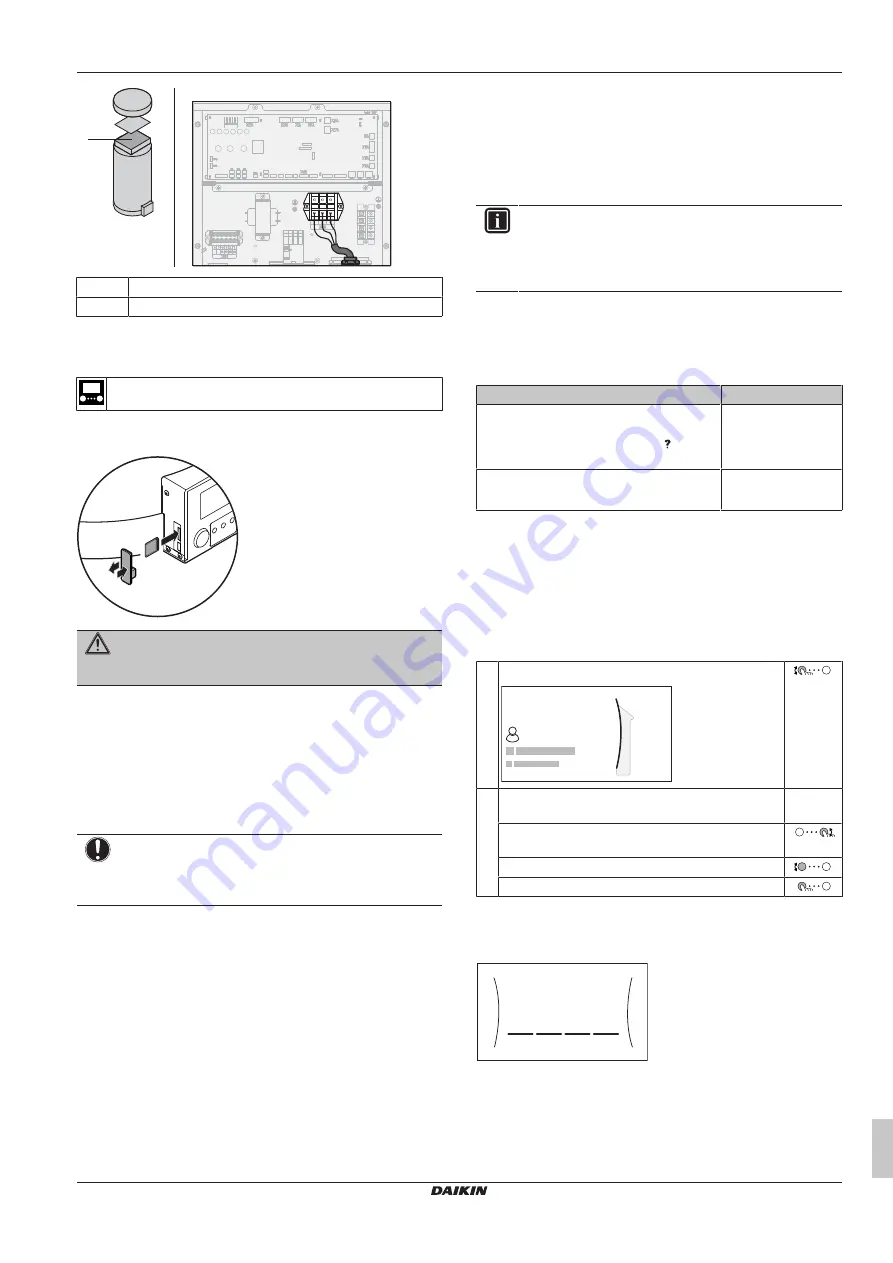
a Booster heater power supply cable

b Field wiring

6.3.3

To connect the WLAN cartridge (delivered
as accessory)

[D] 

Wireless gateway

1

Insert  the  WLAN  cartridge  into  the  cartridge  slot  on  the  user
interface of the indoor unit.

WARNING

In  order  to  keep  IPX3,  the  rubber  part  must  be  correctly
fixed after WLAN installation.

7

Configuration

7.1

Overview: Configuration

This  chapter  describes  what  you  have  to  do  and  know  to  configure
the system after it is installed.

NOTICE

This  chapter  explains  only  the  basic  configuration.  For
more  detailed  explanation  and  background  information,
see the installer reference guide.

Why

If you do NOT configure the system correctly, it might NOT work as
expected. The configuration influences the following:

▪ The calculations of the software

▪ What you can see on and do with the user interface

How

You can configure the system via the user interface.

First  time  –  Configuration  wizard.

  When  you  turn  ON  the  user

interface  for  the  first  time  (via  the  unit),  the  configuration  wizard
starts to help you configure the system.

Restart  the  configuration  wizard.

  If  the  system  is  already

configured, you can restart the configuration wizard. To restart the
configuration 

wizard, 

go 

to 

Installer 

settings


>

Configuration  wizard

.  To  access 

Installer  settings

,  see

"7.1.1 To access the most used commands"

 [

4

 13].

Afterwards.

  If  necessary,  you  can  make  changes  to  the

configuration in the menu structure or the overview settings.

INFORMATION

When  the  configuration  wizard  is  finished,  the  user
interface  will  show  an  overview  screen  and  request  to
confirm.  When  confirmed,  the  system  will  restart  and  the
home screen will be displayed.

Accessing settings – Legend for tables

You  can  access  the  installer  settings  using  two  different  methods.
However,  NOT  all  settings  are  accessible  via  both  methods.  If  so,
the  corresponding  table  columns  in  this  chapter  are  set  to  N/A  (not
applicable).

Method

Column in tables

Accessing settings via the breadcrumb in the

home menu screen

 or the 

menu structure

.

To enable breadcrumbs, press the   button
in the home screen.

#

For example: [5.5]

Accessing settings via the code in the

overview field settings

.

Code

For example: [6-0D]

See also:

"To access the installer settings"

 [

4

 14]

"7.5 Menu structure: Overview installer settings"

 [

4

 17]

7.1.1

To access the most used commands

To change the user permission level

You can change the user permission level as follows:

1

Go to [B]: 

User profile

.

User profile

B

2

Enter the applicable pin code for the user permission
level.

▪ Browse  through  the  list  of  digits  and  change  the

selected digit.

▪ Move the cursor from left to right.

▪ Confirm the pin code and proceed.

Installer pin code

The 

Installer

  pin  code  is 

5678

.  Additional  menu  items  and

installer settings are now available.

5678

Installer

Advanced user pin code

The 

Advanced user

 pin code is 

1234

. Additional menu items for the

user are now visible.

Содержание EKHWET90BAV3

Страница 1: ...Installation manual R32 Split series Domestic hot water tank English Installation manual R32 Split series Domestic hot water tank EKHWET90BAV3 EKHWET120BAV3 https daikintechnicaldatahub eu...

Страница 2: ...trukcij atbilst d m direkt v m vai regul m ja vien ie izstr d jumi tiek lietoti saska ar m su instrukcij m s v zhode s nasleduj cou imi smernicou ami alebo predpisom mi za predpokladu e sa v robky pou...

Страница 3: ...or test run 18 9 Hand over to the user 19 10 Technical data 20 10 1 Piping diagram Indoor unit 20 10 2 Wiring diagram Indoor unit 21 1 About this document Target audience Authorised installers Documen...

Страница 4: ...ng the indoor unit see 4 3 Mounting the indoor unit 410 WARNING Fixing method of the indoor unit MUST be in accordance with the instructions from this manual See 4 3 Mounting the indoor unit 410 Pipin...

Страница 5: ...g ambient temperatures Domestic hot water production 5 35 C Mind the following spacing installation guidelines 300 300 300 300 400 mm 300 300 Additionally to the spacing guidelines Because the total r...

Страница 6: ...ease height From floor to 100 mm below top of the unit N A Not applicable Minimum floor area Release height The minimum floor area requirements depend on the release height of the refrigerant in case...

Страница 7: ...d Must be 50 of Anv min minimum bottom opening area Must be 1 5 m from the floor A B Anv Anv min Min 50 of Anv min Calculate the total floor area Atotal AroomA AroomB See table 4 Look up the minimum b...

Страница 8: ...or area m 2 00 4 00 6 00 8 00 10 00 12 00 14 00 2 2 4 88 2 49 1 70 1 47 2 3 5 10 2 60 1 77 1 53 1 38 2 4 5 32 2 71 1 84 1 59 1 43 2 5 5 53 2 82 1 91 1 65 1 49 1 37 2 6 5 75 2 93 1 99 1 71 1 54 1 42 Ta...

Страница 9: ...a as specified in the table below 50 of the required opening area Anv min must be 200 mm from the floor of the unoccupied room The bottom of the opening must be 100 mm from the floor of the unoccupied...

Страница 10: ...ce when connecting the field piping and make sure the piping is aligned properly Deformation of the piping can cause malfunctioning of the unit For information related with piping length diameter conn...

Страница 11: ...the indoor unit a b a DHW hot water OUT screw connection b DHW cold water IN screw connection NOTICE A pressure relief valve field supply with an opening pressure of maximum 7 bar 0 7 MPa must be inst...

Страница 12: ...heater power supply Booster heater cable Wires 2 GND 1 5 mm 9 4 Booster heater WARNING The booster heater MUST have a dedicated power supply and MUST be protected by the safety devices required by th...

Страница 13: ...tings see 7 1 1 To access the most used commands 413 Afterwards If necessary you can make changes to the configuration in the menu structure or the overview settings INFORMATION When the configuration...

Страница 14: ...rotective functions The unit is equipped with the following protective function Tank disinfection 2 01 The unit automatically runs the protective function when necessary During installation or service...

Страница 15: ...ue When you later want to change the storage setpoint you only have to do it in one place The tank will heat up until the storage comfort temperature has been reached It is the higher desired temperat...

Страница 16: ...fine the weather dependent curve by its slope and offset Change the slope to differently increase or decrease the target temperature of the tank for different ambient temperatures For example if tank...

Страница 17: ...Cold Hot You feel Fine tune with slope and offset At regular outdoor temperatures At cold outdoor temperatures Slope Offset Hot OK Hot Cold Hot Hot See 7 3 3 Slope offset curve 416 To fine tune the w...

Страница 18: ...ly installed protection devices are installed according to this document and have NOT been bypassed The power supply voltage matches the voltage on the identification label of the unit There are NO lo...

Страница 19: ...inished and the unit operates properly please make sure the following is clear for the user Fill in the installer setting table in the operation manual with the actual settings Make sure that the user...

Страница 20: ...aikin website publicly accessible The full set of latest technical data is available on the Daikin Business Portal authentication required 10 1 Piping diagram Indoor unit R5T a1 c a2 R3T b1 b2 3D13820...

Страница 21: ...h box Multi DHW Tank switch box Multi domestic hot water tank switch box Indoor Indoor Outdoor Outdoor SWB Switch box 2 Legend 2 Legend A1P Main PCB F2B Overcurrent fuse booster heater FU1 A1P fuse 5...

Страница 22: ...wiring Power supply OUTDOOR UNIT X1M 1 2 3 earth 4 core X2M 1 2 3 earth INDOOR UNIT 1 1 booster heater power supply 1 2 kW 230 V earth STANDARD PART X1M L N earth Only for normal power supply installa...

Страница 23: ......

Страница 24: ...4P680074 1 2021 11 Copyright 2021 Daikin 4P680074 1 0000000N Verantwortung f r Energie und Umwelt...

Отзывы: