background image


19

Click the mark manager button 

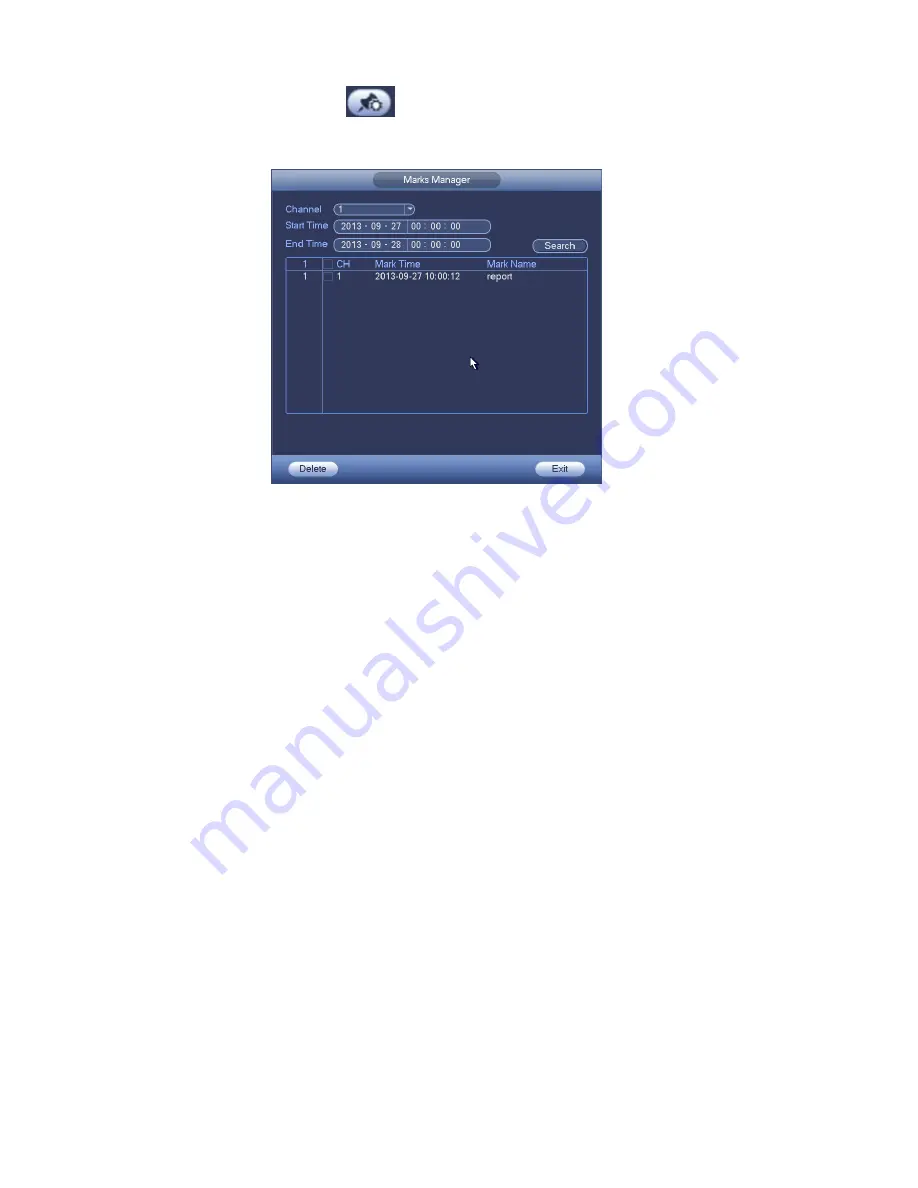
 on the Search interface (Figure 2-6); you can go to Mark 

Manager interface. See Figure 2-10. System can manage all the record mark information of 
current channel by default. You can view all mark information of current channel by time.  


Figure 2-10 

z

 Modify 

Double click one mark information item, you can see system pops up a dialogue box for you to 
change mark information. You can only change mark name here.  

z

 Delete 

Here you can check the mark information item you want to delete and then click Delete button, 
you can remove one mark item. .  
 

Note 

z

  After you go to the mark management interface, system needs to pause current playback. 

System resumes playback after you exit mark management interface.  

z

  If the mark file you want to playback has been removed, system begin playbacking from the 

first file in the list.   


2.6


Schedule  

Note:  

You need to have proper rights to implement the following operations. Please make sure the 
HDDs have been properly installed. 
After the system booted up, it is in default 24-hour regular mode. You can set record type and 
time in schedule interface. 
 
In the main menu, from Setting->Storage->Schedule, you can go to schedule menu. See 
Figure 2-14. 

Please note you need to go to main menu->Setting->System->General->Holiday to set 
holiday date first, otherwise, there is no holiday setup item. 

Содержание HDCVI series

Страница 1: ...Standalone DVR Quick Start Guide Version 1 0 0...

Страница 2: ...Output Connection 4 1 9 1 Alarm Input and Output Details 4 1 9 2 Alarm Input Port 5 1 9 3 Alarm Output Port 5 2 Overview of Navigation and Controls 7 2 1 Boot up Shut Down 7 2 1 1 Boot up 7 2 1 2 Shut...

Страница 3: ...2 Trigger Snapshot 25 2 7 3 Priority 26 2 7 4 Image FTP 26 2 8 Network 27 2 9 Pan Tilt Zoom 29 2 9 1 PTZ Setup 29 2 9 2 PTZ Operation 30 3 Web Operation 32 3 1 Network Connection 32 3 2 Login 32 3 3...

Страница 4: ...wards Handle with care Do not apply power to the DVR before completing installation Do not place objects on the DVR 4 Qualified engineers needed All the examination and repair work should be done by t...

Страница 5: ...cluded in the resource CD The model label in the front panel is very important please check according to your purchase order The label in the rear panel is very important too Usually we need you to re...

Страница 6: ...is 15cm 6 inches space around the device to guarantee sound ventilation z Please install from the bottom to the top z If there are more accessories connected in the rack please take precaution measure...

Страница 7: ...input port 9 DB25 port the 5th to the 16th channel audio input port 10 Audio output 11 Bidirectional talk input port 12 Bidirectional talk output port 13 Alarm input alarm output RS485 port 14 Video V...

Страница 8: ...amount according to the ports on the rear panel Please note the following contents are based on our 2U series product For detailed operation instruction of other series products please refer to the Us...

Страница 9: ...ol devices such as PTZ Please parallel connect 120T between A B cables if there are too many PTZ decoders 1 9 2 Alarm Input Port Please refer to the following sheet for more information z Normal open...

Страница 10: ...12V it can be used to provide power to devices such as reset smoke sensor z To avoid overloading please read relay parameters sheet in the User s Manual carefully z RS485 A B cable is for the A B cabl...

Страница 11: ...e z When you see corresponding dialogue box System is shutting down Do not click power on off button directly z Do not unplug the power cable or click power on off button to shutdown device directly w...

Страница 12: ...counts z Username admin Password admin administrator local and network z Username 888888 Password 888888 administrator local only z Username 666666 Password 666666 Lower authority user who can only mo...

Страница 13: ...dle button to control window split You can use mouse middle button to switch window split amount Preview Control The preview control function has the following features z Support preview playback In t...

Страница 14: ...ent channel to the USB device System can not backup the video of multiple channel at the same time Click button system begins recording Click it again system stops recoridng You can find the record fi...

Страница 15: ...ion System supports main stream and sub stream There are three statuses schedule manual stop Please highlight icon to select corresponding channel z Manual The highest priority After manual setup all...

Страница 16: ...tion 2 5 Search Playback Click search button in the main menu or right click mouse and then select Search button when you are previewing search interface is shown as below See Figure 2 6 Usually there...

Страница 17: ...support picture backup function but it supports picture playback function You can select to play from redundancy HDD if there are pictures on the redundancy HDD 3 Calendar zThe blue highlighted date...

Страница 18: ...ick the button to view the locked file zReturn Click button system goes back to the calendar and channel setup interface Please note zFor the file that is writing or overwriting it can not be locked P...

Страница 19: ...setting the configuration The time bar zooms in the period of the current playback time when you are playing the file 11 Backup z Select the file s you want to backup from the file list You can check...

Страница 20: ...e same period of the corresponding channel to play 16 Digital zoom When the system is in full screen playback mode left click the mouse in the screen Drag your mouse in the screen to select a section...

Страница 21: ...ner to search records by time See image on the left side of the Figure 2 8 For example input time 11 00 00 and then click Search button you can view all the record files after 11 00 00 The records inc...

Страница 22: ...ideo information z Add Mark When system is playback click Mark button you can go to the following interface See Figure 2 9 Figure 2 9 z Playback Mark During 1 window playback mode click mark file list...

Страница 23: ...m Note z After you go to the mark management interface system needs to pause current playback System resumes playback after you exit mark management interface z If the mark file you want to playback h...

Страница 24: ...m can pre record the video before the event occurs into the file The value ranges from 1 to 30 seconds depending on the bit stream z Redundancy System supports redundancy backup function You can highl...

Страница 25: ...previous menu There are color bars for your reference Green color stands for regular recording yellow color stands for motion detection and red color stands for alarm recording The white means the MD...

Страница 26: ...interface Figure 2 16 You can see current channel name is grey such as channel 1 Now you can select the channel you wan to paste such as channel 5 6 7 If you wan to save current setup of channel 1 to...

Страница 27: ...nnel is recording now current setup will get activated right away the current file will be packet and form a file then system begins recording as you have just set After all the setups please click sa...

Страница 28: ...24 Please refer to the following figure for detailed information Figure 2 17 Figure 2 18...

Страница 29: ...alarm occurred z In main menu from Setting Camera Encode Snapshot interface here you can input snapshot mode as trigger size quality and frequency See Figure 2 20 z In main menu from Setting Event De...

Страница 30: ...two types at the same time system can activate the activation snapshot when alarm occurs and otherwise system just operates the schedule snapshot 2 7 4 Image FTP In the main menu from Setting Network...

Страница 31: ...from 0 to 128 It is to mark a specified network MAC address Usually it includes an organization of multiple level z Default gateway Here you can input the default gateway Please note system needs to c...

Страница 32: ...address mode eth0 and eth1 operate separately You can use the services such as HTTP RTP service via etho0 or the eth1 usually you need to set one default card default setup is etho to request the auto...

Страница 33: ...ence may be found in the user s interface due to various protocols z Please make sure the speed domes A B cables are properly connected to the A B ports of DVR z You have properly set PTZ information...

Страница 34: ...ud rate Select baud rate z Data bit Select data bit Default value is 8 z Stop bit Select stop bit Default value is 1 z Parity There are three choices none odd even Default value is none Figure 2 26 Af...

Страница 35: ...8 In Figure 2 28 please click direction arrows See Figure 2 29 to adjust PTZ position There are total 8 direction arrows Please note if you use remote control you can use just four directions Up down...

Страница 36: ...ers such as Safari fire fox browser Google browser Device supports multiple channel monitor PTZ control DVR parameter setup on the Apple PC 3 2 Login Open IE and input DVR address in the address colum...

Страница 37: ...e LAN mode after you logged in you can see the main window See Figure 3 3 Click the channel name on the left side you can view the real time video Figure 3 3 3 3 2 WAN Login In WAN mode after you logg...

Страница 38: ...34 Figure 3 4 For detailed operation information please refer to the User s Manual included in the resources CD...

Страница 39: ...ments contained in products will not leak or mutate so that the use of these substances or elements will not result in any severe environmental pollution any bodily injury or damage to any assets The...

Отзывы: