


EN - 21
stainless steel for a long time.
Cleaning Painted Surfaces (if available)
•
Spots of tomato, tomato paste, ketchup,
lemon, oil derivatives, milk, sugary
foods, sugary drinks and coffee should
be cleaned with a cloth dipped in warm
water immediately. If these stains are
not cleaned and allowed to dry on the
surfaces they are on, they should NOT
be rubbed with hard objects (pointed
objects, steel and plastic scouring wires,
surface-damaging dish sponge) or
cleaning agents containing high levels
of alcohol, stain removers, degreasers,
surface abrasive chemicals. Otherwise,
corrosion may occur on the powder
painted surfaces, and stains may occur.
The manufacturer will not be held
responsible for any damage caused
by the use of inappropriate cleaning
products or methods.
5.2
maintenance
WARNING:
The maintenance of this
appliance should be carried out by an
authorised service person or qualified
technician only.
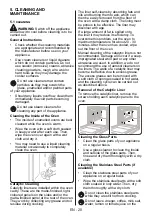
Changing the Oven Lamp
WARNING:
Switch off the appliance
and allow it to cool before cleaning
your appliance.
•
Remove the glass lens, then remove the
bulb.
•
Insert the new bulb (resistant to 300 °C)
to replace the bulb that you removed
(230 V, 15-25 Watt, Type E14).
•
Replace the glass lens, and your oven
is ready for use.
•
The product contains a light source of
energy efficiency class G.
•
Light source can not be replaced by end
user. After sales service is needed.
•
The included light source is not intended
for use in other applications.
Replaceable light source by a
professional
The lamp is designed specifically for
use in household cooking appliances.
It is not suitable for household room
illumination.
•
Do not try to scrape the lime residues
that may form on the floor of the
oven. Otherwise, the oven floor will be
damaged.
•
In order to dissolve any lime that may
form on the floor of the oven, pour 200-
250 ml of white vinegar with an acid
ratio of not more than 6% onto the oven
floor after every 2 or 3 uses and wait for
30 minutes. Then clean it with a damp
wet cloth.
Содержание O6HD51H2BG
Страница 1: ...BG O6HD51H2BG Built in Oven User Manual EN...
Страница 2: ...2...
Страница 4: ...4 1 1 1 8 8...
Страница 5: ...5...
Страница 6: ...6 1 2...
Страница 7: ...7 1 3 100 C...
Страница 8: ...8 1 4 45...
Страница 9: ...9 0 1 5 2 3 200 250 6 30...
Страница 10: ...10 E...
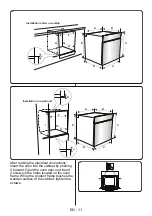
Страница 11: ...11 2 2 1 100 C 2 2 A mm 557 F mm 560 580 B mm 550 G mm 555 C mm 595 H I mm 600 590 mm 575 J K mm 5 10 E mm 576...
Страница 12: ...12 F A B C C D E G J F A B C C D E G I J K...
Страница 13: ...13 2 3 3 220 240V H05VV F...
Страница 14: ...14 3 1 2 3 1 2 3 4 5 6 4 5 6...
Страница 15: ...15 4 4 1...
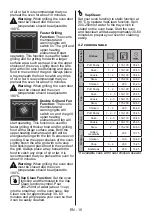
Страница 16: ...16 1900 C 1900 C 1900 C 200 250 1 30 60 VapClean 90 C 200 250 30 60...
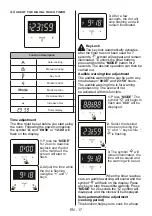
Страница 19: ...19 4 4 MODE 00 00 12 00 1 MODE 2 2 3 7 MODE 2 00 00 23 59 1 MODE 000 2 3...
Страница 20: ...20 MODE 2 0 10 1 2 MODE dur 3 4 0 MODE 2 MODE 4 5 K...
Страница 21: ...21 20 1 B x A x A B 2 y B y B 3 x C x C 1 2 a a 3...
Страница 22: ...22 a a 5 5 1 20 30...
Страница 23: ...23...
Страница 24: ...24 5 2 300 C 230 V 15 25 Watt E14 G 2 3 200 250 6 30...
Страница 25: ...25 6 6 1 6 2...
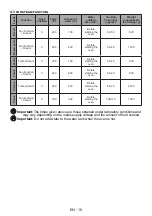
Страница 26: ...26 7 7 1 O6HD51H2BG E kg 29 6 103 6 94 0 A kWh 0 87 kWh 0 79 1 E l 69 EN 60350 1...
Страница 49: ...52448278 https daewooelectronics com Service https daewooelectronics com service...


