Daewoo O6HD51H2BG Скачать руководство пользователя страница 36

EN - 10

2.  INSTALLATION AND 

PREPARATION FOR USE

WARNING :

 This appliance must be 

installed by an authorised service 

person or qualified technician, according to 

the instructions in this guide and in 

compliance with the current local 

regulations.

• 

Incorrect installation may cause harm 

and damage, for which the manufacturer 

accepts no responsibility and the 

warranty will not be valid.

• 

Prior to installation, ensure that the local 

distribution conditions (electricity voltage 

and frequency) and the adjustments 

of the appliance are compatible. The 

adjustment conditions for this appliance 

are stated on the label.

• 

The laws, ordinances, directives and 

standards in force in the country of use 

are to be followed (safety regulations, 

proper recycling in accordance with the 

regulations, etc.).

• 

If the product contains removable shelf 

guides (wire racks) and the user manual 

includes recipes like yoghurt, the wire 

racks shall be removed and the oven 

operated in the defined cooking mode. 

Removal of the Wire Shelf  information 

is included in the CLEANING AND 

MAINTENANCE section.

2.1 

inStructionS for the inStaller

General instructions

• 

After removing the packaging material 

from the appliance and its accessories, 

ensure that the appliance is not 

damaged. If you suspect any damage, 

do not use it and contact an authorised 

service person or qualified technician 

immediately.

• 

Make sure that there are no flammable 

or combustible materials in the close 

vicinity, such as curtains, oil, cloth etc. 

which may catch fire.

• 

The worktop and furniture surrounding 

the appliance must be made of 

materials resistant to temperatures 

above 100°C.

• 

The appliance should not be installed 

directly above a dishwasher, fridge, 

freezer, washing machine or clothes 

dryer.

2.2 

inStallation of the oven

The appliances are supplied with 

installation kits and can be installed in a 

worktop with the appropriate dimensions. 

The dimensions for hob and oven 

installation are given below.

A (mm)

557

min./max. F (mm)

560/580

B (mm)

550

min. G (mm)

555

C (mm)

595

min. H/I (mm)

600/590

D (mm)

575

min. J/K (mm)

5/10

E (mm)

576

Содержание O6HD51H2BG

Страница 1: ...BG O6HD51H2BG Built in Oven User Manual EN...

Страница 2: ...2...

Страница 3: ...1 4 1 1 4 1 2 6 1 3 7 1 4 8 1 5 9 2 11 2 1 11 2 2 11 2 3 13 3 14 4 15 4 1 15 4 2 17 4 3 18 4 4 19 4 5 20 5 22 5 1 22 5 2 24 6 25 6 1 25 6 2 25 7 26 7 1 26...

Страница 4: ...4 1 1 1 8 8...

Страница 5: ...5...

Страница 6: ...6 1 2...

Страница 7: ...7 1 3 100 C...

Страница 8: ...8 1 4 45...

Страница 9: ...9 0 1 5 2 3 200 250 6 30...

Страница 10: ...10 E...

Страница 11: ...11 2 2 1 100 C 2 2 A mm 557 F mm 560 580 B mm 550 G mm 555 C mm 595 H I mm 600 590 mm 575 J K mm 5 10 E mm 576...

Страница 12: ...12 F A B C C D E G J F A B C C D E G I J K...

Страница 13: ...13 2 3 3 220 240V H05VV F...

Страница 14: ...14 3 1 2 3 1 2 3 4 5 6 4 5 6...

Страница 15: ...15 4 4 1...

Страница 16: ...16 1900 C 1900 C 1900 C 200 250 1 30 60 VapClean 90 C 200 250 30 60...

Страница 17: ...190 30 40 2 175 200 40 50 1 2 200 45 60 1 2 170 190 25 35 1 2 3 150 170 25 35 1 2 3 150 170 25 35 2 175 200 40 50 1 2 200 45 60 1 2 3 170 190 35 45 1 2 3 150 170 30 40 1 2 3 150 170 25 35 2 175 200 40...

Страница 18: ...18 4 3 C 3 200 100 30 50 820 3 200 200 30 40 1500 3 180 150 30 40 500 3 200 250 45 60 500 3 220 200 60 70 2000 3 180 300 100 110 1000...

Страница 19: ...19 4 4 MODE 00 00 12 00 1 MODE 2 2 3 7 MODE 2 00 00 23 59 1 MODE 000 2 3...

Страница 20: ...20 MODE 2 0 10 1 2 MODE dur 3 4 0 MODE 2 MODE 4 5 K...

Страница 21: ...21 20 1 B x A x A B 2 y B y B 3 x C x C 1 2 a a 3...

Страница 22: ...22 a a 5 5 1 20 30...

Страница 23: ...23...

Страница 24: ...24 5 2 300 C 230 V 15 25 Watt E14 G 2 3 200 250 6 30...

Страница 25: ...25 6 6 1 6 2...

Страница 26: ...26 7 7 1 O6HD51H2BG E kg 29 6 103 6 94 0 A kWh 0 87 kWh 0 79 1 E l 69 EN 60350 1...

Страница 27: ...TION Injury or property damage risk IMPORTANT NOTE Operating the system correctly Thank you for choosing this product This User Manual contains important safety information and instructions on the ope...

Страница 28: ...2 1 Instructions for the Installer 10 2 2 Installation of the Oven 10 2 3 Electrical Connection and Safety 12 3 PRODUCT FEATURES 13 4 USE OF PRODUCT 14 4 1 Oven Controls 14 4 2 Cooking Table 15 4 3 Fo...

Страница 29: ...knowledge if they have been given supervision or instruction concerning use of the appliance in a safe way and understand the hazards involved Children should not play with the appliance Cleaning and...

Страница 30: ...ordance with all applicable local and international standards and regulations Maintenance and repair work should only be carried out by authorised service technicians Installation and repair work that...

Страница 31: ...ren climb on the oven door or sit on it while it is open Please keep children and animals away from this appliance 1 2 For steam cooking The water must be poured into the water reservoir before oven o...

Страница 32: ...sed for packaging nylon staplers Styrofoam etc may be harmful to children and they should be collected and removed immediately Protect your appliance from the atmosphere Do not expose it to effects su...

Страница 33: ...not leave the oven unattended while cooking with solid or liquid oils They may catch fire under extreme heating conditions Never pour water on to flames that are caused by oil instead switch the oven...

Страница 34: ...we recommend you always use original spare parts and to call our authorised service agents in case of need Do not try to scrape the lime residues that may form on the floor of the oven Otherwise the...

Страница 35: ...chine This symbol on the product or on its packaging indicates that this product should not be treated as household waste Instead it should be handed over to the applicable collection point for the re...

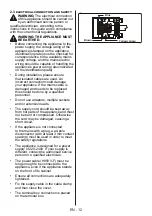
Страница 36: ...he oven operated in the defined cooking mode Removal of the Wire Shelf information is included in the CLEANING AND MAINTENANCE section 2 1 Instructions for the Installer General instructions After rem...

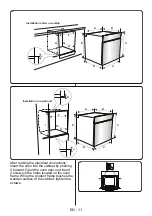
Страница 37: ...allation in a wall unit After making the electrical connections insert the oven into the cabinet by pushing it forward Open the oven door and insert 2 screws in the holes located on the oven frame Whi...

Страница 38: ...the mains cable is damaged and needs to be replaced this should be done by a qualified personnel Do not use adaptors multiple sockets and or extension leads The supply cord should be kept away from ho...

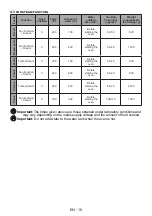
Страница 39: ...the product vary and the appearance of your appliance may differ from that shown in the figures below List of Components 1 Control Panel 2 Oven Door Handle 3 Oven Door 1 2 3 Control Panel 4 Oven Funct...

Страница 40: ...mostat and warning lights will switch on and the lower and upper heating elements will start operating The static cooking function emits heat ensuring even cooking of food This is ideal for making pas...

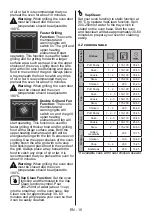
Страница 41: ...brush the wire grid with oil to stop food sticking and place food in the centre of the grid Always place a tray beneath the food to catch any drips of oil or fat It is recommended that you preheat the...

Страница 42: ...1500 Pastry Turbo Steam 3 180 150 Before starting the oven 30 40 500 Potato Fan Function Steam 3 200 250 Before starting the oven 45 60 500 Chicken Turbo Steam 3 220 200 Before starting the oven 60 7...

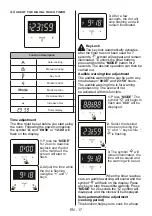
Страница 43: ...remain illuminated To unlock the timer buttons press and hold the MODE button for 2 seconds The desired operation can then be carried out Audible warning time adjustment The audible warning time can b...

Страница 44: ...and the dot in the middle of the screen will start to flash Press MODE to display current signal sound After this each time the button is pressed a different signal will sound There are three differen...

Страница 45: ...tion of C x C If the oven door is a triple glass oven door the third glass layer can be removed the same way as the second glass layer Removal of the Oven Door Before cleaning the oven door glass you...

Страница 46: ...fats and oils and burning them to ash which can then be easily removed from the floor of the oven with a damp cloth The lining must be porous to be effective The liner may discolour with age If a lar...

Страница 47: ...alified technician only Changing the Oven Lamp WARNING Switch off the appliance and allow it to cool before cleaning your appliance Remove the glass lens then remove the bulb Insert the new bulb resis...

Страница 48: ...used Do not frequently open the door unless you are cooking things that need to be turned If you open the door often the interior temperature will be lower and this may affect the results of your cook...

Страница 49: ...52448278 https daewooelectronics com Service https daewooelectronics com service...

Отзывы: