EN - 18
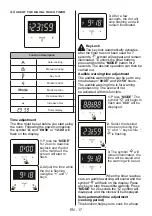
period of time. A time range between 0 and
10 hours can be set. Prepare the food for
cooking and put it in the oven.
1.
Select the desired cooking function and
the temperature using the control knobs.
2.
Press “
MODE
” until
you see “
dur
” symbol
on the display screen.
The symbol “
A
” will
flash.
3
. Select the desired
cooking time period
using the “
+
” and “
-
”
keys.
4.
The current time will
reappear on the
screen, and the
symbols “
A
”, and “
”
will remain illuminated.
When the timer reaches zero, the oven
will switch off and an audible warning will
sound. The symbols “
A
” will flash. Turn both
control knobs to the “
0
” position and press
any key on the timer to stop the warning
sound. Press “
MODE
” for 2 seconds the
“
A
” symbol will disappear and the timer will
switch back to manual function.
Sound Adjustment
To adjust the volume of the audible warning
sound, while the current time of day is
displayed, press “
+
” and “
-
” keys and the
dot in the middle of the screen will start
to flash. Press “
MODE
” to display current
signal sound. After this, each time the “
-
”
button is pressed, a different signal will
sound. There are three different types of
signal sounds. Select the desired sound
and do not press any other buttons. After
a short time, the selected sound will be
saved.
4.5
acceSSorieS
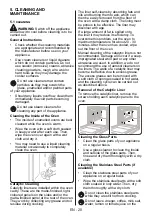
The Shallow Tray
The shallow tray is best used for baking
pastries.
Put the tray into any rack and push it to the
end to make sure it is correctly placed.
The Wire Grid
The wire grid is best used for grilling or for
processing food in oven-friendly containers.
WARNING
Place the grid to any corresponding
rack in the oven cavity correctly and push it
to the end.
The Water Collector
In some cases of cooking, condensation
may appear on the inner glass of the oven
door. This is not a product malfunction.
Open the oven door into the grilling position
and leave it in this position for 20 seconds.
Water will drip to the collector.
Cool the oven and wipe the inside of the
door with a dry towel. This procedure must
be applied regularly.
Содержание O6HD51H2BG
Страница 1: ...BG O6HD51H2BG Built in Oven User Manual EN...
Страница 2: ...2...
Страница 4: ...4 1 1 1 8 8...
Страница 5: ...5...
Страница 6: ...6 1 2...
Страница 7: ...7 1 3 100 C...
Страница 8: ...8 1 4 45...
Страница 9: ...9 0 1 5 2 3 200 250 6 30...
Страница 10: ...10 E...
Страница 11: ...11 2 2 1 100 C 2 2 A mm 557 F mm 560 580 B mm 550 G mm 555 C mm 595 H I mm 600 590 mm 575 J K mm 5 10 E mm 576...
Страница 12: ...12 F A B C C D E G J F A B C C D E G I J K...
Страница 13: ...13 2 3 3 220 240V H05VV F...
Страница 14: ...14 3 1 2 3 1 2 3 4 5 6 4 5 6...
Страница 15: ...15 4 4 1...
Страница 16: ...16 1900 C 1900 C 1900 C 200 250 1 30 60 VapClean 90 C 200 250 30 60...
Страница 19: ...19 4 4 MODE 00 00 12 00 1 MODE 2 2 3 7 MODE 2 00 00 23 59 1 MODE 000 2 3...
Страница 20: ...20 MODE 2 0 10 1 2 MODE dur 3 4 0 MODE 2 MODE 4 5 K...
Страница 21: ...21 20 1 B x A x A B 2 y B y B 3 x C x C 1 2 a a 3...
Страница 22: ...22 a a 5 5 1 20 30...
Страница 23: ...23...
Страница 24: ...24 5 2 300 C 230 V 15 25 Watt E14 G 2 3 200 250 6 30...
Страница 25: ...25 6 6 1 6 2...
Страница 26: ...26 7 7 1 O6HD51H2BG E kg 29 6 103 6 94 0 A kWh 0 87 kWh 0 79 1 E l 69 EN 60350 1...
Страница 49: ...52448278 https daewooelectronics com Service https daewooelectronics com service...


