background image

-9-

4. Default Setting in User Menu OSD

4-1. Picture

1) Mode

* HDMI & PC Input - Only brihgtness and contrast are available.

2) Default Value of Other Functions

* N.R. means the noise reduction
* HDMI & PC don't support N.R. functions

4-2. Sound

1) Mode

2) Default Value of Other Functions

Normal

Dynamic

Cinema

User

Brightness

48

46

55

Undefined

Contrast

70

74

60

Undefined

Sharpness

7

8

6

Undefined

Colour

55

60

50

Undefined

Tint

50

50

50

Undefined

Function

Default Value

Colour Temp

Normal

N.R.

On

Normal

Movie

Music

News

User

120 Hz

32

50

48

15

Undefined

200 Hz

32

50

48

15

Undefined

500 Hz

32

38

38

32

Undefined

1.2 kHz

32

28

15

50

Undefined

3 kHz

32

28

15

50

Undefined

7.5 kHz

32

40

42

32

Undefined

12 kHz

32

48

56

15

Undefined

Function

Default Value

Balance

0

Effect

Off

AVC

Off

Содержание DPX-32F1BMB

Страница 1: ...mproving their performance without notice in the parts list So if you need the latest parts information please refer to PPL Parts Price List in Service Information Center Service Manual 32 PLASMA PDP...

Страница 2: ......

Страница 3: ...e to check if any screw is missing when assembling reassembling Do not leave any screws inside the set 5 If you open the BACK COVER you will see a Panel Gas Exhaust Tube Picture 1 1 inside the bracket...

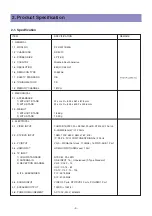
Страница 4: ...Kg 2 WITH STAND 19 2 Kg 3 ELECTRICAL 3 1 VIDEO INPUT COMPOSITE NTSC PAL SECAM PAL M N NTSC4 43 2 Ports S VHS 50 60Hz Y C 2 Ports 3 2 DTV DVD INPUT 1080i 720P 480P 480i 576P 576i Y Pb Cb Pr Cr COMPONE...

Страница 5: ...SPECT RATIO 16 9 4 3 NUMBER OF PIXELS 852 H X 480 V 4 4 DISPLAY COLOR 1 073 000 000 Colors 10 Bits for each RGB 4 5 CELL PITCH 277um H X 830 V um 1 Pixel a Set of RGB Cells 4 6 PEAK LUMINANCE Typical...

Страница 6: ...z 3 Video PAL PAL M PAL N NTSC NTSC 4 43 SECAM Resolution H Freq kHz V Freq Hz Remark HDMI PC 31 469 59 940 DOS O O 640 x 480 37 861 72 809 VESA O O 37 500 75 000 VESA O O 720 x 400 31 469 70 087 IBM...

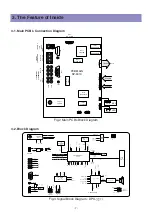
Страница 7: ...SP 901X AV3 Y C CVBS J853 J851 J802 J801 P801 J854 Upgrade jack PC D SUB DVI PC Audio L R HDMI SPDIF _OUT S VIDEO1 MONITOR_OUT VIDEO1 COMPONENT2 COMPONENT1 P701 TU901 TUNER PA103 IC751 MSP4650K From P...

Страница 8: ...8 The Feature of Inside 3 3 Power Specification...

Страница 9: ...Cinema User Brightness 48 46 55 Undefined Contrast 70 74 60 Undefined Sharpness 7 8 6 Undefined Colour 55 60 50 Undefined Tint 50 50 50 Undefined Function Default Value Colour Temp Normal N R On Norm...

Страница 10: ...Mode Channel Memory Fine Tune Video Default Value Cable 1 Erase 0 Auto HDMI PC don t support MGDI function 2 Closed Caption 3 Time Setting 4 ISM Function Background Language Child Lock MGDi plus Auto...

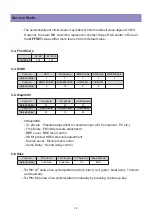
Страница 11: ...r CONTRAST adjustment All inputs O Bias R For R BRIGHTNESS adjustment All inputs O Bias G For G BRIGHTNESS adjustment All inputs O Bias B For B BRIGHTNESS adjustment All inputs O Gain R For R CONTRAST...

Страница 12: ...O In Msp46X0 Sc pScale Prescale adjustment for external input AV Component PC etc Fm pScale FM AM prescale adjustment BBE Level BBE level control HDMI pScale HDMI prescale adjustment Mvoice Level Mvo...

Страница 13: ...of the panel 5 8 Reset O Level 1 Resets all data in E2 PROM other than HDCP key EDID RGB offset and YPbPr offset of FrontEnd_1 O Level 2 Resets all data in E2 PROM other than the exception of Level 1...

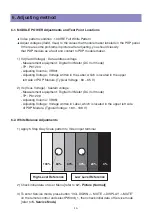
Страница 14: ...e Label which is located in the upper left side of PDP Module Typical Voltage 60 65 V 2 Vs Vsus Voltage Sustain voltage Measurement equipment Digital Volt Meter DC Volt mode TP P812 9 Adjusting Volume...

Страница 15: ...een 7 Adjust White Balance by varying the BIAS values of R G B BIAS Values of R G B should be adjusted to DP 10 if out of these range then classify as a fault Set the Color Coordinate to x 0 275 0 003...

Страница 16: ...7 Noticeable Points While Assembling 16...

Страница 17: ...Noticeable Points While Assembling 17...

Страница 18: ...8 Software Upgrade Methord 18 PICkit 2 Micro Controller Programmer PICkit 2 Connector Pinout 8 1 Pic upgrade...

Страница 19: ...Software Upgrade Methord 19 1 Main pcb Power off 2 Connecting the Pic upgrade board to Main pcb as shown below...

Страница 20: ...Software Upgrade Methord 20 3 Run PICkit 2 Microcontroller Programmer 4 Please confirm if pickit 2 microcontroller programmer deteced device PIC16F690 appropriately or not...

Страница 21: ...21 5 Importing HEX file for upgrade Software Upgrade Methord...

Страница 22: ...22 6 Write Click 7 Plese remove Pickit2 upgrade board when complet massage is come out Software Upgrade Methord...

Страница 23: ...location Connect the device to a spare USB port on your PC Once the composite driver has been installed Windows Found New Hardware Wizard will launch The screen below is shown Select No not this time...

Страница 24: ...r browse to it by clicking the browse button Once the file path has been entered in the box click next to proceed The following screen will be displayed as Windows XP copies the required driver files...

Страница 25: ...lick Next to proceed with the installation Select Install from a list or specific location Advanced as shown below and then click Next Select Search for the best driver in these locations and enter th...

Страница 26: ...Connection the device appears as a USB Serial Converter with an additional COM port with the label USB Serial Port The following screen will be displayed as Windows XP copies the required driver file...

Страница 27: ...rt of set Run Flashupgrader exe in the PC to excute the program as shown below Select correct COM Port and Baud Rate 115200 as shown below Then press Flash button to finish setup Select current Upgrad...

Страница 28: ...ware Upgrade Methord Turn on the power and then upgrade program will start the download as shown below When the upgrading is complete a window below will be opened Press Finish button to complete the...

Страница 29: ...driver or electric screwdriver Plastic adjusting tool 3 Oscilloscope for detailed examination only Before replacing PCBs you MUST disconnect the AC Power After replacing High Voltage Board Power PCB Y...

Страница 30: ...es after AC power disconnect To be more careful using a Multimeter you should check to see if Vs is less than 10V and then connect connectors Definition Red LED Stand by state ready for operating Gree...

Страница 31: ...ctly connected Check LVDS connection between CTRL B D and Main B D Does input source AV device work Check AV device Check other connections in all Boards Are they OK Is input selection in the correct...

Страница 32: ...sed Is speaker cable correctly connected check P701 P702 Replace Main B D Replace speakers Is sound OK DONE Go to the section of No image Connect the jack and check the sound again Cancel the mute and...

Страница 33: ...ect AC power Open BACK COVER Disconnect P812 and P814 of Power PCB Connect AC power Stand By Connect AC power Stand By Turn on the set Green LED Turn on the set Green LED Is SHUT DOWN occurred Replace...

Страница 34: ...nect P1 P2 in Ysus B D and P10 in Zsus B D Turn on the set after connection AC power Is SHUT DOWN occurred Replace Ysus Zsus B D N Y Is SHUT DOWN occurred N Y Connect P1 in Ysus B D Turn on the set af...

Страница 35: ...power Check the AC connection Replce the Main B D Replce the Main B D Does LED turn on to red light Turn on the set using remote control Does LED turn on to Green light Check the connector of Key PCB...

Страница 36: ...mote control Does LED turn on to Green light Check the battery of remote control Is there battery Try to turn on the set using Key button Does LED turn on to Green light Replace the Main B D Done Repl...

Страница 37: ...37 Trouble shooting 9 6 No Key and Remote Control Operation...

Страница 38: ...l Set the values to typical voltages Replace the Y SUS Do you still see the weak discharge or abnormal discharge on the screen Do you still see the weak discharge or abnormal discharge on the screen D...

Страница 39: ...ak Discharge Check Start Is Power B D working Does it make normal sound Replace the Power B D Replace Y SUS Z SUS and Scan B D Is the set correctly working Done N N Y Y 9 9 Particular Input Signal Vid...

Страница 40: ...does not operate normally Disconnecting and connecting the AC power make the set to operate normal again Upgrade the software first If you still see the same symptom replace the Main C Images are abn...

Страница 41: ......

Страница 42: ...42 11 Exploded View...

Страница 43: ...DAEWOO ELECTRONICS CORP 686 AHYEON DONG MAPO GU SEOUL KOREA C P O BOX 8003 SEOUL KOREA PRINTED DATE June 2008...

Отзывы: